Gravity Forms Dropbox Add-On (Classic)
The Gravity Form Add-On plugin allows you to automatically send files uploaded with Gravity Forms to your Dropbox account.
To get started, if it’s not already activated on your site, activate Gravity Forms under Plugins in the left-hand menu of your Dashboard. Then, activate Gravity Forms Dropbox Add-On.
Connect to Dropbox
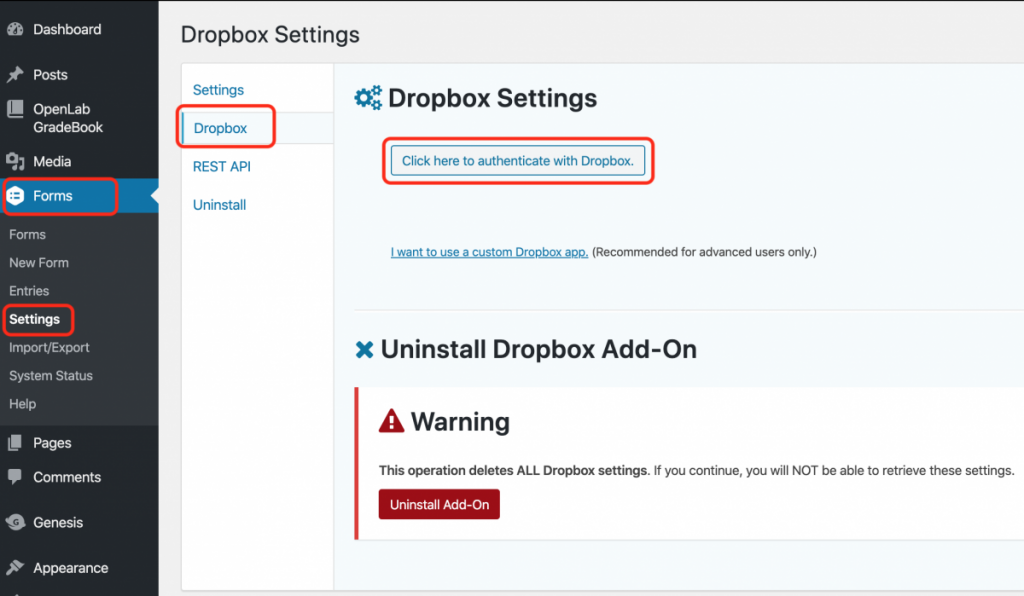
1. Go to Forms > Settings > Dropbox to configure the Dropbox add-on. Click the button that says Click here to authenticate with Dropbox.
2. You will be sent to a Dropbox sign in page, where you should sign in with the Dropbox account you want to connect to. Use your CUNY Login credentials if you’d like to connect to your CUNY Dropbox, which has unlimited space.
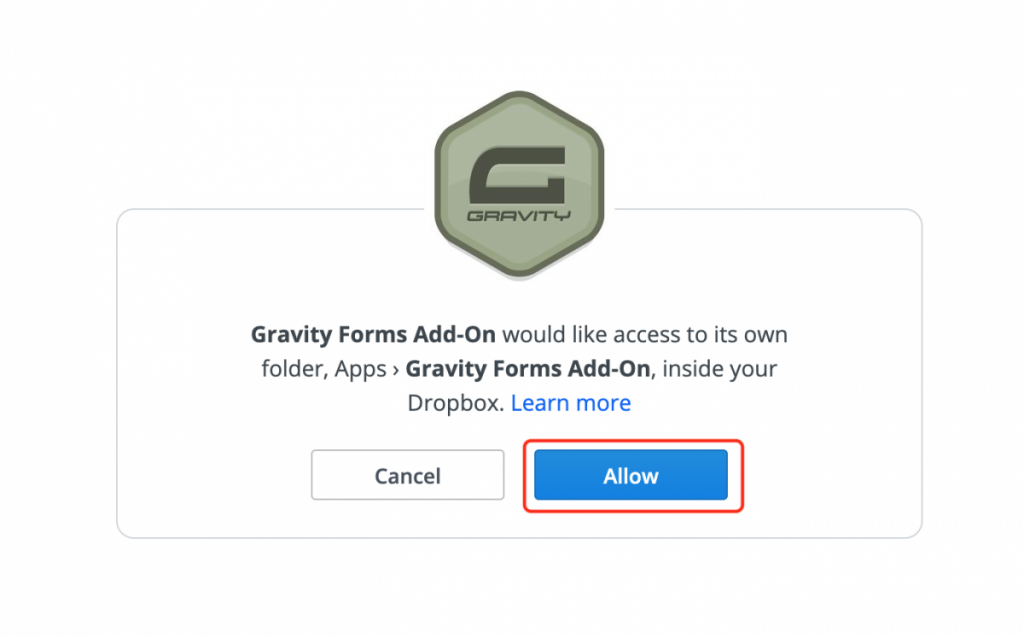
You’ll see a message that Gravity Forms Add-On would like access to its own folder, Apps › Gravity Forms Add-On, inside your Dropbox. Click Allow. This will create three new folders in your Dropbox account: Apps > Gravity Forms Add-On > openlab.citytech.cuny.edu. Files uploaded via Gravity Forms will appear in the openlab.citytech.cuny.edu folder, and you can also create sub-folders for different sites or assignments.
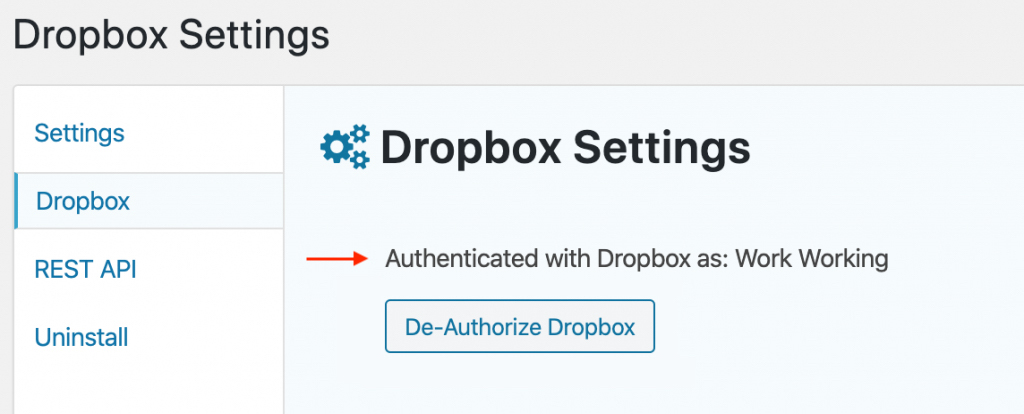
3. After allowing access, you will be brought back to the Gravity Forms Add-On settings page, which will show that you have successfully “Authenticated with Dropbox.” The button you clicked initially should now say “De-Authorize Dropbox.”
Create a form
You will need to set up the form you’re going to use to send uploaded files to Dropbox. If you’ve already set up a form with a file upload field, open that form and jump to the next section, Create a feed.
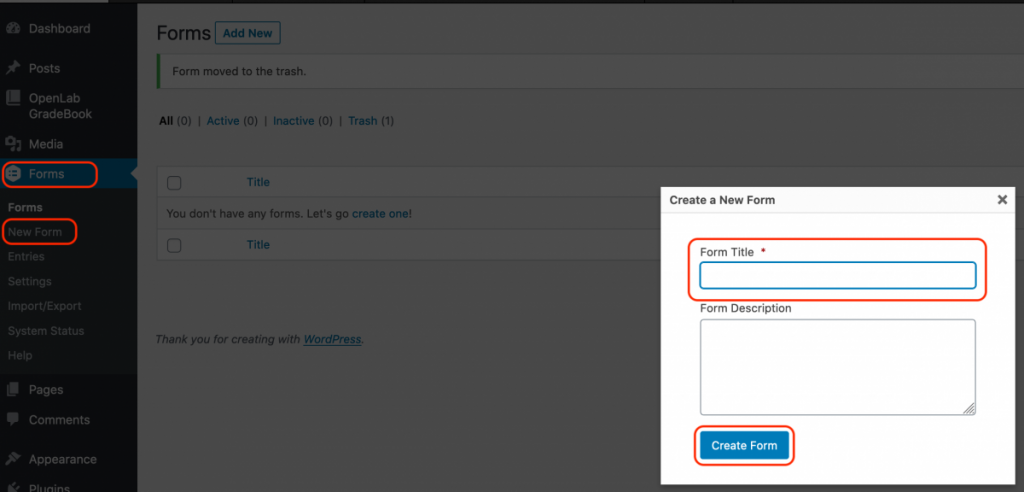
1. Go to Forms > New Form.
2. Give the form a title (e.g. “Paper 1” or “Application Submission”), and click Create Form.
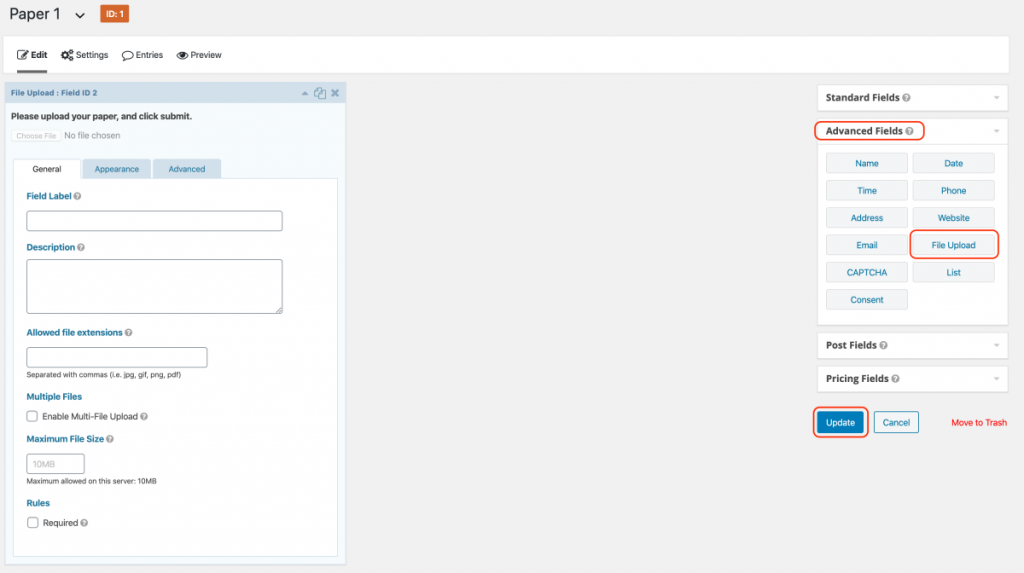
3. You’ll be taken to the form editor screen. Here, you’ll add a button to upload a file to your form. Under Advanced Fields, click File Upload.
4. Expand the options for the file upload field. Add a “Field Label” to identify the File Upload field (e.g. “Upload Homework #2”). Add a “Description” with additional directions for uploading the file. When you’re done, click Update. There are also optional settings, where you can add limitations for allowed file types, enable users to upload multiple files at once, and specify a maximum file size.
Create a Feed
In order to connect Dropbox to Gravity Forms, you need to create a feed.
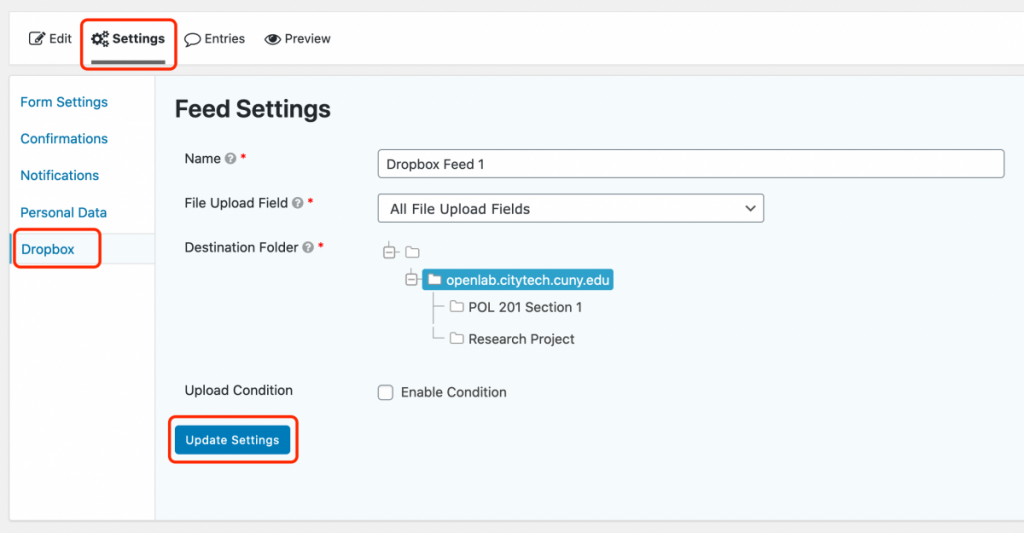
1. You should still be in the settings for your form. If not, return to your form and go to Settings. Choose Dropbox.
2. Click Add New to create a new feed. You will see the feed settings screen:
- Name: Leave the existing name or add something different. This is for identification only and doesn’t appear anywhere on the form.
- File Upload Field: Choose the name of the file upload field in the form you just created. Or, if you have multiple upload fields in a single form that you want to connect to Dropbox, leave the default choice as “All File Upload Fields.”
- Destination Folder: This is the Dropbox folder where the files will be uploaded. When you first connected Gravity Forms to Dropbox, there were three folders created in your Dropbox: Apps > Gravity Forms Add-On > openlab.citytech.cuny.edu. All files uploaded via Gravity Forms will appear here, but you can create new subfolders within the openlab.citytech.cuny.edu folder for different courses or assignments. You will need to do this in your Dropbox account. Once you do that, the folders will appear here as options.
Click Update Settings when you’re done.
Form settings
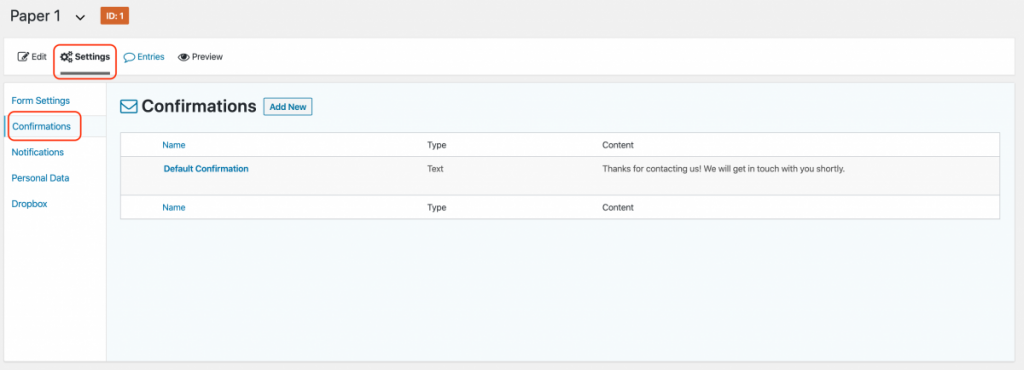
1. You may want to customize the confirmation message users see after they upload a file. Go to Settings > Confirmations. Click on Default Confirmation to edit. Change the text to a custom confirmation message, and click Save Confirmation.
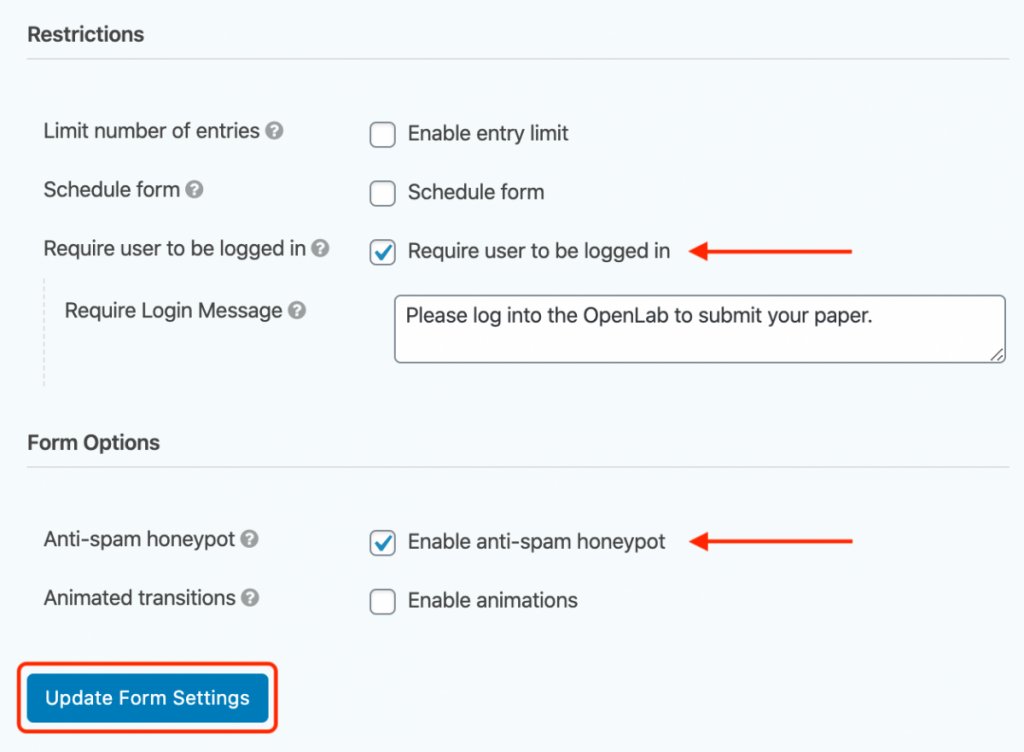
2. Depending on how you’re using the form, you may want to require that the user be signed in to the OpenLab to submit. Go to Settings > Form Settings. Scroll down to the bottom of the page, and under Restrictions, check the box next to “Require user to be logged in.”
3. If you don’t require users to be logged in, you may want to enable the Anti-spam honeypot. This is a protection measure against spam that doesn’t require your site users to do anything. You can find this settings at the bottom of the page, in the Form Options section.
4. When you’re done, click Update Form Settings.
Add your form to a post or page
1. Create or edit the post or page where you want to include your form. You can add any text or media you wish to the post or page. When you’re ready to add your form, click the Add Form button.
2. In the window that appears, choose the form you want to add, and click Insert Form.

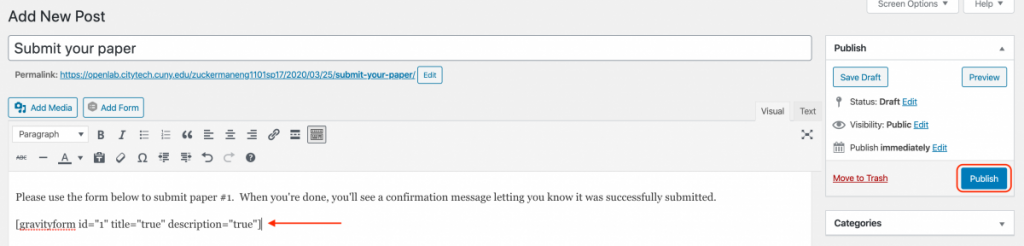
3. Click the post or page Publish or Update button when you’re finished. The form shortcode should look similar to the screenshot below.
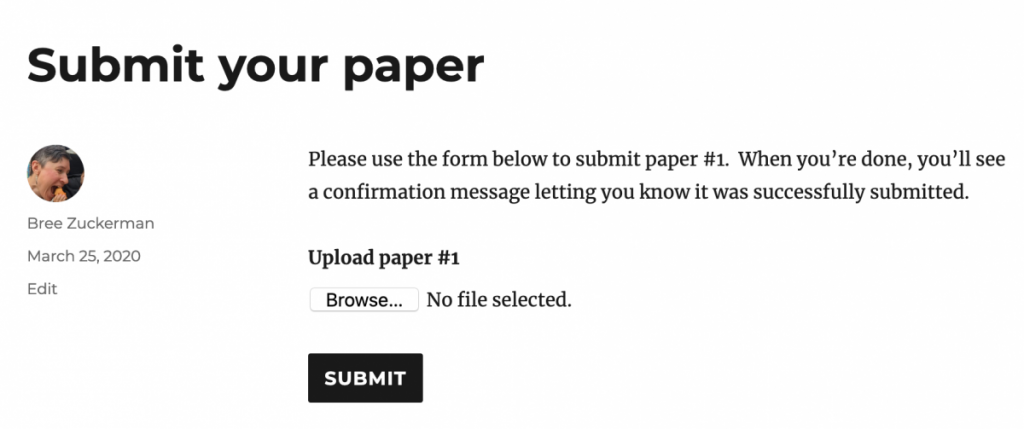
4. When published on your site, the form will look something like the screenshot below. After submitting their file, users will see a confirmation message, either the default message or the one you edited. You will receive an email notification of the file upload.
Viewing and exporting form entries
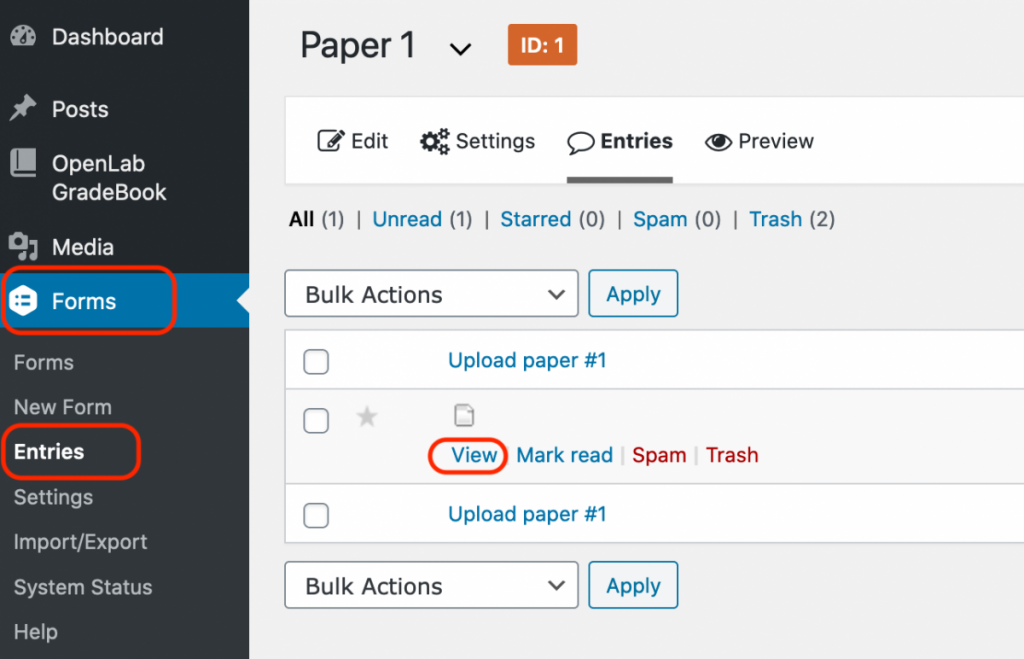
1. Go to Forms > Entries. This screen shows a list of all entries. If you hover over an entry and click View, it will show you a link for the file. When you click on the link, you can view the file directly in Dropbox.
2. You can also view and download all uploaded files by going to your Dropbox > Apps > Gravity Forms Add-On > openlab.citytech.cuny.edu.
3. If you want to export entries to a spreadsheet, go to Forms > Import/Export. You will be on the Export Entries screen. Choose your form, and any of the fields you want to export, and click Download Export File.


