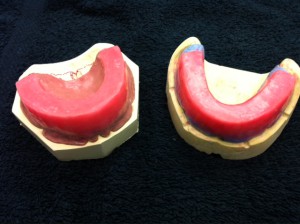
Four Steps of Occlusion Rims Fabrication as below:
First of all, I find the midlines are the center of both maxillary teeth and mandible teeth in order to setting up the occlusion rims in the dynastic (record base )model later.
Second, occlusion rims can be made by hands or a device like a horseshoe shape. I frame the pink wax which can be heated and fold it over 3 or 4 times by using my thumb and middle fingers . I form the pink wax into a horseshoe shape and strengthen it as I want.Then I mount the wax on the record base.
Again, the occlusion wax rim must be centered of the maxillary teeth or mandible teeth over the crest of the residual ridge and sealed to the diagnostic recording base with hard acrylic resin or the shellac baseplate in my lab class.
Third, I start to make the mandibular occlusion rim first. The anterior height of the mandible rim measures 18mm from the labial to the occlusal plane. The anterior width of the rim is 8mm, and the posterior width of the rim is 10mm wide on the residual ridge.
Then make the maxillary rim. The anterior height for the maxillary occlusion rim measures 22 mm in the labial flange. The posterior height of the rim is 18mm from the deepest point on the buccal flange. And the anterior width of the rim is 8mm, and the posterior width of the rim is 10mm at the residual ridge as well.
Fourth, I melt the wax on a large spatula-#31to carry the wax from a bunsen burner. I contour the facial and lingual surfaces of the rim according the previous measurement. Surely, I am making both of mandible and maxillary occlusion rims in a straight line because they guide me at the patient’s occlusal vertical dimension and in centric relation.


