WK 14

IN CLASS
We’ll critique R1 of your Final Project
Work in class to refine after crit

HOMEWORK
Rework & Finalize your Final Project
Submit as single page PDF’s & Print/Trim for class

FINAL EXAM
We’ll meet at 6pm sharp (be on time please) Dec. 18th
Bring your printed & trimmed letterforms (in color + proper size) before class starts (we’re not going to have time to trim in class.

RE-SUBMISSIONS
If you’d like to resubmit any of the previous projects, you have until the start of the final exam period to submit on dropbox here. CREATE A FOLDER WITH YOUR NAME & SUBMIT USING SPECS/ FILE NAMING FROM ORIGINAL PROJECT BRIEF (all of which is linked on this site).

WK 13

IN CLASS
Freelancing Lecture (learn some tips about how to charge money for creative services)
I’d recommend taking notes! $$$

FINAL PROJECT
See Project PDF here
See Presentation here

Jessica Hische Inspiration here

HOMEWORK
Complete Part 01 of Final
Submit Part 01 here  (Submit as a single multipage PDF)
Submit Final here (as separate PDFs)

We’ll critique R1 next class DIGITAL ONLY
Then Final Critique during Final Exam PRINTED/TRIMMED & DIGITAL

WK 12

IN CLASS
Recap of Photoshop Tools

  • Layer Masks
  • Adjustment Layers
  • Clone Stamp
  • Edit>Transform>Distort

EXERCISE
Download this image.
We’ll walk through touching this up as a group.

Introduce Next Assignment
PDF of Assignment here

HOMEWORK
Complete Project 05 and submit here
Name file FirstnameLast_P05_NewOldTech_01.png or jpg

phone image

WK 10

IN CLASS
Critique Printed Gig Poster 01
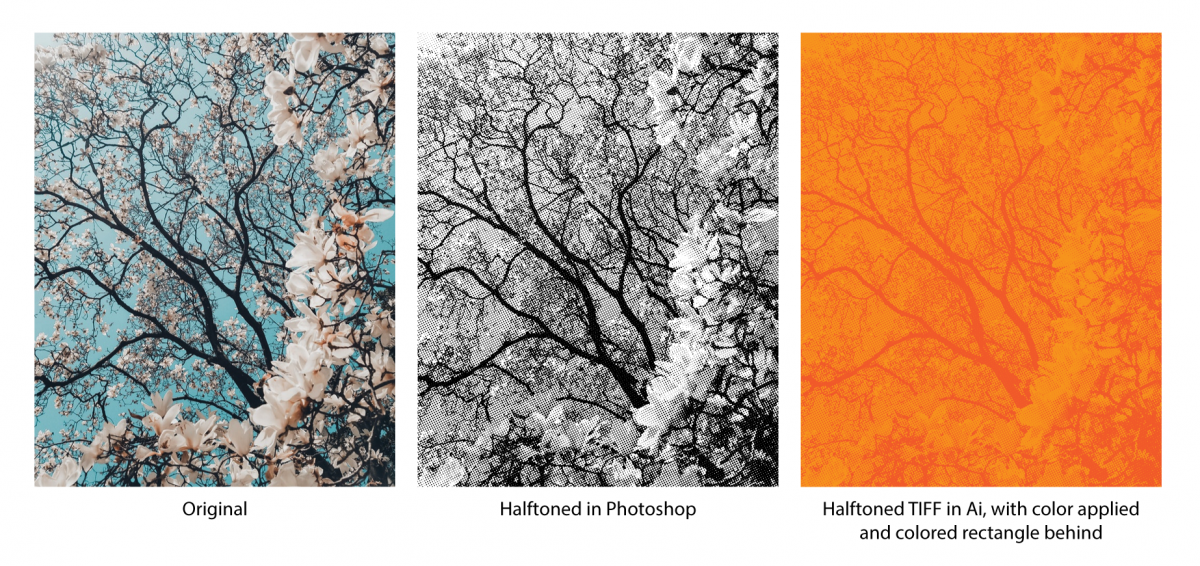
Introduce Halftoning + Type Lecture

NEW TOOLS
Setup Illustrator File for poster
Setup Photoshop document for poster
Halftone Images in Photoshop (see below for detail)

HALFTONING Step-By-Step
1. Open or create your image in Photoshop

2. Convert to Grayscale
Image-Mode-Grayscale in top bar, click Discard color info

3. Optional – Use levels adjustment layer to add contrast

4. Create Bitmap
Image – Mode – Bitmap in top bar
in Pop Up – Select Halftone Screen under Method, click OK
Next Pop Up – Adjust Frequency (lower freq. equals bigger effect, higher freq. equals more detail)
Shape: round, line, diamond – you can play with any of these

5. Undo and retry if you aren’t happy with it

6. Save image as TIFF, and place in Illustrator (where you can scale, change color, repeat, etc.)

Halftone Example


RESOURCES
PDF presentation of Typography intro

HOMEWORK
Complete a second gig poster (a completely new poster, not refining of the first)
Same criteria, submit PDF with crop marks & bleed settings, AND print 11″x17″ for next class
Submit PDF Here

WEEK 09

IN CLASS
Look through Photoshop Exercises
Introduce our Next Project

NEW TOOLS
Review Masking + Adjustment Layers in Photoshop
Selecting Images with Unsplash.com (very high resolution, creative commons photos you can use)
Review type tools in Illustrator
Using both Illustrator & Photoshop together
Saving PDF with cropmarks

PRESENTATION
You can access the Presentation PDF here

Project 04 Brief here

HOMEWORK
Design 11×17 poster for next class 11/13
Print 11×17 in color with trim marks
Submit PDF in this Dropbox folder

Week 08

IN CLASS
Critique Illustrated Avatars on screen

NEW MATERIAL
Introduce Photoshop!

  • Recap of Raster Images
  • Tour of the interface
  • Document Setup/Pixel Dimensions
  • Layers
  • Masking
  • Adjustment Layers
  • Non-Destructive Editing

RESOURCES
Intro to Photoshop Tutorial

PS tools


IN CLASS EXERCISES
Use this image to clone out the deer
Use this image to clip the creature and add a color background
Use this image to make everything black + white except flowers (and change the color of flowers as a bonus)

HOMEWORK
Combine a person and a food by masking 2 found images together.
Upload your image into this Dropbox folder

Example