

Contents
DNA Fingerprinting
Background:
Throughout the first half of the semester we focused our efforts on classic genetic experiments including crosses. We will now turn our attention to different types of molecular genetic techniques that can be used to assess levels of genetic variation. The number of molecular genetic techniques available to researchers is quite large, and it is imperative that the correct method is used to address the question of interest.
DNA fingerprinting is a widely used approach to identify organisms and determine evolutionary relatedness. As an example, DNA fingerprinting is commonly used in forensics to identify criminals from a set of possible suspects. In short, residual traces of DNA are collected from a crime scene along with DNA samples from multiple suspects. DNA fingerprints are then constructed from the crime scene DNA and compared to all other DNA samples (Fig. 1). Matches in banding patterns between the crime scene sample and one of the suspects would implicate that particular suspect in the crime.
.")
The technique can also be used to indicate paternity in a set of potential fathers. Figure 2 depicts the results of a DNA fingerprinting experiment focused on determining which of three men was the father of a child. ‘M’ represents the DNA fingerprint of the mother, ‘Ch’ is the fingerprint of the child, and samples 1, 2 and 3 are the fingerprints from the three potential fathers. Remember that in diploid organisms (including humans), there are two alleles per locus. Looking at the banding pattern below, which male is the most likely father?
.")
As alluded to above, multiple molecular genetic techniques may be used to construct a DNA fingerprint to use for identification or relatedness purposes. One historically common method is termed restriction fragment length polymorphisms (RFLPs). In this method, one or multiple restriction enzymes are used to cut the DNA at specific regions of the genome. Most restriction enzymes are derived from different species of bacteria and cleave DNA at specific recognition sites. Figure 3 illustrates the process of DNA digestion by the enzyme HindIII. This particular enzyme recognizes and cuts the following sequence:
5’ – AAGCTT – 3’
3’ – TTCGAA – 5’
")
Notice that following digestion, the cut DNA protrudes as overhangs that are called sticky ends. This contrasts with restriction enzymes that result in blunt-ended DNA fragments lacking an overhang. Once DNA is cut with a restriction enzyme, the fragmented DNA can be reattached through an enzyme called DNA ligase. Alternatively, a plasmid could also be cut with the same restriction enzyme, and the DNA fragment of interest may be inserted into the plasmid. The recombinant plasmid can then be introduced into a bacterial cell (e.g. E. coli) and continuously replicated during binary fission. This is part of the technique termed molecular cloning.
The first step in a typical fingerprinting analysis is to digest different DNA samples with a restriction enzyme. Next, the resulting fragments are separated using a technique called horizontal agarose gel electrophoresis. Digested DNA samples are first loaded into separate wells of an agarose gel. The DNA is generally mixed with a loading dye to assist in loading the samples into the gel. A stain is needed to actually visualize DNA banding patterns on the gel (i.e. DNA by itself is colorless). Along with the digested DNA samples, we want to load a DNA ladder (usually in the first well) to give us a broad idea of fragment sizes (Fig. 4).
.")
Once all the samples are loaded in the gel inside of the gel rig, we apply an electrical current to ‘electrophorese’ the DNA through the gel. DNA is a negatively charged molecule and will migrate towards a positive electric field (the red side of the gel apparatus). DNA migrates at a rate inversely proportional to the size of the fragment (i.e. shorter fragments migrate at a faster rate). As you can see from Fig. 4, fragments that are 1,000 bp in size do not migrate far from the well where the sample was loaded. Depending upon the specific application, you’ll want to run the gel for ~100 V for 30 min or so. As a general rule of thumb, I tend to stop the current once the DNA has migrated about halfway down the gel.
Note that in a more typical RFLP-based DNA fingerprinting experiment, a subsequent step called Southern blotting is needed in order to visualize and compare fragments. The reason is that when human DNA (or DNA from any other eukaryote with a large genome) is cut with a restriction enzyme and run out on a gel, distinct bands are not easily detectable. Instead, the likely outcome is a broad smear encompassing a large range of fragment sizes. To help resolve distinct bands that can be compared among samples, radioactive DNA probes complementary to the DNA samples are used that hybridize to the digested DNA. In our lab exercise the crime scene DNA and suspect DNA samples originate from plasmids that contain relatively few cut sites. Thus, there is no need to perform the laborious task of Southern blotting. In other words, distinct bands can be easily visualized on a gel following restriction enzyme digestion.
Activity:
This will be a two-week lab exercise to familiarize you will techniques commonly used in a molecular genetics laboratory. You will be working in groups of four during these two weeks. Thus, each lab section should contain four groups of four students. The breakdown of the two weeks is as follows:
Week 8: Background, pipette review, restriction enzyme digestion
Week 9: Gel electrophoresis of DNA digests, analysis, review questions
*Note that nitrile or latex gloves are required. It is up to you to bring these to lab, as your instructor and technicians will not supply them.
Week 8:
Following the background lecture material, it may be worthwhile to practice your pipetting skills before you begin the lab exercises. The technicians have provided practice cards and plates that you can use to practice as you see fit. Do not move on to the actual lab exercise until you feel comfortable with pipetting.
A. Pipetting and Measurements
Types of Micropipettors
Pipettors are made by many different manufacturers and thus all do not look the same. Learning to correctly use one type of pipettor will provide you the knowledge to use others as they share the same method of distributing small volumes. This lab will illustrate the Rainin Pipetman® micropipettors.
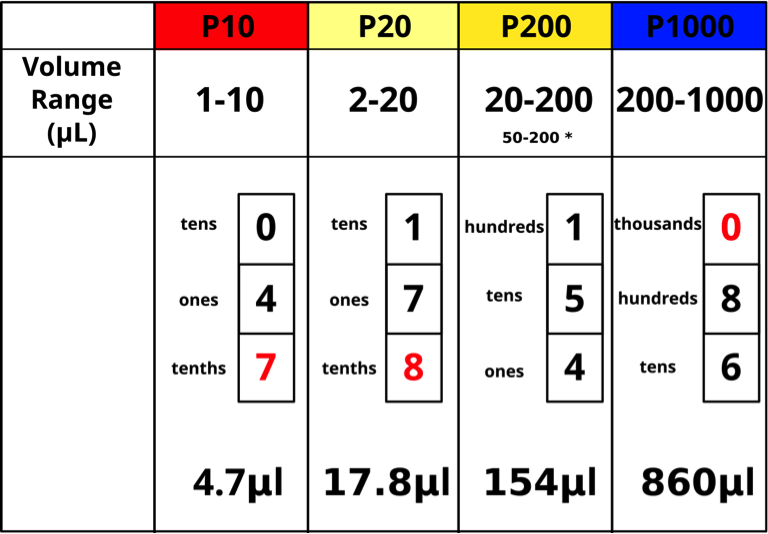
The top of the plunger shows the pipettor size for the Pipetman models. Each pipettor has its own volume range and it is CRITICAL to use a pipettor only in its proper volume range. The “P-number” represents the maximum volume in μL that the pipettor can measure. Pipettors are more accurate in the upper part of their range. For example, 20 μL should be measured with a P20 rather than with a P200. The four pipettor sizes (P10, P20, P200, P1000) used in our lab will measure from 1 μL – 1000 μL as shown below (Figs. 5,6).
Correctly Adjusting the Pipettors
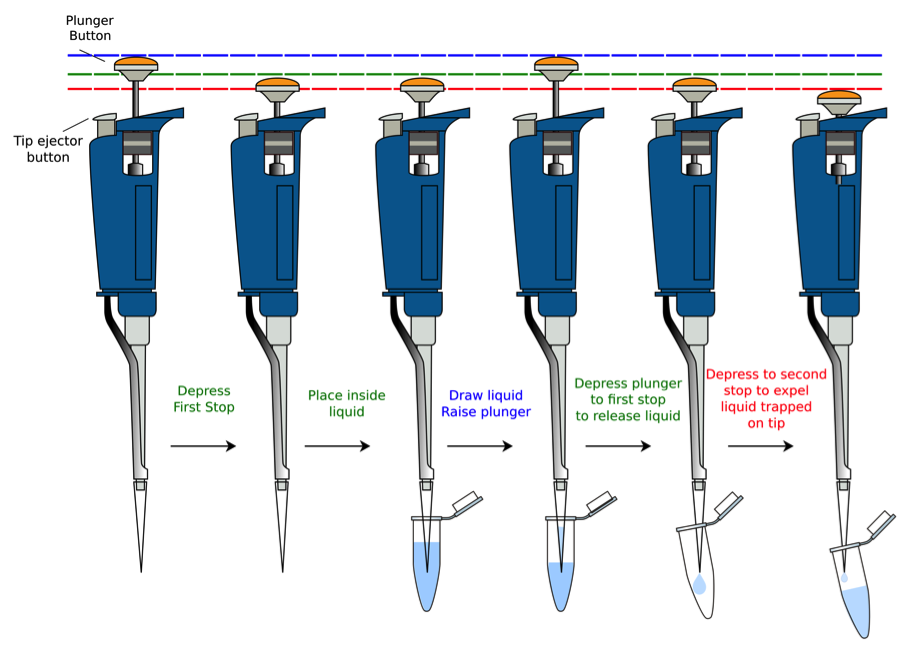
Tutorial on Proper Usage
Rules for use of the micropipettors:
These are precision instruments which can easily be damaged. Treat them with respect and care. They are essential for your success in this course and shared amongst numerous students.
- Never measure higher or lower than the range of the pipettor allows.
- Never turn the volume adjuster above or below the range indicated on the pipettor or you risk breaking the instrument.
- Never allow liquid to get into the micropipettor.
- this causes contamination
- this weakens the seal on the o-rings and can damage them
- Never use the micropipettor without an appropriate tip. Never force a tip that doesn’t fit.
- Never invert or lay down the micropipettor with liquid in the tip.
- liquids will roll into the piston this way
- Never let the plunger snap back when filling or ejecting liquid.
- Never immerse the barrel in fluid.
- this causes contamination
- Never set the micropipettor on the edge of the bench; this may result in the micropipettor falling or being knocked onto the floor.
Exercise: Pipetting Practice
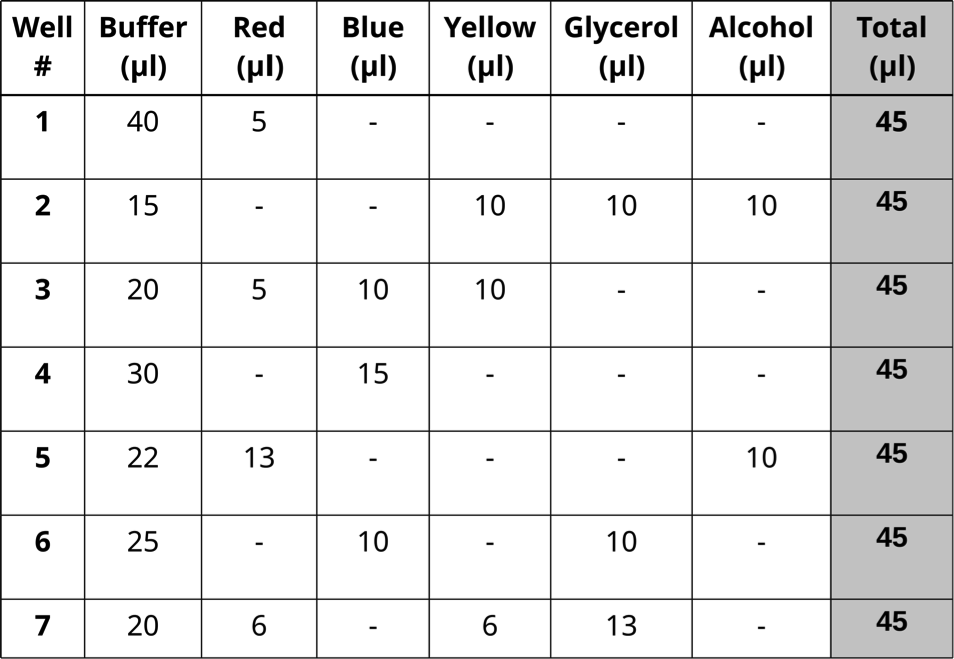
- Prepare seven dye mixtures as illustrated in the table below.
-One student mixes samples in Column A and a second mixes in Column C
-Column B is left empty and used if one student makes a mistake
- Each dye mixture prepared in one well to reach a total volume of 45 μl.
- Pipet 10 μl in triplicate from each well of the mixing plate into the center of the appropriate circles on the target card

B. Setting up restriction enzyme digests
Now we are ready to set up the restriction digests. Each group should have one tube labeled ENZ that contains the rehydrated restriction enzymes EcoRI and PstI. It important to keep the restriction enzymes on ice during the preparation of restriction digests as enzymatic activity decreases at higher temperatures.
- Label colored tubes as follows:
Green = CS (crime scene DNA)
Blue = S1 (Suspect 1)
Orange = S2 (Suspect 2)
Violet = S3 (Suspect 3)
Pink = S4 (Suspect 4)
Yellow = S5 (Suspect 5)
Clear = negative control
Also include your name or initials, date, and lab section on your tubes.
- The technicians should have already rehydrated both the enzymes and the DNA samples and transferred 10 ul of the stock DNA into the corresponding colored tube. For your negative control you will use water.
- Add 10 ul of the enzyme mix to each tube. Make sure to use a fresh pipette tip between samples to prevent contamination. Pipette the enzyme, sample mixture up and down a few times to homogenize the sample. Close lid on all caps.
- If you see bubbles in your tubes, gently flick the bottom or gently tap the tube on your lab bench. Make sure the cap is securely closed to prevent spillage. You may also wish to briefly vortex the sample and/or place it in a mini- or microcentrifuge for a few seconds. When using a microcentrifuge you must make sure it is balanced or you may damage the rotor.
- Place the tubes inside a dry bath and incubate for 45 min at 37ºC.
- When the incubation period is complete, store digests in the refrigerator until the following week.
Week 9:
This week we will quantify the results of your restriction digests to determine if any of the suspect DNA samples match the DNA found at the crime scene. Remember that a suspect DNA banding pattern matching the pattern at the crime scene would implicate that individual in the crime.
Each class will prepare four 1% gels in total.
1. For each gel, combine 50 ml of TBE buffer with 0.5 g agarose. Swirl mixture.
2. Microwave mixture for 30 sec – 1 min. Using protective gloves, remove the mixture from the microwave and swirl. Be careful as the flask will be hot to the touch! If needed, microwave for another 30 sec – 1 min. The agarose should be completely dissolved in the buffer solution and look clear. Make sure that the solution does not spill out of the flask when boiling.
3. Add 5 ul of SYBR safe solution to each flask and swirl. This is the stain that will help you visualize the DNA in your gel.
4. Gently pour solution into a gel casting tray and place two combs into the gel.
5. Wait for gel to solidify (~20 min).
6. Use one row of wells to practice loading the gel. Try loading 5 ul of dye into each well.
7. Remove your restriction digests from the refrigerator. Make sure there are no bubbles inside the tubes. Gently flick tubes, tap them on the bench, vortex them, or spin them in a microcentrifuge if needed.
8. Add 5 ul of loading dye to each sample. The loading dye is used to help load your samples into the gel. Make sure you use a different pipette tip between samples! Once the loading dye is added, each tube should contain a total of 25 ul (10 ul DNA + 10 ul restriction enzyme + 5 ul loading dye).
9. When solidified, carefully transfer the gel to an electrophoresis chamber. Make sure to fill the chamber with enough buffer to cover your gel. Also, make sure that the wells of the gel are near the black electrode (not the red).
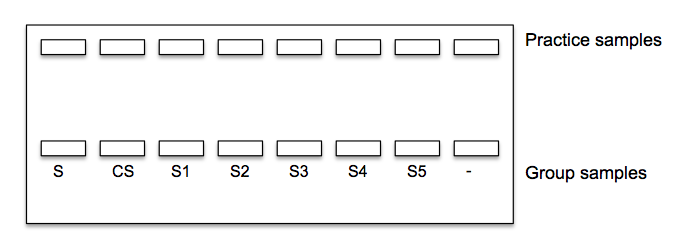
10. Load the gels following the diagram below. Make sure to use a different pipette tip for each sample when loading. Use 10 ul of the size standard (S) and 20 ul of each sample. Place your negative control in last well.
11. Place the lid on the electrophoresis chamber and plug the correct electrodes into the power supply and the gel rig (black to black, red to red).
12. Turn on power supply and set to 100 V. Electrophorese your samples for ~30-45 min.
13. While waiting, work on the review questions.
14. Turn off the power supply after the loading dye is approximately halfway through the gel. With gloves, carefully remove gel from chamber and place on transilluminator to visualize the results. Do any of the samples match? Is it possible that any of the suspects committed the crime?
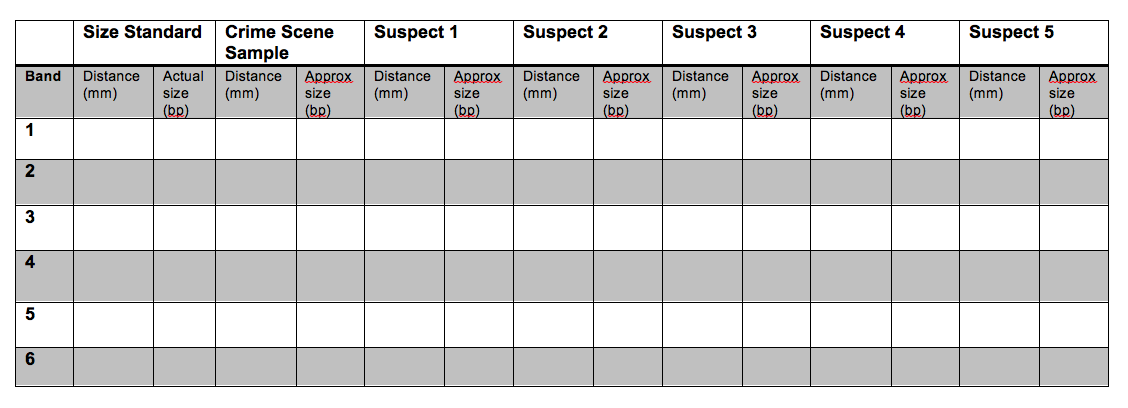
15. Use a ruler to measure the distance (mm) of each band from the well. Determine the approximate size of the band (in bp) by comparing it with the Invitrogen 1kb ladder. Fill-in the table below. Use the table to plot the data in the following plot. Your x-axis should be distance (mm) and the y-axis should be fragment size (bp). Be sure to label the axes! What is the general shape of the curve? How can the figure be used to estimate the size of an unknown fragment?
Review Questions
- If a restriction enzyme digested a linear piece of DNA in two places, how many fragments would result? What if the DNA was circular instead of linear?
- In gel electrophoresis, why is the DNA loaded near the negative end (cathode) of the chamber?
- How does this experiment compare and contrast to a typical RFLP DNA fingerprinting assay?
- Describe the role of restriction enzymes in constructing a recombinant plasmid.
- Which of the suspect DNA samples contained the largest DNA fragment? What about the smallest?
- A more modern molecular technique to RFLP fingerprinting is called Amplified Fragment Length Polymorphisms (AFLPs). In AFLP analysis, restriction enzymes are again used to digest genomic DNA into multiple fragments. Next, adapters complementary to restriction site overhangs are ligated to the fragments using an enzyme called DNA ligase. These adapters are complementary to primers used to amplify the fragments using the polymerase chain reaction (PCR). Can you think of any potential benefits of AFLP analysis over RFLP? Explain your reasoning.
- Using what you now know about restriction enzymes, why do you suppose that wells in the gel contained more than one band?
- How would the voltage used change the rate of DNA electrophoresis? Can you think of any benefit of running the samples at a slow rate?
- What is the purpose of including a negative control in your experiment? Would DNA bands in the negative control influence your conclusions? Explain your reasoning.
- What would your gel look like if the DNA were not fragmented?
- In your own words, describe the utility of molecular genetic approaches to individual identification and estimation of relatedness. How can restriction enzymes be used to link a suspect to a crime scene?
- Do any of the suspects have the same banding pattern? If not, does it mean that the individuals are not related? Explain your reasoning.

