AutoCAD WORKSHOPs

The AutoCAD workshops are now up and running, you are encouraged to attend all of them to support your auto CAD skills.

TUESDAY | 12:35PM – 2:30PM | V817
STEVEN ZIMMERMANN


  • 09.24.19 Autocad working with references
    • Software: AutoCAD
  • 10.15.19 Autocad working with blocks
    • Software: AutoCAD
  • 10.22.19 Annotating + printing settings
    • Software: AutoCAD
  • 10.29.19 CAD 3D basics I or advanced annotation and hatches
    • Software: AutoCAD
  • 11.05.19 CAD to Rhino + Illustrator
    • Software: AutoCAD, Rhino, Illustrator
  • 11.12.19 Rhino + illustrator to CAD with layer management
    • Software: AutoCAD, Rhino, Illustrator
  • 11.19.19 Revit to AutoCAD
    • Software: AutoCAD, Revit
  • 11.26.19 CAD to Sketchup
    • Software: AutoCAD, Sketchup
  • 12.03.19 CAD review of basics + printing + annotating
    • Software: AutoCAD
  • 12.10.19 CAD open help: ­nal submission assistance
    • Software: AutoCAD
Posted in Uncategorized | Leave a comment

Tectonics Photo Essay

Student Challenge
I went twice to the center and was told the first time that the exhibit is not open is not open because of a press conference/meeting.

Optional Solution
Because of your accessible trouble please turn your essay from photo essay more and Internet research PowerPoint. The describe the architect and the competition project from online sources.

Posted in Uncategorized | Leave a comment

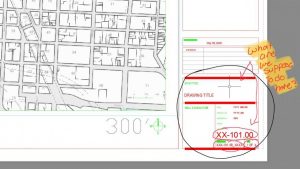
Title block info.

Question:
I was wondering what exactly we had to put in the box, if you can give an example it would be appreciated.


Response:
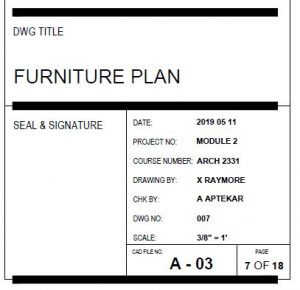
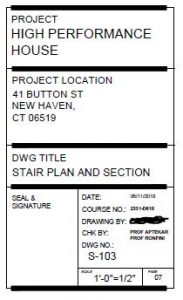
In this box you put identifying information about the drawing. You may have to copy the text out of the block if you still have your information in block form.

An example follows:

Drawing title: STRUCTURAL GRID
Drawing number (a unique number for each drawing will go into the drawing number conventions in another class): S-100.01
CAD file No. (the filename or part of your drawing): [Aptekar_F_19_Dwayne-Johnson(01_Site).dwg] OR [01_Site]
Page ([the page number] OF [the number of pages in your drawing set]): 5 OF 10

Posted in Uncategorized | Leave a comment

Question:
I have scaled the maps in the Model side, then I made the viewports on the other side, and changed the scale in there. But I’m having problem with the scaling inside the viewports, it just zooms in and the drawing can’t be seen.
Response:
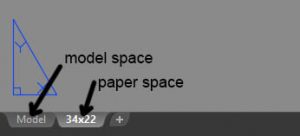
It does take time to get use to the interface of AutoCAD, sometimes it is necessary to double-click the outline of the viewport in order to control the zooming in paper space. If you get stuck in a sub view you may have to flip back to model space and then back to paper space. Also review the post titled Viewport scaling for information on custom views and working in paper space. Another useful trick to see your area in your viewport is use the zoom command “extents” it will zoom so you can see all your work in your view.

Posted in Uncategorized | Leave a comment

upload

Question:
I just want to know how I am going to upload the file for the first assignment.
Response:
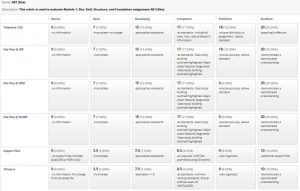
The assignments are in content area of blackboard. If you click on the content area button in blackboard you should be able to access the assignment. I have added a rubric to help you organize your submission.

Posted in Uncategorized | Leave a comment

New York City maps

Question:

I’m having a problem with Tax map. I can’t zoom in to capture the area. could you please recommend me any other cite for maps?

Response:
There are many maps with scales, the tax map is useful because it has property lines dimensioned. You can use the image clipping software like “snipping tool” to catch a screenshot of your image. Some other useful maps include:

Posted in Uncategorized | Leave a comment

Viewport scaling

Question:
I am confused as to how to do the project and scaling it (site maps) in the 34×22.

Response:
The scaling exercise consists of two parts, part one uses the reference scale feature to scale an image into model space. The second part scales the view or viewport from AutoCAD model space into paper space. In your template paper space view is called 34×22.

To scale in your 34×22 paper space. Select the viewport edge that you are working with

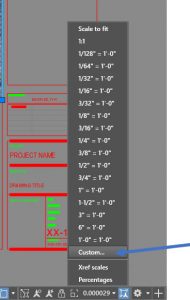
Once you have it selected you will be able to change it scale from the scale control option on the bottom of the menu.

The scales required may not be in the scale list to add a scale click on the custom scale button.

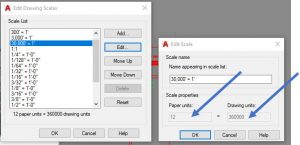
Add the scales as needed (in this example I have added a 30,000’ equals 1’scale)

  • paper units = 1’
  • drawing units = 30,000’

Note that auto CAD default is in feet so that the units have turned from feet to inches in the dialog box below [30,000×12=360,000 and 1×12=12]

Once you have your custom scale you can change your viewport scale by selecting utilizing “scale of selected viewport”

You will need to repeat the process until you have 3 viewports with your three different site scales.


Some links on the topic:

Posted in Uncategorized | Leave a comment

assignment 1

Question: I am inquiring on today’s lesson and what the exact instructions are for the assignment?

Per our discussion in class of added more details on the assignment to the OpenLab, please refer to this page: A01 Assignment.

Question: From what I understood was that there must be 3 views tax maps of the site only?  Or as well as the completed drafting of the floor plan?

You are required to upload the 3 views site plan. You should be developing your Grid drawing and your assigned floor plan, please refer to this page: A01 Assignment.

Posted in Uncategorized | Leave a comment

Scaling in AutoCAD

Question: I am having some trouble tracing to scale in auto CAD. I was wondering if we had to trace to scale?, and what scale to make the trace?

Good questions;
Just start tracing your assigned floor, focus on the elements you think are structural, you do not need to complete the drawing. We can scale your line work in class tomorrow.
We plan to go over scaling on Thursday. Scaling [SK key command] can be easily accomplished by having two objects to snap to and using the reference scale command.
reference scaling to an object in auto CAD
1. type SC for scale
2. Select the object to scale.
3. Select the base point.
4. Enter r (Reference).
5. Select the first and second reference points, or enter a value for the reference length.

This link contains a decent reference scaling video:
https://autocadtips1.com/2011/04/17/scale-objects-with-a-reference/

Posted in Uncategorized | Leave a comment

BT2 Survey and Assignment

Survey and Assignment Link

https://forms.gle/1DtVcVwUt9nBNDyz7

Posted in Uncategorized | Leave a comment