OpenLab GradeBook
Please note: We are no longer supporting this plugin. Please use the LMS grading center for sharing grades with students.
OpenLab GradeBook provides faculty with a simple and secure way to keep track of and share grades for a course. When logged into the OpenLab, faculty, as admin of their course site, will be able to enter and view all grades for their course via their course site dashboard, and each student will be able to see only their own grades. Faculty may also add comments related to the grades they assign.
Activating OpenLab Gradebook
If faculty teach multiple courses on different OpenLab sites, they will need to repeat the set-up below for each course.
- Go to your site Dashboard > Plugins, and activate OpenLab Gradebook.
- Once activated, you’ll see OpenLab Gradebook appear as an option in the left-hand menu of your Dashboard.
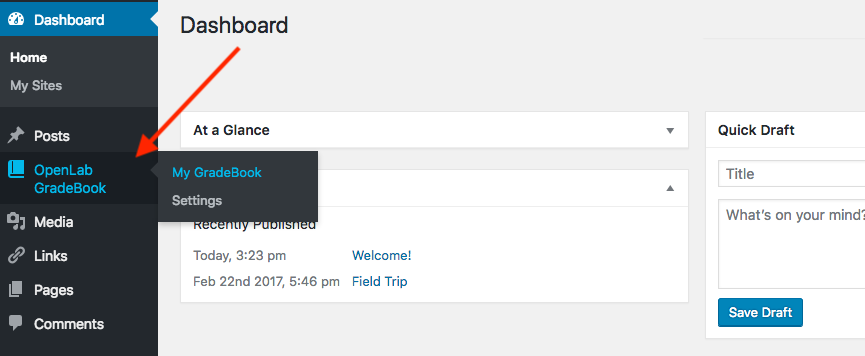
Creating a Gradebook
- Click on the main OpenLab GradeBook menu item or My GradeBook in the sub-menu, and you will be prompted to create create a new gradebook.
- The GradeBook Name will be pre-filled with the same name as the course site, which you can keep or change to anything you’d like. You can also fill in a section, semester, and year, or leave those fields blank. Click Save when you’re finished.
Adding Assignments
You can choose to add assignments or add students first in the order that makes sense for your workflow. You may want to wait until all or most students have joined your course so that you can add all students at once. Below, we begin with adding assignments.
There are two columns, for mid-semester and final grades, automatically included by default in each gradebook. The mid-semester grades are formatted specifically for City Tech requirements.
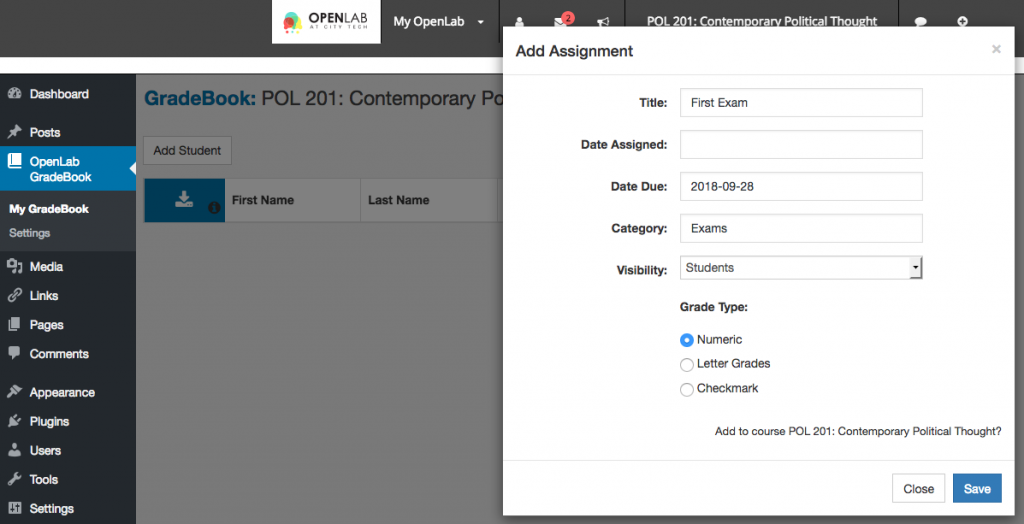
- Click on the name of the gradebook you just created to view the main screen for the gradebook, and then click Add Assignment.


- Fill out the title of the assignment (e.g. “First Exam”). You can choose to fill out any other information you choose.
- Category: Adding a category (e.g. “Exams”) will allow you to filter assignments by a particular category. Categories are case sensitive, so “Exams” will be saved as a separate category than “exams.”
- Visibility: Choosing “Students” in the dropdown means that students will be able to see grades for this assignment in their gradebook. Choosing “Instructor” means that you can see and enter grades but the assignment won’t appear for students when viewing their gradebook. You can change this setting at any time, so you can enter an assignment without grades, and then later change the visibility when you’re ready to share grades with students.
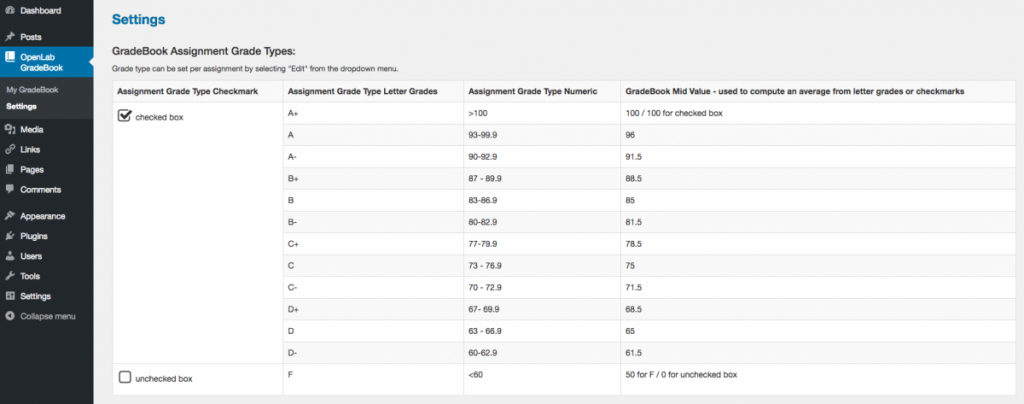
- Grade Type: Assignments can have three grade types: Numeric (0-100+), Letter Grades (A-F), or Checkmark (credit, no credit). You can change the grade type at any time, and the grades for the assignment will be automatically converted to the new grade type. The Settings section of GradeBook contains a table with grade type conversions.
- When you’re finished, click Save.
Adding Students
- From the main screen for a gradebook, click Add Student. This will allow you to add any students who have joined your course as members. Anyone who hasn’t joined can’t be added yet, but you can add additional students at any time.
- You can choose to add all students in the course at once, or you can add students individually. When you’re finished, click Add.

Entering and Managing Grades
Once you have added students and assignments, you can give each student a grade for each assignment. You will be able to view all students and grades, but each student will only be able to see their own name and grades, if you’ve made them visible to students. Students also cannot make any changes to anything in the gradebook. They will be able to view their statistics in relation to the class average for each assignment.
Uploading a CSV to add assignments and/or grades
After students have been added, you have the option of adding assignments and/or grades to your gradebook using a pre-formatted CSV file that can be edited and uploaded to import new data. Note: students cannot be added or edited via CSV file, only assignments and grades.
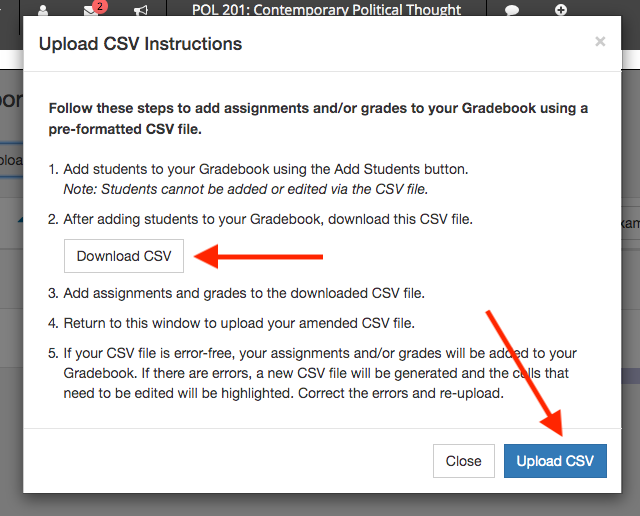
1. Click Upload CSV.

2. You’ll see a window pop up with instructions.
3. Click the Download CSV button in this window to download the pre-formatted CSV file.
4. Add assignments and/or grades to the downloaded CSV file.
5. When you’re finished, return to the Upload CSV window and click Upload CSV in the window (the blue button shown below). You can work on editing your CSV and return to the Upload CSV window at any time by clicking the Upload CSV button shown above in step 1.
6. If the CSV file has no errors, you’ll see a message that the file was successfully uploaded. Your assignments and/or grades have been added to your Gradebook, and you can close the Upload CSV window.
7. If there are errors in the CSV file, a new file will be generated and the cells that need to be edited will be highlighted. Correct the errors and re-upload.
Entering Grades
- When you’re in the main screen of a gradebook, you’ll see a table with the assignments and students you’ve added.
- To enter a numeric grade, click in the cell to highlight the ‘–’ placeholder, and replace it with a numeric grade. To add a letter grade, choose the appropriate grade from the dropdown. A checkmark grade will appear as a checkbox.
- To the left of the individual assignments, you can enter a Mid-semester and Final grade for each student. Mid-semester grade options correspond to the official college evaluation options (e.g., P for passing, BL for borderline, U for unsatisfactory).

Adding Comments
Comments can be added to any grade you assign.
- Click on the comment bubble next to a grade.

- Enter your comment and click Save.
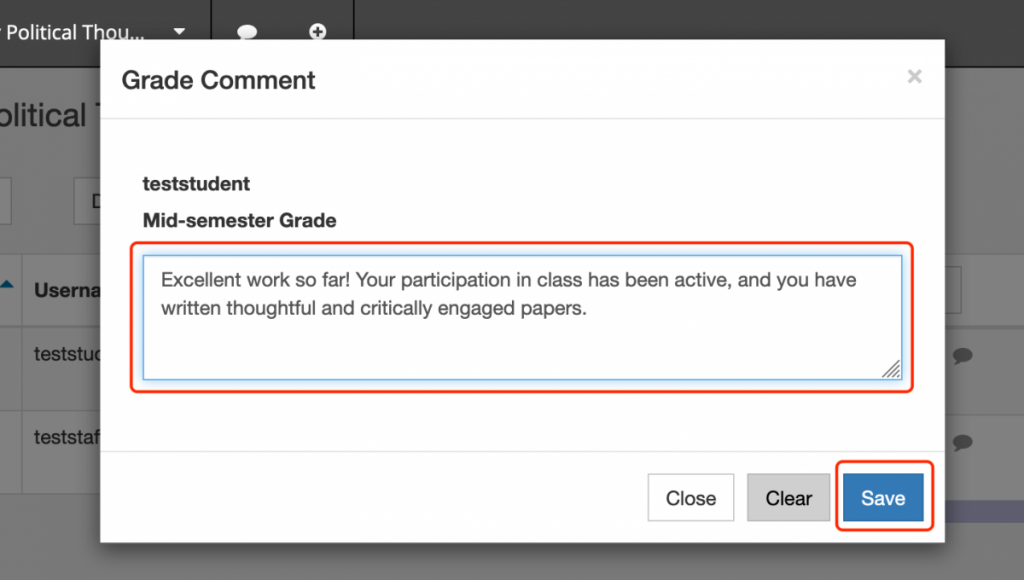
- When there is a comment associated with a grade, the comment bubble will appear blue. To view or edit a comment, click on the blue comment bubble.

Managing Grades
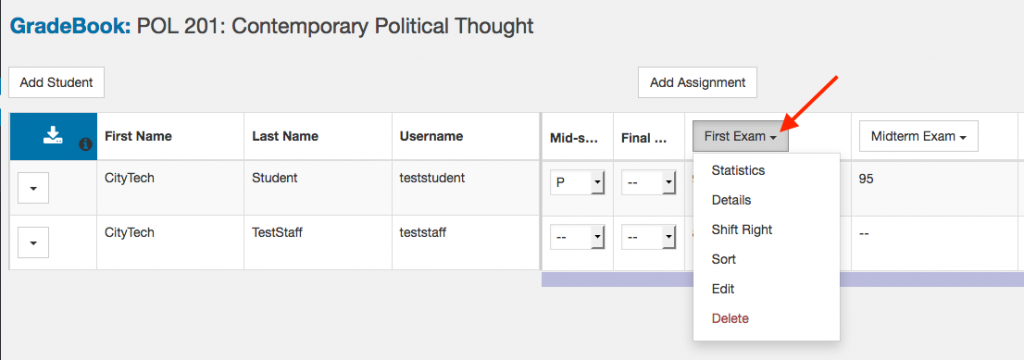
- You can find a number of options for each assignment by clicking on the arrow next to the assignment name. Doing so allows you to view the dropdown, which includes options to view Statistics or assignment Details, change the order of assignment columns (Shift Right or Left), and change the Sort order. Choose Edit if you would like to change the assignment name, due date, category, visibility or grade type. You can also Delete assignments here.
- You can filter assignments by choosing the assignment category in the dropdown shown below and clicking Filter.
- To download a CSV file of the gradebook, click the blue download icon in the upper left-hand corner of the gradebook table.
- You can delete a student, or view a student’s statistics in relation to the rest of the class by clicking the arrow to the left of a student’s name.

Adding a Gradebook Widget
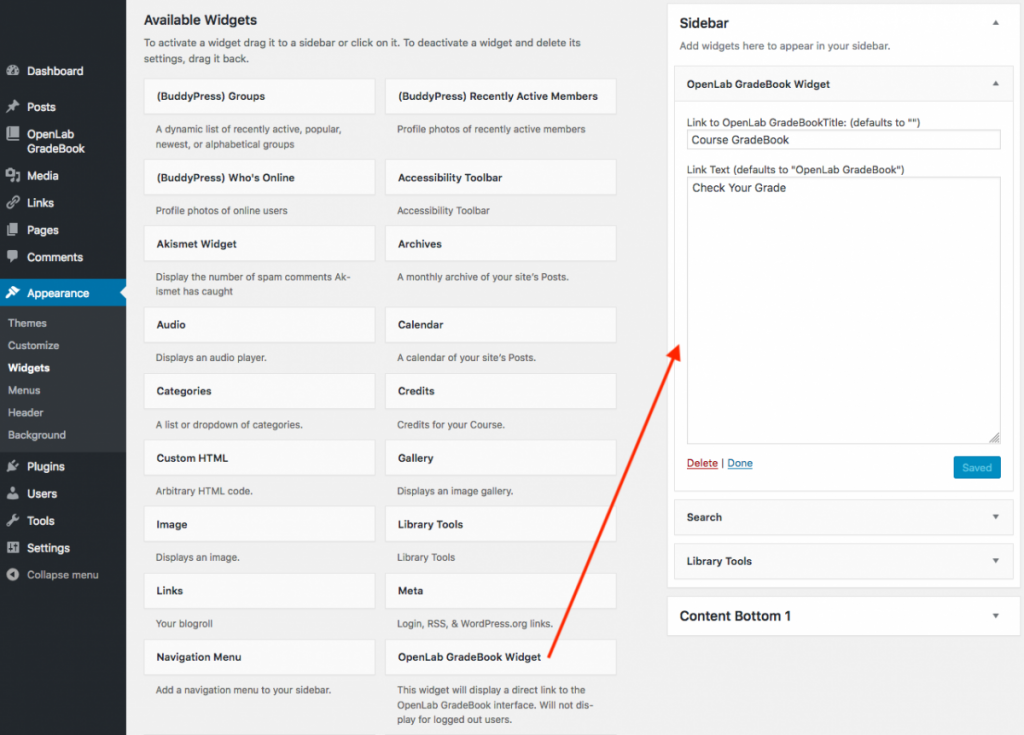
The Gradebook plugin comes with a widget that adds a quick link to the front-end of your course site that allows logged-in students to go directly to their personal gradebook.
- Go to Dashboard > Appearance > Widgets. Choose the OpenLab Gradebook widget, and add it to your sidebar or the widget area where you’d like it to appear.
- You can customize the title and link text of the widget. When you’re finished click Save.
Gradebook Settings
The Gradebook Settings section doesn’t contain any settings to edit, but shows the conversion for numeric, letter, and checkmark grade types.
Student View
Students can access their gradebook through the course site Dashboard, or the quick link on the front-end of the site, if the widget has been added. They will only be able to see their own grades and can also view their grade statistics compared with the class average. Students will not receive email notifications when grades are entered, so they will need to check their gradebook on the course site.


