OBJECTIVE
Research and design a three page website about a major figure in digital history, chosen from this list. Your site’s pages will include an index/landing page with an image and brief bio, a gallery with at least four thumbnail images (linking to full-resolution original images), and a reference page with links to your sources and a brief acknowledgement (e.g. “information and media for this site was compiled from the following sources:”) To complete this project you will need to:
- compile research and images/graphics related to an assigned topic
- use an external stylesheet to handle CSS across multiple pages
- create a responsive layout by using relative units and @media queries
- design a header with responsive graphics and custom fonts
- integrate new tags <header>, <nav>, <article>, <aside>, <ul> and <li>
- use new position and display CSS techniques to control placement of elements
PROCESS
Step 1: Research
- Choose a figure from digital history from this list.
- Research basic biographical information about this figure, keeping note of your sources.
- Write a new OpenLab post with a brief (1-2 paragraph) summary of your research. Tag with categories “Site 2: Digital Pioneers” and “Digital Pioneer Research”.
Step 2: Nav and Header
Every page in your site will have the same <nav> and <header>, so it’s the ideal place to start. Your implementation of this design will inform the styling of the other content on your site.
- lay out the <header> with responsive units and an auto-scaling background image.
- create horizontal <nav> using the display:flex CSS property.
- lay out the page title and subhead text (<h1> and <h2>), using relative units (rem and %) and typefaces imported from Google Fonts.
Step 3: Landing Page/Bio (index.html)
- write at least two paragraphs describing your figure and their accomplishments (doesn’t have to be Shakespeare, but don’t copy from Wikipedia or other resources).
- use semantic tags, responsive/relative units and the display: flex CSS property to lay out your text and at least one captioned image.
Step 4: Gallery
- collect at least four images related to your figure, no smaller than 1024 x 1024px
- use photoshop to save smaller preview versions of your source image (~400 x 400px)
- create a new html document to use for the gallery – you can save a copy of your index.html, rename it something like “gallery.html”, and delete everything after the <header> and <nav>.
- add a <ul> to your gallery page, and create an <li> for each image
- inside each <li>, create an <a> hyperlink to the original high-resolution image
- use CSS to set the dimensions of the gallery thumbnails, and set the low-resolution previews as their backgrounds.
Step 5: Reference Page and Final Touches
- create a new html document to use for the references/bibliography – you can save a copy of an existing page, and delete everything after the <header> and <nav>.
- to this page, add a brief statement acknowledging the resources you used, followed by a stylized <ul> of hyperlinks to each
- check HTML and CSS for errors/typos/inconsistencies
Step 6: Upload and Post
- log into your hosting account and access the file manager through cPanel
- in your public_html folder, create a new directory called “hello” and move the files from your “Hello, World!” site into it; this means you can still access and link to the project
- upload all HTML, CSS, and image files necessary for your site to your server
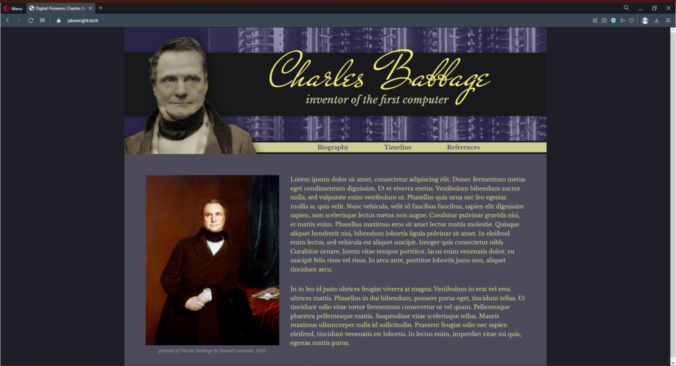
- create a new OpenLab post featuring a screenshot of your site in a browser window, properly hosted at your personal domain. Apply categories “Student Posts” and “Site 2: Digital Pioneers”