Objective
Design a tessellating pattern based on the colors, content, and context of a room from film, TV, or other mass media. This can be something that would “go” in the room (e.g. upholstery for the Millennium Falcon), OR it can be a standalone piece that strongly references its source material (e.g. a textile based on the design of a Pokemon center).
Extra credit: design/paint a “product” suited to the space as well. This product *may* incorporate your new pattern – e.g. upholstery on a piece of furniture – but this is not required.
Step 1: Inspiration and Research
- Choose your room and get approval. It can be real or fictional, live-action or animated, so long as it’s an interior (indoor) space. When you’ve made your choice, run it past me for approval – if you missed the class session, email me your idea instead.
- Get a high-quality, high-resolution reference image (1280 x 720 or larger). I recommend taking your own screenshot; some streaming services automatically block screenshots on computers, so it may be easier to take the screenshots on a smartphone. When you take your screenshots, make sure the play buttons and progress bar are hidden!
- “Shop” for at least four existing products or artworks with design that would complement the room, saving a link for each product. For example, this tile has design elements that would complement the Millennium Falcon’s interior; this gun lamp by Phillipe Starck would fit into Harley Quinn’s living room.
- Write an OpenLab post presenting your room and shopping list (with links and images, if possible), tagged with “Project 3: Living Room” and “Step 1: Inspiration and Research”. Present and discuss the content of your post in class. Include a paragraph explaining your choice of room, color palette, and products.
Step 2: Color Analysis
- Use the eyedropper tool in Photoshop or Illustrator to choose at least four key colors from the room. Look for areas of neutral/white lighting with little to no shadow, if possible. Take note of the specific colors, by noting their color codes and/or adding them to your Adobe library.
- Choose at least four NEW colors that relate to your room and selected palette. Remember you can play with value (brightness) and tone (saturation) while keeping the hue (specific color) consistent.
- Use Illustrator to design a simple graphical representation of your color scheme. This should incorporate the original image, and present the key colors and the related colors you chose in a coherent manner.
- Post your layout to OpenLab, tagging with “Project 3: Living Room” and “Step 2: Color Analysis”. Write a couple sentences identifying the color relationship(s) you will incorporate into your pattern design.
Step 3: Geometric/Compositional Analysis
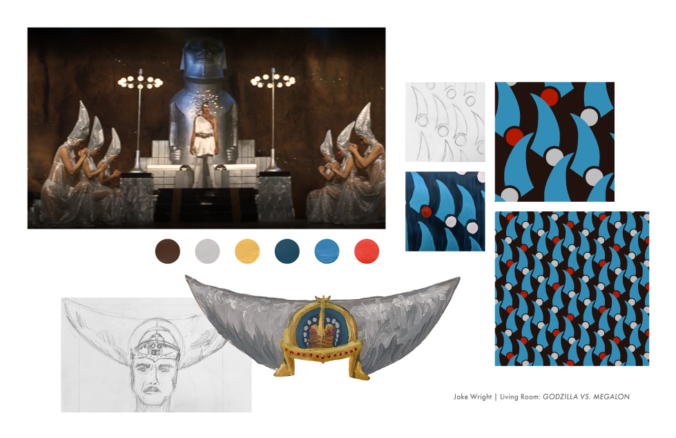
- Identify at least four design elements from the room to inspire your pattern. These don’t necessarily need to be the most important elements in the room – in the Godzilla example, I was inspired by the dancers’ hats and the 70s light fixtures, rather than the major character in the center of the shot.
- Sketch simplified versions of the geometry (shapes and lines) that make up your design elements.
- Create a layout in Illustrator presenting your isolated design elements alongside your simplified sketches. Use clipping masks to present the elements isolated from the rest of the image.
- Post your layout to OpenLab, tagging with “Project 3: Living Room” and “Step 3: Geometric/Compositional Analysis”.
Step 4: Draft
- Using your geometric analysis as a starting point, make at least 10 thumbnail sketches of different creative directions for your pattern design. Discuss in small groups during class. Thumbnail sketches are small, quick drawings, usually about 1-3″ square with only the most important details marked – the drawing version of notes.
- Expand three of your thumbnails into color sketches, at least 4″ x 4″ (or equivalent for non-square tiles). You can do this in your sketchbook or on acrylic paper; you can use pencil, pen and ink in addition to paint.
- Post your painted sketches to OpenLab, tagging with “Project 3: Living Room” and “Step 4: Draft”.
Step 5: Digitize and Refine
- Choose your favorite draft from Step for your final design direction.
- Scan your draft, place in Adobe Illustrator, and recreate the pattern design as vector graphics. You can use the “image trace” feature to help speed this process up, but keep a close eye on the accuracy and complexity of the traced shapes. It’s sometimes easier to “trace” the image by yourself with the pen tool instead of wrangling the complex shapes produced by the algorithm.
- Revise and finalize pattern design.
Step 6: Present
- Collect images for final mood board and presentation. The images you need:
- Original high-quality room photo
- Swatches/palette of colors from original room and colors used in pattern
- Painted draft of pattern design (you only need to include the one you used)
- Revised Illustrator version of pattern
- Scaled/down Illustrator version of pattern, to show repetition
- Design an 11” x 17” layout (aka mood board) incorporating the images from the previous step, demonstrating your process from start to finish.
- Export final mood board as a .PDF using the “High-Quality Print” preset. Upload and post to OpenLab, tagging with “Project 3: Living Room” and “Step 6: Present”.