How to Use My Sketchbook

Featured

DUH… I DRAW IN IT.


YES… I agree. This seems pretty obvious.

Any student who has studied drawing at all has probably been keeping a sketchbook for at least the past semester, if not for years. But please bear with me and read on. Regardless of the simplicity of the tool, there is a reason ALL serious artists keep a regular sketchbook practice, and there is infinite room here to learn, grow, and develop your craft.

Your sketchbook is the place in which you will really improve your drawing skills.  It will, by developing the habit of daily use, become a PRACTICE. No different than a daily meditation practice. And it should be thought about with similar rigor.

Throughout this semester, and hopefully moving forward you will keep a sketchbook that you will work in every day.  It will become a depository of ideas, a place to work on your concepts, and a place to draw both what you see in your daily life as well as what you see in your imagination.

For now, focus solely on DEVELOPING THE HABIT and PRACTICING THE SKILLS YOU LEARN IN CLASS.

Every week you are required to share pages from your sketchbook here. Be sure to Title your post! Include the Week and the Theme if you are given one, or make up your own title!

Sketchbook Requirements:

  • For this course students are required to keep an ongoing sketchbook which will be utilized a minimum of 2 hours, 30 min per page, for a total of at least 4 sketchbook pages per week.
  • Students can not to tear out pages and pages must be dated.  Students may of course draw MORE than the required number of pages. Sketchbooks will be reviewed weekly in Openlab.
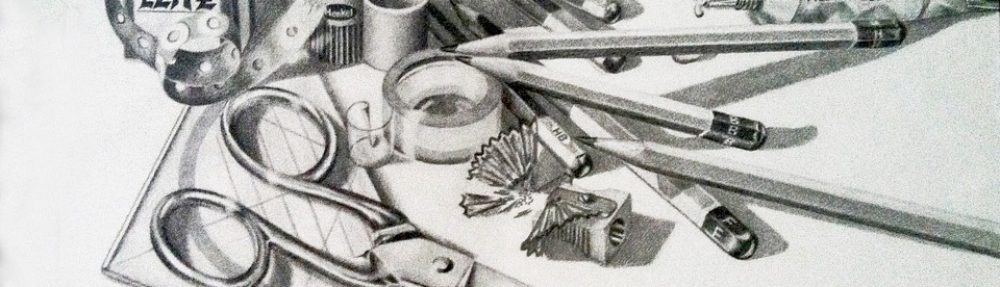
  • In it students will include only life drawing, objects, still life, gesture drawings etc. and process work towards their assignments.
  • Class notes should also be included in this sketchbook.

Be sure to comment on each other’s sketches.

DISCUSSION:

Please reply to this post acknowledging that you understand the requirements and purpose of the sketchbook.  Also please let us know in a couple of sentences about your sketchbook experience and what kind of things you like to sketch!

Uploading Instructions

Featured

Upload photographs of your Sketchbook from this semester in the Sketchbook Category on this site.


Be sure to give the drawings a title.  On our class site, title your drawing with the week and the theme (if one was given).  Write brief descriptions of the drawings in your post.  Your descriptions should include what you feel the aim of each drawing was, what you learned from making it, and what was challenging to do.  Of course you may write other comments as well. For instance, you may ask questions for other students to answer.

How to Post to our class: On this class site, go to Post located on the left > Give your drawing a title in the subject line like this: Sketchbook Week 1, contour drawing: “My Converse Sneakers” > Write a brief description of the drawing in the Comments space > Just above your title click on the Add Media icon (it looks like a camera on top of a music note) and browse for your file > Click Insert > Click Drawings in the list of Categories on the right > Click Publish at the top right.

Your description should include what you feel the aim of the drawing was, what you learned from making it, and what was challenging to do.  Of course you may include other thoughts as well.

For Midterm and Finals your Assignments should be loaded into your Eportfolio for grading.  

How to Post to your ePortfolio:  Go to Dashboard > New Page > Pages > Add New > Locate “Parent” in the Page Attributes > choose “Academics” from the pull-down menu. In the Title area of your ePortfolio, be sure to write the name of our class (Foundation Drawing) or our course code (COMD1103).  Also be sure to Publish, and invite me to join your ePortfolio.  In settings, be sure to state either “Public” or “Private>visible to City Tech members.”  Otherwise no one will be able to see what you’ve posted.

How to take the photo, find a spot with even light so that you will have no shadows or strange light gradations across the drawing.  Frame the drawing so there is a small even frame on all sides.  Optimize the file, or reduce it to 72 dpi, with a file size no more than 1MB (about 8-9 inches on one side). Rotate it if necessary to it uploads right-side-up. If you have access to any photo-correcting program, see if you can increase the contrast so that delicate drawing lines are visible.