Abstract
Energy saving LED light bulbs are becoming common. They are replacing traditional light bulbs in many applications because they are becoming cheaper. This project will use Arduino micro-controller to control LED light bulb by using infrared signal. Both the brightness and color can be changed. Moreover, Arduino can be programmed to control the light bulb from other sources such as sensors, smart phone etc and through the internet. Next step will be to use smart phone to control a light bulb through the Arduino by using the Bluetooth. Some of the real-world application of this technologies are Room lighting, Store displays, Party lighting, Fashion industry.
Introduction:
In this research project we show how Arduino micro controller board can be used to control the LED light bulb.
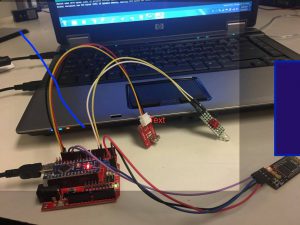
The LED light bulb comes with a Infra-Red (IR) remote for controlling light intensity and color. An IR receiver is connected to Arduino input. Arduino output is connected to IR LED emitter which sends IR control codes to the light bulb as shown in the schematic diagram below. Arduino is also connected to a smart phone through a Bluetooth module as shown in the pictures. In the software code shown below, single letter commands sent from the smart phone are received by Arduino through the Bluetooth connection. Each command is converted to an IR code which is then transmitted by Arduino to the light bulb through the IR emitter LED.
Code: IR RECIEVE
#include <IRremote.h>
int RECV_PIN = 11;
IRrecv irrecv(RECV_PIN);
decode_results results;
void setup()
{
Serial.begin(9600);
irrecv.enableIRIn(); // Start the receiver
}
void loop() {
if (irrecv.decode(&results)) {
Serial.println (results.decode_type);
Serial.println(results.value, HEX);
Serial.println(results.value, BIN);
Serial.println (results.bits);
// Serial.println (results.rawbuf);
Serial.println (results.rawlen);
irrecv.resume(); // Receive the next value
}
delay(100);
}
Updated Code:
#include <SoftwareSerial.h>
#include <IRremote.h>
IRsend irsend;
SoftwareSerial mySerial(10, 11); // RX, TX
char command;
void setup() {
Serial.begin(9600);
Serial.println(“Goodnight moon!”);
// set the data rate for the SoftwareSerial port
mySerial.begin(9600);
mySerial.println(“Hello, world?”);
}
void loop() { // run over and over
if (mySerial.available()) {
command = mySerial.read();
Serial.write(command);
}
switch (command) {
case ‘r’:
irsend.sendNEC(0x00FF906F, 32); break;
case ‘g’:
irsend.sendNEC(0x00FF10EF, 32); break;
case ‘b’:
irsend.sendNEC(0x00FF50AF, 32); break;
case’w’:
irsend.sendNEC(0x00FFD02F, 32); break;
case ‘o’:
irsend.sendNEC(0x00FFE01F, 32); break;
case ‘f’:
irsend.sendNEC(0x00FF609F, 32); break;
case’i’:
irsend.sendNEC(0x00FF20DF, 32); break;
case ‘d’:
irsend.sendNEC(0x00FFA05F, 32); break;
case’n’: // orange
irsend.sendNEC(0x00FFB04F, 32); break;
case ‘p’:
irsend.sendNEC(0x00FF48B7, 32); break;
case ‘y’:
irsend.sendNEC(0x00FA7AF3, 32); break;
case ‘u’: // purple
irsend.sendNEC(0x00FF6897, 32); break;
case ‘s’: //flash
irsend.sendNEC(0x00FFF00F, 32); break;
case ‘e’ : //fade
irsend.sendNEC(0x00FFD827, 32); break;
}
if (Serial.available()) {
mySerial.write(Serial.read());
}
}
Setup & Schematic:

Conclusion:
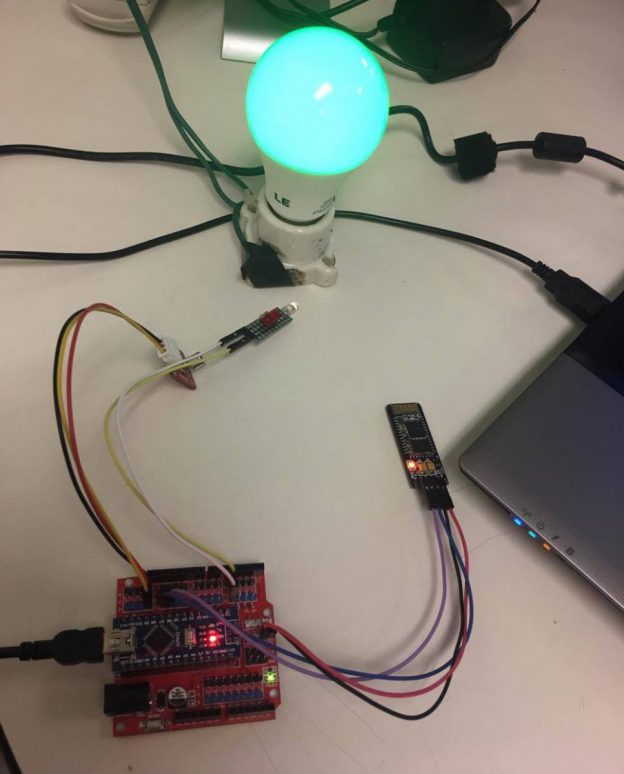
Hardware and software in this project was tested together and everything worked very well. We were able to change the light intensity and color as well as turn the light bulb on and off from the smart phone. The IR emitter that we used had very short range of few inches. Next step will be to use higher range emitter to control a light bulb across several feet distance. Future work on this research work would involve creating a custom application on the smart phone. Controlling the light bulb through Wifi and internet can also be implemented in future.

