So, you’ve got WeBWorK set up for your students — but during the first couple weeks of class, there will be students who add and drop. How do we deal with these minor changes?
To add a student (or students) to your WeBWorK course, first login and then click “Classlist Editor” in the lefthand column.
Select the “Add” tab, and enter the number of students you would like to add to your course. In this case, we have opted to add one student.

(You may, of course, add more than one student at this point – just enter the number of students you want to add before clicking “Take Action!”)
Once you’ve clicked “Take Action!”, you’ll see the following:
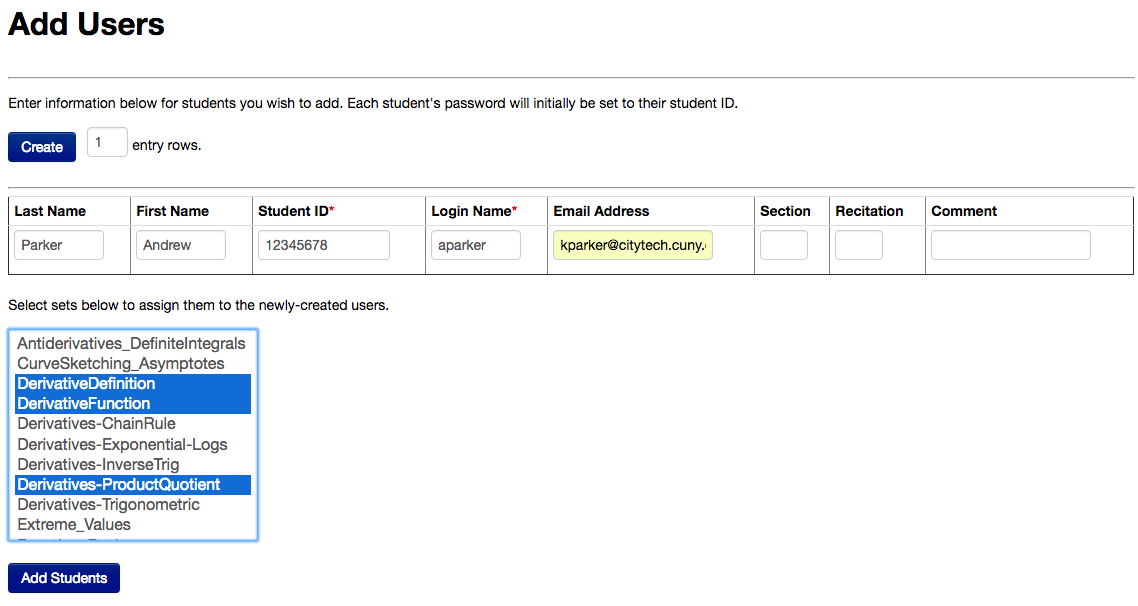
In the above screenshot, I’ve already entered the student’s Last Name, First Name, StudentID (which functions as their initial password), Login Name, and Email Address. The other boxes may be left blank, though you may want to add your section code in the field marked “Section” (for consistency).
Also notice that I’ve selected multiple problem sets to be assigned to the student immediately upon creation. This is useful if a student adds your course after you’ve already begun assigning problem sets to the other students. Now click the “Add students” button, and you’re done! The student has been added to your roster and has already been assigned any problem sets which you selected during the add process.
Removing dropped students:
Click the pencil icon next to the login name for the student that dropped. On the next screen, you’ll see the student’s information, and one of the columns is for “Status” — that column contains a dropdown menu, which you’ll change from “Enrolled” to “Drop”.

Then click “Take Action!” to save your changes, and that’s it!
The dropped student will still appear in your Classlist Editor, but:
- their login will be disabled,
- they’ll no longer be assigned problem sets when you “Assign to all users”,
- they won’t receive emails when you “email to all students”,
- and they won’t appear in the spreadsheet when you download student scores.

