A Chocolate Lover’s Dream

a tower of different flavored chocolate bars

Image by: Dave

As a kid, all you care about are the sweeter things in life, like the candy and all the other sugary delights that you can get your hands on. You might have formed a strong love or addiction for chocolate…an overwhelming intense need for it in any form whether a candy bar or morsel chips in a cookie. Chocolate is everywhere, there are restaurants that cater their entire menu to chocolate lovers such as Jacques Torres and Max Brenner. Chocolate is an ingredient that can easily stand-alone but can also be accompanied with many other flavor concepts. I have such a strong interest in chocolate, its history, its creation process as well as how it has always been popular in both the culinary and confectionary world.

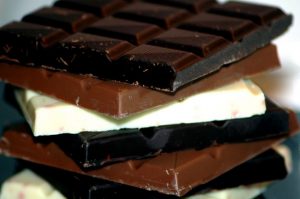
There is dark chocolate, milk chocolate, and white chocolate but there is a new chocolate version on the horizon, pink chocolate. Yes, you heard me correctly–pink chocolate. There are typically only three different varieties of chocolate which consists of Criollo, Trinitario, and Forastero. The higher quality chocolate is the Criollo and Trinitario beans which are the more expensive varieties as it isn’t cultivated as much and has a higher concentration of cocoa within the bean. These beans tend to be more robust, with a more potent flavor and bitterness. But the large-scale chocolate that is readily sold around the world for wide consumption is created from the Forastero beans. The cocoa bean itself is a fruit that is usually dried and fully fermented before it can go through the necessary processes to become chocolate.

pink colored chocolate

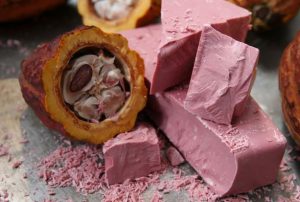
Image by: Independent UK

With the exception of white chocolate, which is only created from cocoa butter and not the actual cocoa bean. This amazing creation was invented about eighty years ago, but today, the production of white chocolate is old news. Now, everyone has a newfound interest in pink chocolate. It has officially become the newest type of chocolate in the world. Ruby chocolate has a reddish-pink hue which comes from the Ruby cocoa bean and its flavor concept is not bitter or sweet but it has flavor notes of fruitiness and a smooth mouthfeel. Despite the popular debate, there are no berries, flavoring, or coloring added to the chocolate. The history of this chocolate is still unknown but has taken many years to have been developed. And now, gone are the days of a cheap Hershey’s candy bars… Here’s to welcoming the new-age innovation of gourmet chocolate.

The Famed Confusion of the Macaron

an arrangement of French macarons

Image by: Elena Kovyrzina

There is a dessert that has taken the pastry world by storm in the last couple years and has been widely appreciated in America, resulting in a widely expanding population of pastry shops in the United States. I am talking about the art of the macaron which is one of the most difficult pastries to make and constantly confused for another dessert which is the macaroon.

Macaroons can still consist of ground almonds and are still considered meringues but usually are filled with coconut. Macaroons and macarons are similar but not synonymous as macaroons avoid certain stages that allow macarons to have the distinct delicate texture that most everyone enjoys. Still, there are two versions of macarons as macarons are meringue based; the versions vary based on the regional meringue recipe being used. A macaron can either be made by way of the Italian meringue and the French meringue; both create a different texture of macaron as the French meringue has more fat incorporated into it. Macarons are extremely difficult to make as they cake easily crack or deflate if the directions are not followed exactly as the recipe suggests.

When the macarons are piped, they are usually piped onto a silicone mat such as a silpat which will avoid the meringue from sticking during the drying and baking stage. After the macarons are piped, they are set to dry out to form a crust before they are baked accordingly. Macarons are typically piped into a circular shape but can be an array of other shapes as well like hearts or squares but those are more complex to pipe precisely.

The fillings typically used to sandwich between the two halves of a macaron are buttercream, caramel, ganache, as well as fruit fillings such as curd, jelly, and jam. The process of filling the macarons must be completed in a delicate manner as the meringues can easily crack. Usually, the fillings are piped onto the meringue half rather than being spooned onto it.


Basic Macaron Recipe

emoji macarons

Image by: Erika Low

Ingredients:

2/3 cup sliced blanched almonds

1 cup confectioners’ sugar

2 large egg whites, room temperature

1/4 cup granulated sugar

Jam or other filling

Directions:

Preheat oven to 350 degrees with rack in lower third. Place almonds in a food processor; process until as fine as possible, about 1 minute. Add confectioners’ sugar; process until combined, about 1 minute.

Pass almond mixture through a fine-mesh sieve. Transfer solids in sieve to food processor; grind and sift again, pressing down on clumps. Repeat until less than 2 tablespoons of solids remains in sieve.

Whisk egg whites and granulated sugar by hand to combine. Beat on medium speed (4 on a KitchenAid) 2 minutes. Increase speed to medium-high (6) and beat 2 minutes. Then beat on high (8) 2 minutes more.

The beaten egg whites will hold stiff, glossy peaks when you lift the whisk out of the bowl. Add flavoring and food coloring, if desired, and beat on highest speed 30 seconds.

Add dry ingredients all at once. Fold with a spatula from bottom of bowl upward, then press flat side of spatula firmly through middle of mixture. Repeat just until batter flows like lava, 35 to 40 complete strokes.

Rest a pastry bag fitted with a 3/8-inch round tip (Ateco #804) inside a glass. Transfer batter to bag; secure top. Dab some batter remaining in bowl onto corners of 2 heavy baking sheets; line with parchment.

With piping tip 1/2 inch above sheet, pipe batter into a 3/4-inch round, then swirl tip off to one side. Repeat, spacing rounds 1 inch apart. Tap sheets firmly against counter 2 or 3 times to release air bubbles.

Bake 1 sheet at a time, rotating halfway through, until risen and just set, 13 minutes. Let cool. Pipe or spread filling on flat sides of half of cookies; top with remaining half. Wrap in plastic and refrigerate.

Adapted from Martha Stewart

Mochi…The Newest Food Trend

powdered green tea mochi shaped into balls

Image by: Han N

One of the newest trends that has taken the dessert world by storm is mochi. It can essentially be paired with mostly anything, both culinary and confectionary. Still, while it continues to soar in its popularity, many wonder and beg the question, “what is mochi?”. Mochi is simply a Japanese delicacy that is created from sweet rice which is pounded until it becomes a paste. This paste is then molded into the desired shape and baked. After it has baked, it is left to cool for hours. In order to ensure that it maintains its texture, it has to be covered with plastic wrap so it does not oxidize which can alter the entire texture. It is then powdered, usually with a rice or potato starch into to avoid the pieces from sticking together.

The popularity of mochi ultimately comes from its very distinctive texture. It is soft, chewy, and gelatinous, which oddly resembles similar qualities of a marshmallow. But the mochi can be used as a dumpling in a savory soup or as a dessert like being wrapped around a scoop of ice cream. I find it to be extremely delicious in that the flavor and texture that it has cannot be found in any other confection. It has a mild sweetness to it so it can be paired with other desserts without making the entire dessert too sweet. It can be paired with ice cream or frozen yogurt and can even be stuffed with an array of different fillings. Unlike most trendy desserts, mochi is fairly easy to make in that it does not have many ingredients and the steps involved are not too complex.

Plain Mochi

Makes about 2 cups of small pieces

Ingredients:

1 cup sweet rice (mochiko) flour

1 cup sugar

½ teaspoon baking powder

1 cup water

Âľ cup full-fat coconut milk, or about half of a 13.5-ounce can

Sweet potato starch or regular cornstarch for dusting

Directions:

Preheat oven to 275° F. Line a 9- by 13-inch glass baking dish with parchment paper. (Note: A 9- by 13-inch dish will yield a thin layer of mochi, only about 1/4-inch thick. For thicker mochi, use a 9- by 9-inch glass dish and bake for longer, about 90 minutes.) In a large bowl, whisk together the mochiko, sugar, and baking powder. In a separate bowl, whisk together the water and coconut milk. (Note: Be sure to use full-fat coconut milk. You can usually find it in cans, and it should be quite thick.) Add the wet ingredients to the dry and whisk until the mixture is smooth and no lumps remain. Unlike most baking, you don’t need to worry about over-mixing the ingredients, since mochi is dense and chewy to begin with. So whisk away! Some recipes even call for mixing all the ingredients, dry and wet, in a food processor all at once, and call it a day. Pour the mixture into your lined baking dish. Cover with foil and bake for 60 minutes. The mochi is done when it is soft and gelatinous but holds its shape when touched. (NOTE: A few people have reported that their mochi did not set. A few notes on softer mochi — using low-fat coconut milk may result in a softer consistency. You may also want to check your oven to make sure it’s at the right temperature. Also, if you want extra insurance, you can add another 1/4 cup mochiko flour to the dry ingredients, which should result in significantly firmer mochi., If you’ve already baked it for an hour and it doesn’t appear to be set, raise the temperature to 300° F and remove the foil. Bake for an additional 10-15 minutes, uncovered. Also, note that even if it’s soft and gel-like when it first comes out of the oven, the mochi will set as it cools.) Let cool completely or overnight. Dust a surface with your starch (alternatively, you can simply use more mochiko flour) and turn the mochi onto the surface. Sprinkle starch over the mochi. Wrap a knife in Saran wrap to prevent the mochi sticking. Using the wrapped knife, cut the mochi into small pieces, then dust again with starch or flour, and serve!

Recipe adapted from Food52