Hey Everyone,
Here is a briefing on what we learned and did during our first class of rigging.
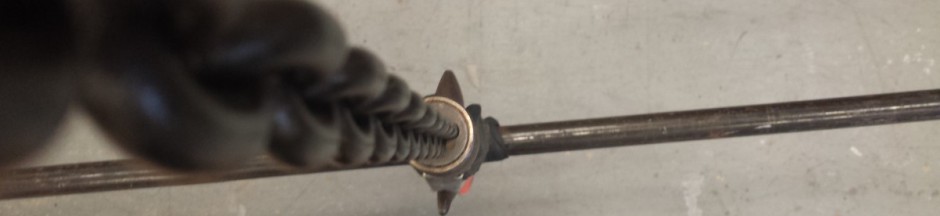
We started off learning the Square Knot, also known as the Reef or Thief Knot. To practice with your tieline you can take the two ends, place the right side over the left, loop it, place the left side over the right, loop it, and secure the knot tightly. Make sure you do not loop the tieline left over left –> left over left , or vise versa. This can actually create the Granny Knot and the two extensions would be perpendicular rather than going along the line. The Square Knot is best used to hang objects that aren’t going to be moved a lot. It can create on and off tension on the line and loosen or cap-size the knot, which is a bad thing. It needs to constantly be monitored for safety precaution. In addition, we learned that rope becomes a “line” when you cut it for a specific job or purpose.
Here’s a link to the animated knots website for the Square Knot. McCullough suggested we practice all the knots we know 10 times a day until we can do with our eyes closed. He also explained when you practice you “do it, evaluate it, and modify it.”
http://www.animatedknots.com/reef/#ScrollPoint
We moved along to “What is Rigging?”
From different answers given in class, we summed it up to “any materials or persons in the air that are being flown in and out of the stage.”
Next we were introduced to the 4 K’s of Rigging
- Know the System. Research and check out the system you’ll be working with.
- Keep it in good working order. It needs to have regular inspections and/or replacement. Also, know when it’s damaged or worn out.
- Know how to use it. Know what it’s meant to be used for and what’s it not meant to be used for.
- Keep your concentration. “When rigging, think about rigging.”- John McCullough ; You need to concentrate on what you’re doing in the moment, no distractions. The seriousness of the subject should be equivalent to the seriousness of consequences.
Following the 4 K’s of Rigging, McCullough told us another focus is on Rigging Safety.
As a class, we made a list on what to focus on concerning safety.
- Codes and requirements.
- Capacity of equipment.
- Space, size, and position of the objects.
- Type of equipment.
- Load- we need to know how much it weighs and where is/isn’t it safe to attach it.
So the focus for safety is on equilibrium- all of the forces on a load balance each other out. With every force bouncing out, we want to make sure our system is “strong enough” to support it.
We also made a list to know how to find the weight of an object
- Specification Sheets
- Fish scale or home scales for small objects
- Measure, calculate, or look it up
This lead us to the math part. We reviewed Newton’s Laws of Motion:
- If an object is at rest, it stays at rest. If an object is in motion, it tends to stay in motion.
- Force=mass*acceleration (F=m*a)
- Every actions causes an immediate reaction.
Then, we participated in a class lab where students had to measure a sandbag and the weight of the sandbag unto a pipe
.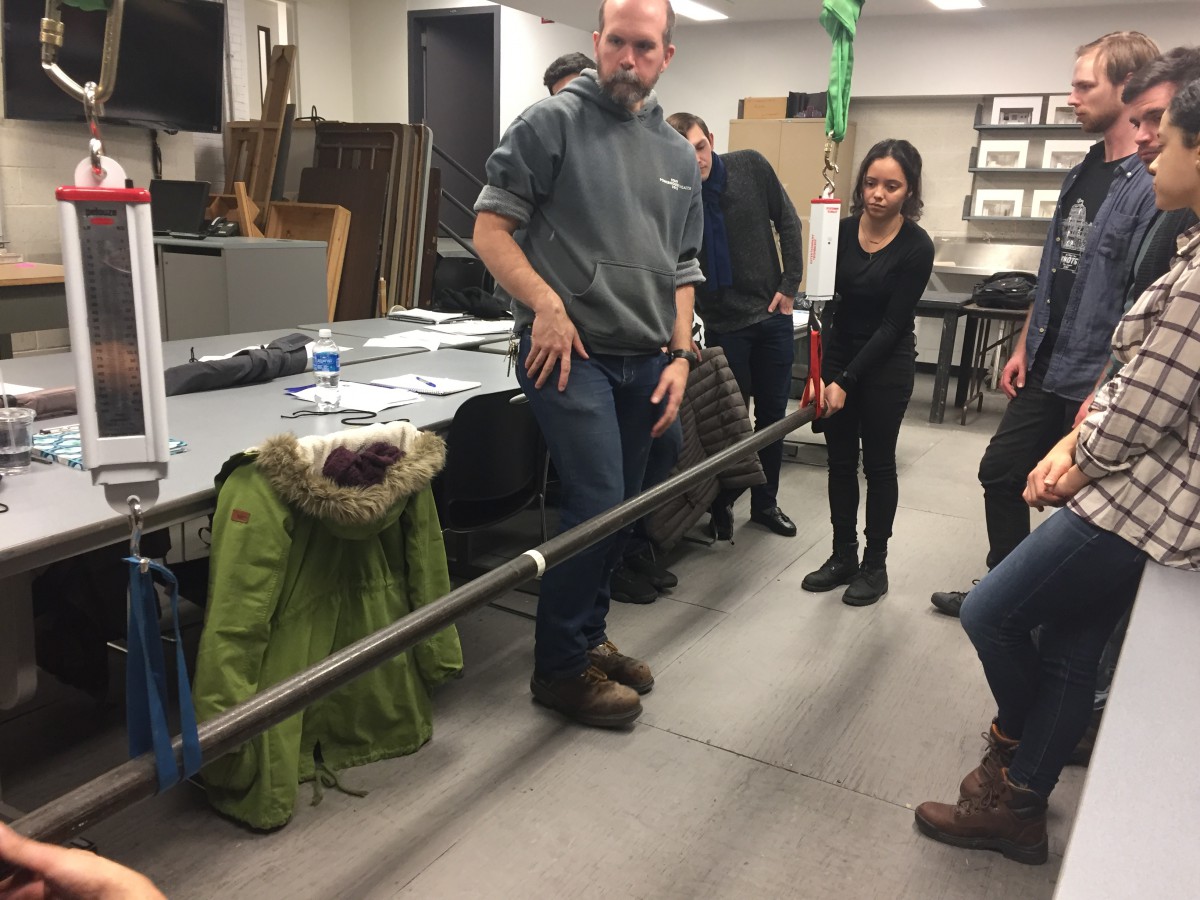
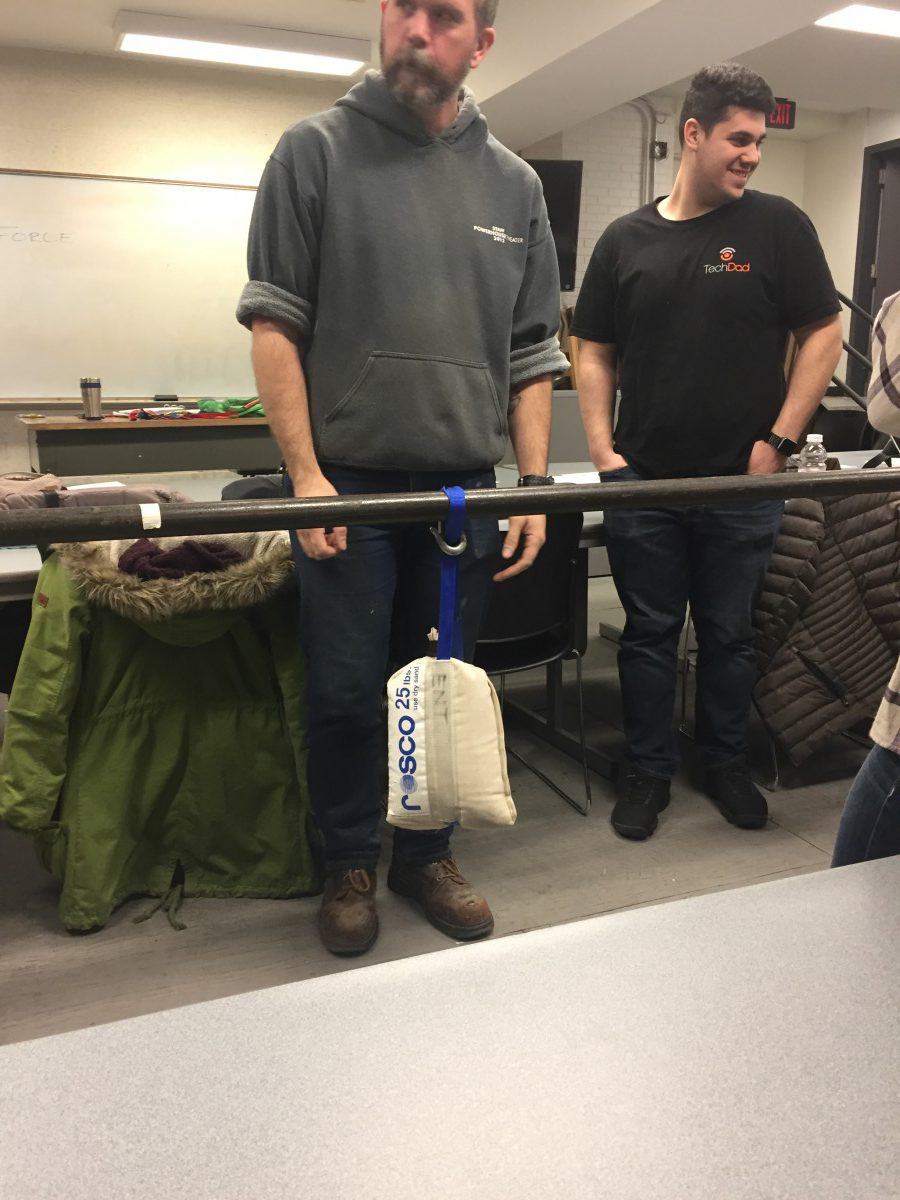
We concluded that the location of the sandbag affects the scale on whichever side it’s on. If it’s 3/4 to the right then the right scale has about 3/4 more weight added.
Then, we learned how to draw a free body diagram. A Free Body Diagram uses symbols to show how our forces and loads relate to each other. Remember that any distributed force (can be cables, lights, speakers, curtains, etc.) is drawn like a brick bar.
We continued onto the sum of vertical forces, sum of horizontal forces, sum of moments (twisting forces). The formula for moment is Moment=F*d(perpendicular) The d represents distance.
Math Problem
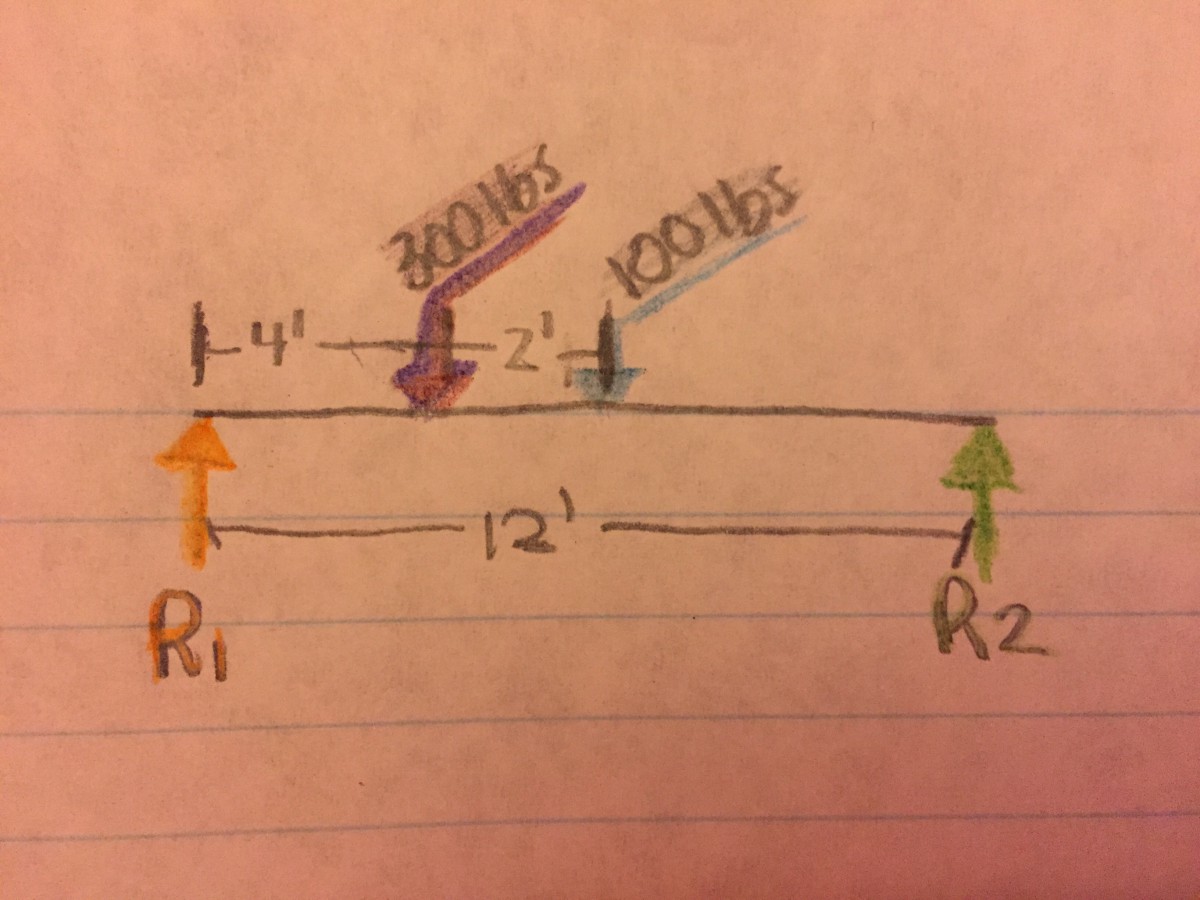
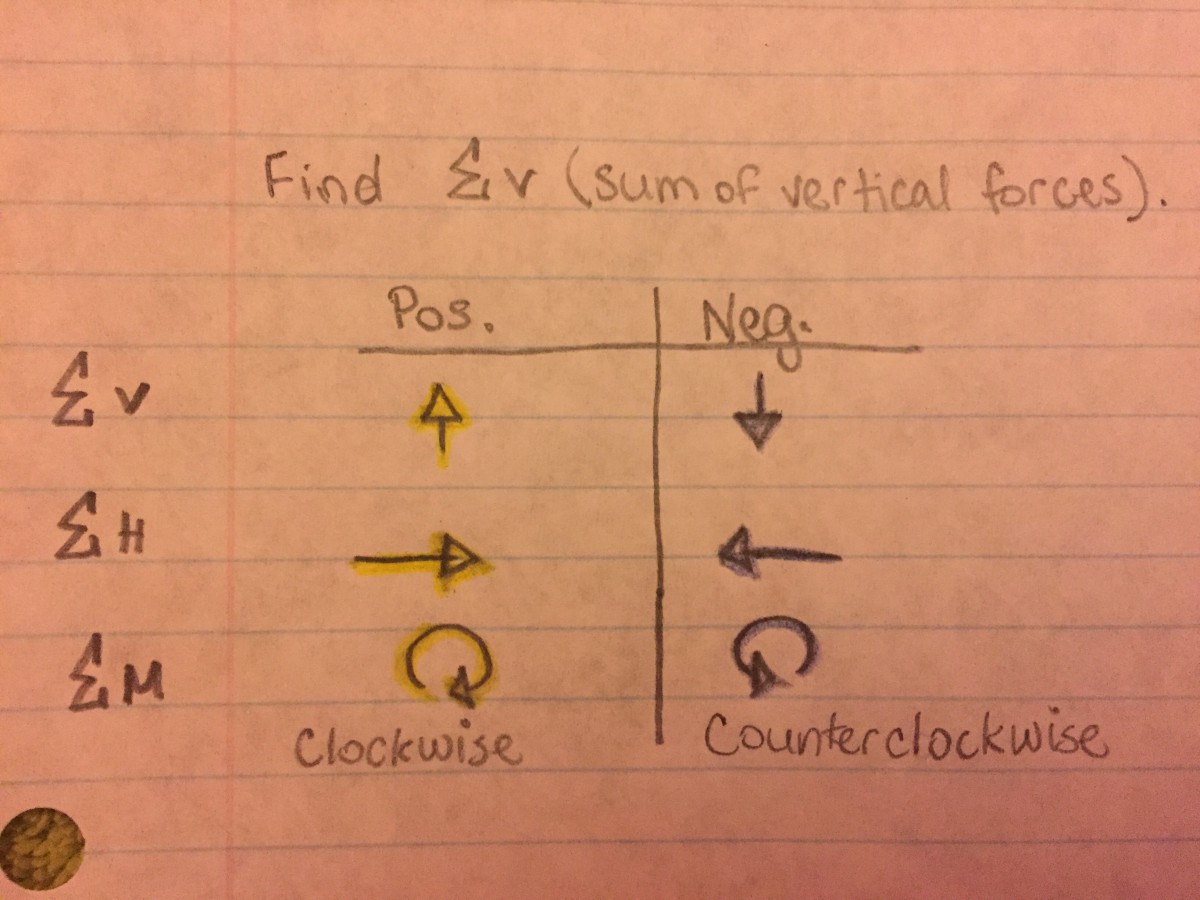
As you guys can see, I redid the whole problem with color. The math problem was a bit shaky at first for me too, but I hope the colors and my explanation helps as I go along with how I think the problem got solved. If anyone sees any errors, please point it out for the sake of all of us passing this class. On the left photo, you see arrows. Keep in mind throughout this whole process that those arrows represent the direction of the force and that we’re focusing on twisting forces (sum of moment). So that means that the forces are either moving clockwise or counterclockwise and we will have a pivot point to reference from.
So our goal was to find the sum of the vertical forces. On the right side, you see a picture that demonstrates which direction would be considered positive or negative when we solve for these forces. The last one, sum of moment, is what we’ll focus on. Bare with me.
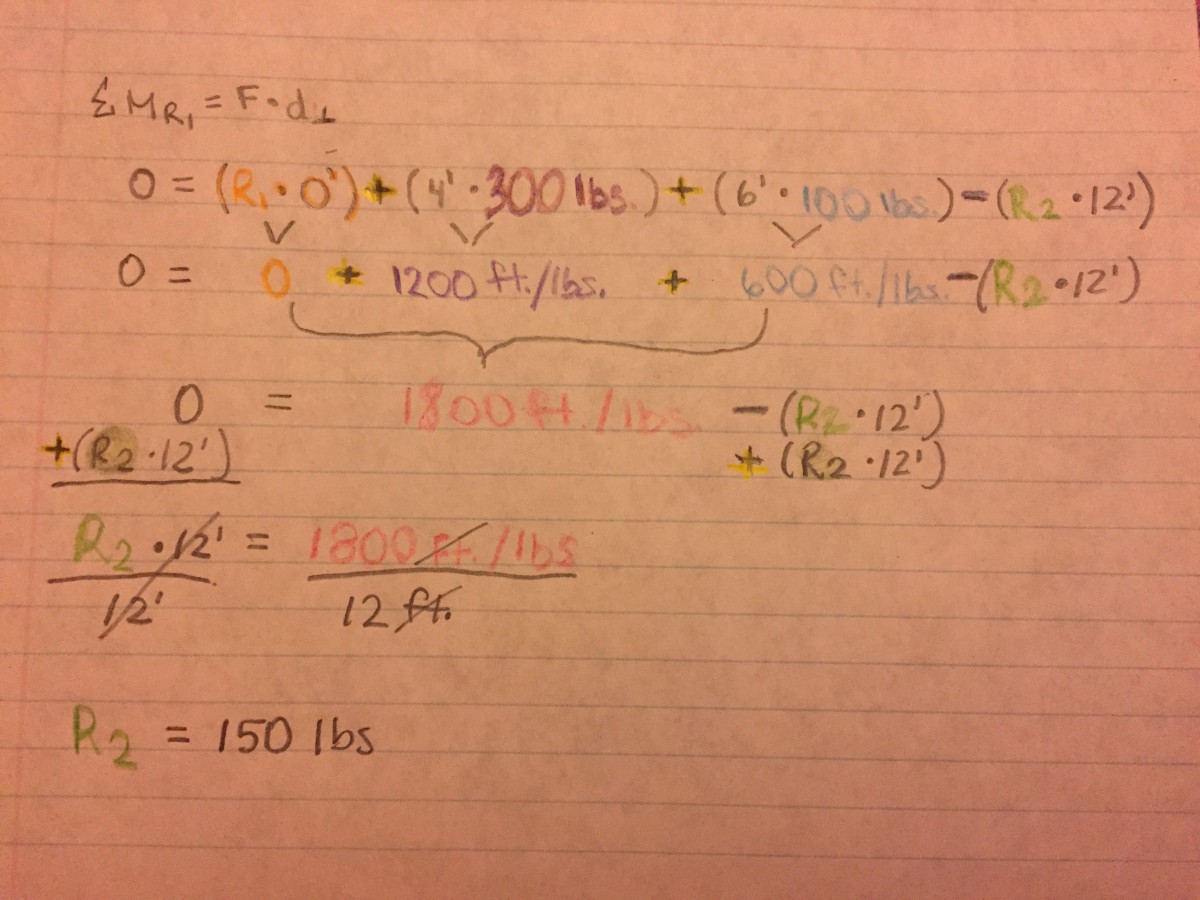
In order to find the sum of vertical forces, we must find the sum of moment for R1 and R2 individually. As you look unto the picture on the left, you can see that we have more information to plug in numbers for R1. Remember the formula for moment is F*d(perpendicular).
I apologize you can’t see the photo as clear as it is on my phone or the colors, but I’ll keep explaining the process. I’ll bring the sheets to class with me next Tuesday, if anyone needs to look over it to understand it more.
R1 becomes our pivot point and starts at 0′-0″. We have two objects: one that is 4′-0″ away from R1, weighing 300 lbs., and another that is 6′-0″ away from R1 weighing 100 lbs. Then we have a pipe of 12′-0″.
So our equation starts off being equaled to 0.
0= (R1*0′) + (4’*300lbs) + (6’*100lbs) – (R2*12′)
What did we do here? We simply followed the formula for moment, multiplying the force with it’s perpendicular distance.
How did we know whether it was positive or negative? Due to the direction (the arrows) the force was going, keeping in mind that R1 is the pivot point and we’re focusing on finding the twisting force.
As we went along with solving the problem. We came to this point:
0= 1800 ft./lbs -(R2*12′)
R2*12′ = 1800 ft./lbs
R2= 150 lbs
We wanted to make sure there weren’t any more negatives around, so we added (R2*12). This canceled out the negative on the right side of the equation and becomes positive on the left side of the equation. Then to solve for R2, we needed to isolate it. Therefore, we divided 12′. On the right side, the feets canceled out each other, leaving us with only pounds (lbs). We concluded that R2= 150 lbs.
You would think we would be finished there but wait, there’s more!
Side note: I realize now that I didn’t have to rewrite the problems with color because I could have just explained all this by typing it out. Since, I already did all that work, I’ll still be showing the photos.
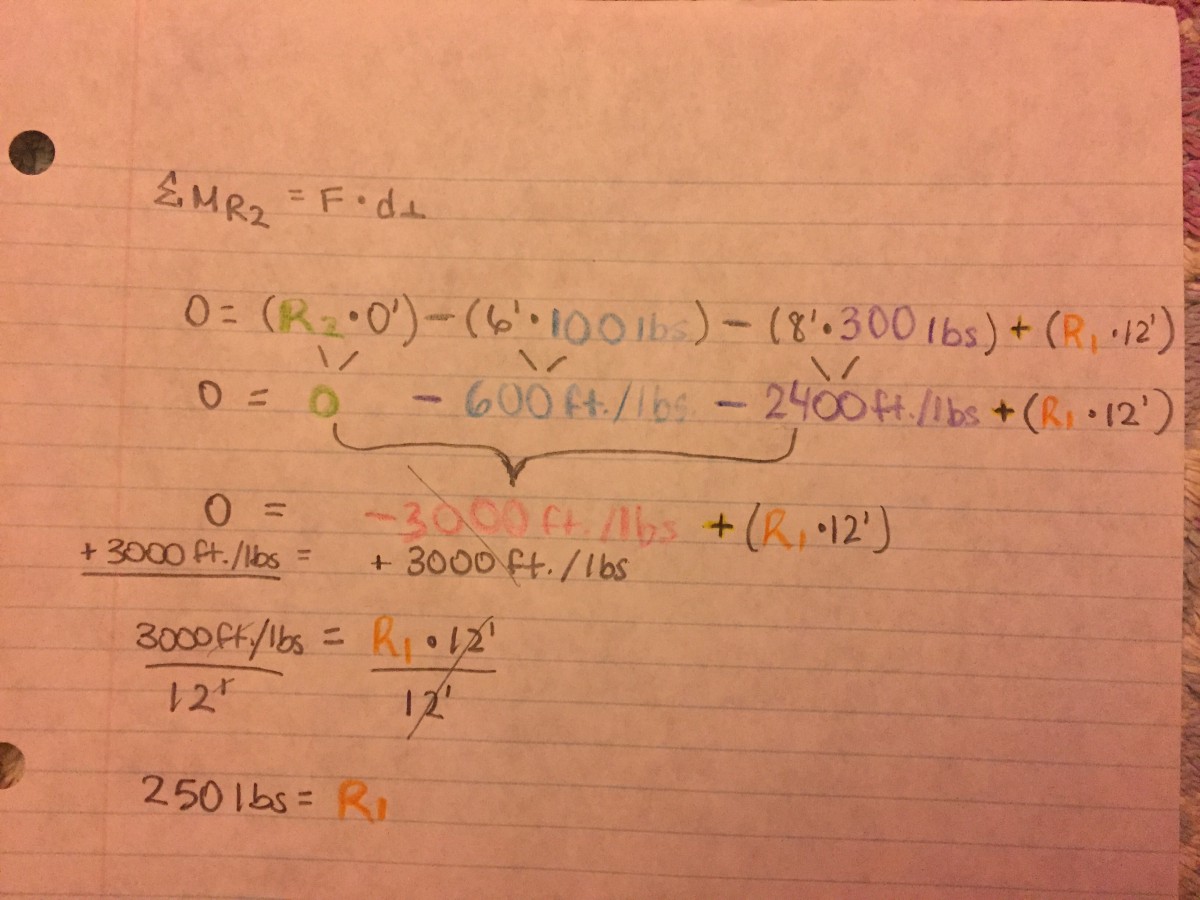
R2 becomes our new pivot point. Our equation becomes:
0=(R2*0′) -(6’*100lbs) -(8’*300lbs) + (R1*12′)
How did we get 6′-0″ and 8′-0″? The distance from R2 (our new pivot point) and the first object is 6′-0″ weighing 100lbs. The distance from R2 and the second object is 8′-0″ weighing 300lbs. The formula for moment is force * perpendicular distance.
We came to this point in the equation:
0= -3,000 ft./lbs + (R1*12′)
3000 ft./lbs = R1 * 12′
250 lbs. = R1
Remember that we want to get all the negativity out. So that’s why we made -3000 ft./lbs positive by adding it on both sides of the equation. Then to find R1, we needed to isolate it. We divided 12′ on both sides, feet cancelling each other out, resulting in our answer that R1= 250 lbs.
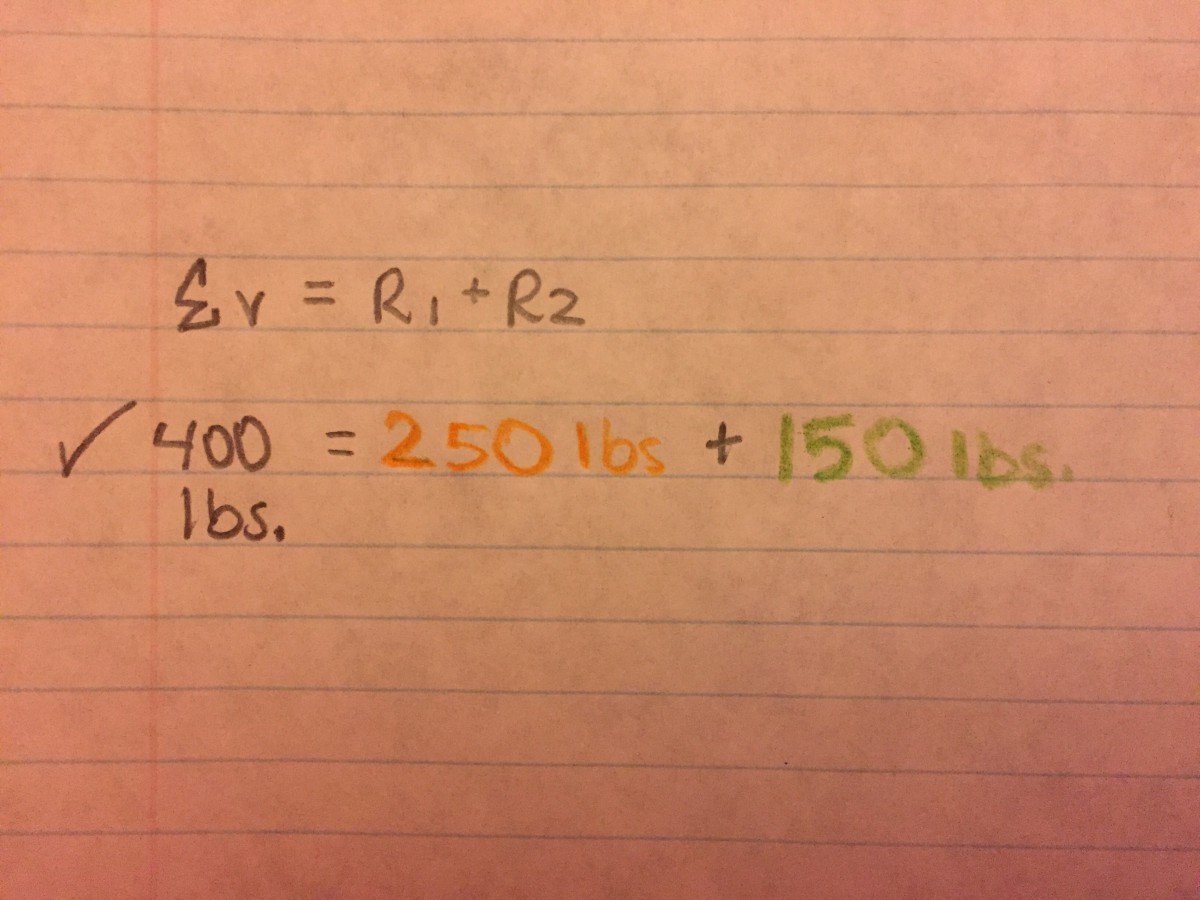
To double check this is correct, we solved for the sum of Vertical Forces. We basically just added R1 and R2 and the answer was 400 lbs. If you scroll up to our first photo, you will see that 400 lbs is exactly the amount of weight that is shown.
Thanks for your patience and baring with me. I hope this really helps a lot of you. Don’t be afraid to ask questions because we may all need some more clarification on certain things.


Thank you so much for the work.
Thank You Natasha, this is very helpful.
would you happened to have note on the steps on solving the formula because im a little shakey on it.
No problem. I added a math section for everyone if you want or need to check it out.
Your sum of the vertical forces section is a little bit off. You need to include every force acting on the object, not just the reactions. You add all of the loads to the reactions, and the total should be 0lbs. See pages 5-7 of the Stage Rigging Handbook for some good examples.