2-Day Photoshoot of Products & Models (#07)

COMD 4900 Internship

When meeting with my advisor this week, she really liked the logos I had edited and changed the prior week. She liked them all and said that one would definitely be used. I am also realizing now from the weekly meeting that is always good to have research/notes to have when meeting and presenting. For the past 3 weeks, I have been giving and showing my research/notes to how I came up with each weekly work. This allows my advisor to gain a better understanding of my work and thought process. The first couple of weeks of the internship, I was just presenting work and was given feedback. But by showing my research/notes, it helps explain my work. It gives me and my advisor more dialogue, as well as makes it easier to come up with a solution.

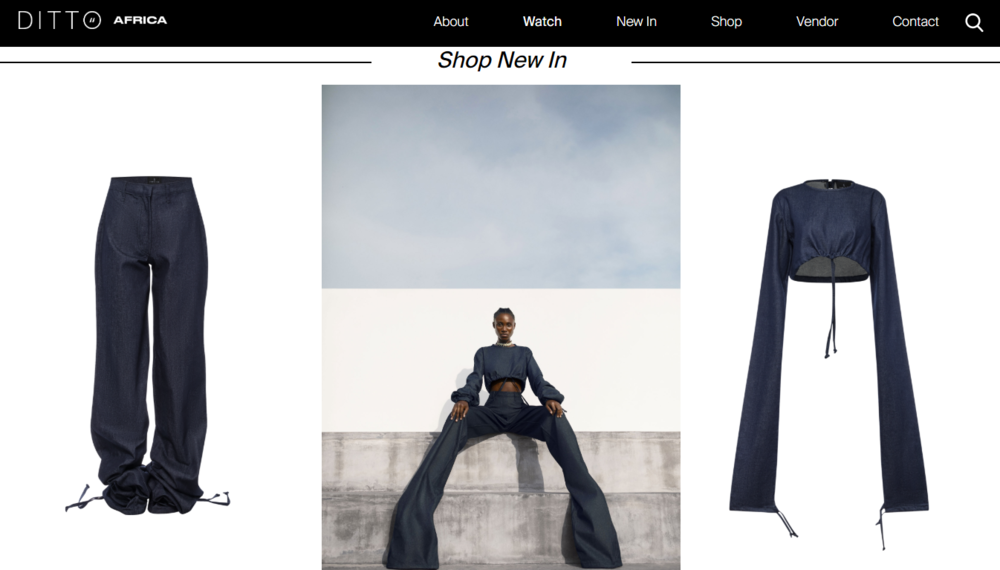
This week, I had a 2-day photoshoot on the weekend. The photoshoot was for their upcoming collection. I took photos of all their products and models modeling them. This was a very new experience for me because I wasn’t used to doing 2 day shoots that’s were both all day long. Each day I took product shots first the first half, and then model shoots for the second half of the day.

It was a little challenging for me as well because taking the product shots became difficult. I had to take so many shots of the same product but I had to keep changing how the product was laying. This was because I was trying to find the perfect way for the clothing to lay. I knew the photos were going to be cropped into a box shape because that is how Instagram feeds shows photos. I spent a lot of time changing the layout but eventually would figure out the perfect layout for each product.

Another issue was trying to get the best lighting to show the true color of the products. The products had very distinct color washes and weren’t basic true colors like red, green, or blue. I had to get the details in the color of each product while trying to balance the lighting intensity. The lights themselves were not the problem, they were very good and showed natural daylight. The problem was when shooting the products, the shots came out making the products look too vibrant and not true to the actual color. But when looking at the products without the camera lens they looked perfect. Eventually, I realized the best and fastest way to fix that would be to fix the coloring in post-editing in photoshop. I had to be quick because we were running on a schedule, the models were going to show up at a certain time and I had to be finished with the product shots before then on both days.

https://www.squareshot.co/post/how-to-plan-a-photo-shoot-for-your-clothing-brand

Shooting the models was a lot less complicated than the product shots. My advisor told me how she wanted the model shoots to look and how she wanted the models to style the products. All I had to worry about was lighting and getting the true color of the products while still making the models look normal. This was not a challenge and went smoothly on both days.

Post experiencing a 2-day photoshoot, I now know how mentally prepared you have to be because it usually will never go perfectly and there will always be a problem or two you need to fix that you were not expecting. But that is part of the job (internship), you need to be a quick thinker and problem solver that will somehow always figure it out. That is a trait that will make you stand out from everybody else who doesn’t have that trait.

The 2 day photoshoot was definitely a little stressful but it was the first time I experienced it, and I didn’t have the right mindset when first starting. I thought it would be like a 1-day photoshoot and be more straightforward. But now that I’ve experienced a 2-day photoshoot, I know it’s more of an experience and project.

Continuing creating Logotypes (# 06)

COMD 4900 Internship

From last week’s work, I met with my advisor and was given feedback on the logos she liked. She requested for me to continue working and with the feedback, I knew what to improve on.

From the last past weekly meeting with my advisor, I knew I had to aim for the logo to give off a unique and excitement feeling. Something that isn’t like your typical classic fashion logo.

I first did research on Avante Garde logotypes because I needed to find odd and unique logotypes for reference. I used the references I found as inspiration when editing my logos so I could have a better understanding of the Avante Garde aesthetic. I gained an understanding of the mindset and perspective of Avante Garde logotypes. With the references I found there were a lot of correlations between each one, they all had a unique quality but all were fun and exciting. They all had a very organic aesthetic because they didn’t resemble or replicate any logos I saw prior.

I as well thought about the details behind the logo. Meaning I knew that this logo was meant to be for their spring collection. So I tried to edit the logos with that mindset so they were more warm and vibrant in detail. Spring is when it starts to get warm again and everyone is in a brighter mood because of it. So I tried to replicate that spring feeling into the logos.

https://www.behance.net/gallery/5438211/Avant-Garde-Logos

I cannot show or go into the exact details I did for each logo due to my NDA but in broad terms with the references, I edited each logo by making each letter unique. I did this in photoshop by using the shape and marker tool. As well as creating an outline to add a cleaner look once finished. I also made experimented with making 2 versions of some by making the second versions 3D like they are popping out at you. Each letter needed a lot more leading between each other because editing them caused them to become a lot wider.

All logos had no color, they were simply black and white. This made me gain a better sense of the positive and negative space to gain the perfect balance. Once finished or midway thru editing I would stop working on it and try to not think about it. I would do something else for a while and then come back to it and look at it from very far away to get honest genuine self-feedback on the logo. I would give myself some time so I don’t view them from the perspective of just creating it and thinking it’s amazing. Allowing time to pass let me gain the perspective of a critique, not a creator. I as well would look at the logos from afar, zooming very far out to see how legible and clean-looking they are as if it was in real life.

When knowing what the design is being used for prior to creating, you can start to understand the perspective of it in real life. This is crucial because when creating and editing graphic designs it will never look exactly how it looks than because you are zoomed in and are looking at it on a flat 2D screen.

Continuing Clothing Label Work (# 04)

COMD 4900 Internship

At my last meeting, my advisor gave me feedback and told me the labels she had liked the most. From the 30 variants originally created, she gave me her top 10 favorites. With the feedback given to me on what she would like me to alter and improve for each label, this week I have been updating her top 1o favorite labels. I had to change the layout and placement for most of the labels because my advisor wanted the focal point to be somewhere else from where I had it in each label. I also changed the colorways a little for each by enriching or dulling the colors. I can not go into detail explaining what I did for each label due to my NDA.

In broad terms, I as well used different colors, fonts, and font treatments. Throughout the experience of it, I realized how important color is when it comes to making clothing labels. The background color can make or break the label by either helping or hindering the font of the text.  You always want the text to pop and not be subtle because the text is what is most important on the label. 

I had to also keep in mind while creating these label designs how they look in real life, the size of the text and quality of how their labels look in person is completely different from when designing. In previous weeks when meeting in person with my advisor, I was given their old clothing label so I can see how the print quality is. I realized that these labels are not printed but woven meaning it is being stitched and not printed. This made me then realize that the design required a font with a weight to it but not too much weight because they wanted the label to resemble their logo as much as possible. 

My advisor gave me a couple of references of other clothing labels she liked so I can get a clearer visual of the aesthetic my advisor wants the labels to have.

www.linxcorp.us/woven-clothing-labels/