BoByBot (12/2/14)

Objective: We shall be testing out our robot. (BoByBot)

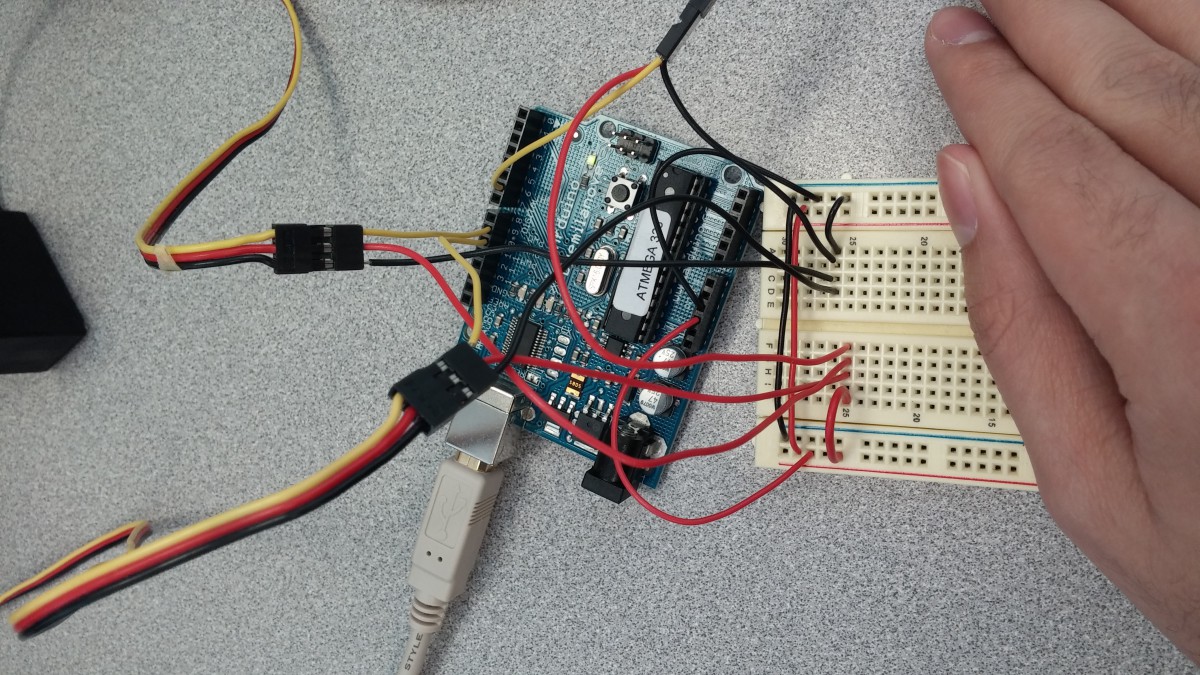
Materials: Bread/Arduino board, screw drivers, pliers, chassis, 3 wheels, batteries and an android smart phone.

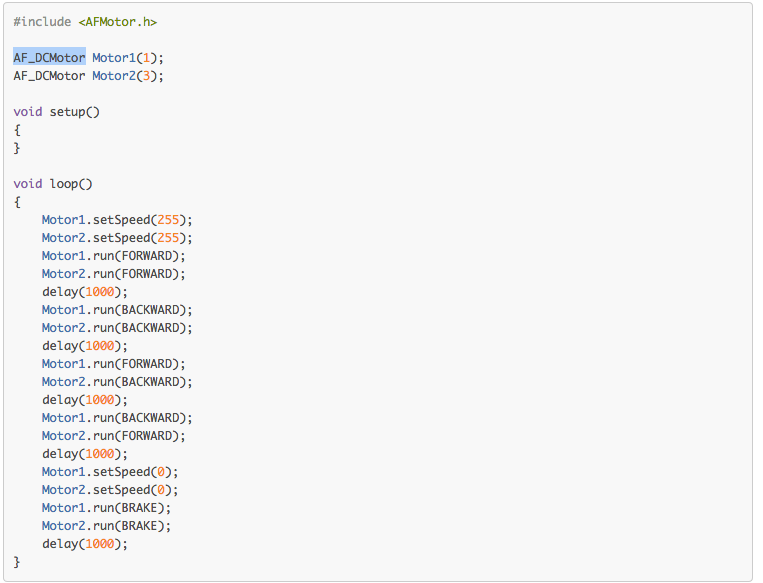
Methods: We connected everything together. (Bread/Ardunio board, wheels to the chassis). All so we could test it our robot. We also tried wsad commands. W being foward, S being reverse, A being left and D being right.

Data:

Results: We had the wheels reversed by mistake and that is why are robot wasn’t working correctly. So, then when we switched them around, and our robot worked fine, for awhile.

DiscussionWe will try and work on fixing the controls so it moves correctly.


Posted in Uncategorized | Leave a comment

BoByBot (11/25/14)

Objective: We got are chassis today. We are trying to connect the breadboard, ardunio boards to the chassis. And also try an test out the motor, to see if it works.

Materials: The chassis, screw drivers, cables, wire cutters, arduino/bread boards, the motor, and an android smart phone.

Methods: We installed/included the AFMotor.h library.  (Code for the motor)

We held up the chassis when we tested the motor so when the wheels moved so the chassis would not roll off the table and break.

Data:

Screen Shot 2014-11-25 at 10.34.14 AM

Results: We tested out the motor and it worked. We also found out after testing it a few time that the max speed you can set it to is 255, and when you dont start it the speed is 0.

DiscussionFor next class, we shall be putting in batteries, and testing the motor and a few of the other features.

Posted in Uncategorized | Leave a comment

Moving Light/Robot

Objective: Make the lid of the box in preparation for building.

Materials: Computer, Makerbot, Clear Filament

Methods: Download the right box lid from Thingaverse and place it into the Makerbot software. Adjust the dimensions to fit the already existing box then click print.

Results: Lid printing.

Posted in Uncategorized | Leave a comment

BoByBot (11-20-14)

Objective: Find out how to send data from the phone to the serial monitor.

Materials: Computer, Arduino Dualmilanova , Bread Board , Smart Phone , Red Yellow Black Wire , Wire cutters , Internet , LED Light.

Methods: For today we tested the bluetooth module on the Arduino board. Also tested the Arduino application on the smart phone. We tried a different application this time. Because we were having trouble with the last application we tried using. So we tired The blueterm app. Which we attempted to use to activate the LED with.

Data:

Screen Shot 2014-11-20 at 11.51.22 AM

 Results: We were able to get the LED working while using the Arduino softwear on the computer. But when we tried to get the LED work (light up) while using the smartphone app (The blueterm app) it was not working for us. Then we figured out the txd and rxd wires were reversed, so once we switched them it leaded to Success.

Discussion: For next class, if the parts we ordered (the Magician Chassis) comes by tuesday, we will work with it. Otherwise we will be working on/with the motor driver, if the chassis doesn’t come on time.

Posted in Uncategorized | Leave a comment

Air Hamster Lab #2

Objective: To get further in the idea of the making.
Materials: Computer, Nintendo Sensor Bar, Wii Remote, Screwdrivers.
Methods:
(Andre / Baker) Deconstructing:

-Taking apart the Sensor Bar
-Total of 6 Screws
-5 LED Lights on each side
-Plug is soldered into wire
-2 Infrared Cap filter
-Snip the black tape covering the wire.

(Suly) For the programming:
No action done
-Working with the arduino Lily Pad to connect with the sensor bar wiring.

(Matthew) For the designing:
Found a gun handle design to construct and modify.

http://www.thingiverse.com/search/page:6?q=gun&sa=

Results:
The sensor bar has wires and lights that can be reconnected into the arduino to be able to work.

Posted in Uncategorized | Leave a comment

BoByBot (11-18-14)

Objective : Testing Bluetooth module on Arduino

Materials : Arduino Dualmilanova , Bread Board , Smart Phone , Red Yellow Black Wire , Wire cutters , Internet , Motor Shield.

Methods : For today we tested the bluetooth module on the Arduino board. Also tested the Arduino application on the smart phone. We attempted to activate a LED with the application.

Data : 

Results : We were able to send message from the serial monitor to the application on the smart phone( The application is called ArduDroid). Unfortunately we were not able to send out any data from the phone.

Discussion : For next time we hope to be able to send data from the phone to the serial monitor.

Posted in Uncategorized | Leave a comment

Darya Dubouskaya: Lab report#1

Objective: For this class my goal is to  make my LED strip works.

Materials: Transistors, power adapter, LED strip, arduino, solder station, wires

Methods: At first we need to discuss with crew our project and come up with one idea for functionality and interface. Then we made a list of next steps for each member of a crew. My main goal for this class is to choose correct power adapter and wire it to Bboard for easily work with all other components. Led Strip need 12V. I found a power adapter with the same Voltage. Then I cut the adapter’s wire and soldered power and ground components to the simple wires that will be easier to use on a BBoard. Also I need to choose what kind of transistors will be better to use with my Led Strip and wire it all together with Arduino.

Data:

Discussion: Now I need to decide what kind of led strips will be better to use. Right now I’m working with just regular led strip. But I found out about addressable ones. Probably they will work for our project better.   

Results: My Led strip is powered right and I can control all leds together. Now I need to find a way to control each of them separate.

Notes: https://learn.adafruit.com/hl1606-led-strip/basic-usage

http://www.adafruit.com/products/729

Posted in Uncategorized | Leave a comment

Interactive Picture Frame: Lab #1

Objective: Have an idea of  the measurements of all pieces involved in this project.

Materials: Photo, Glass, Arduino Uno, Adafruit “Music Maker” MP3 Shield for Arduino, HC-SR04 Ultrasonic Distance Measuring Senso Module for Arduino, Male DC Power Plug to 9v Battery Button Connector Cable, Duracell Coppertop 9v Batterie, Speakers(?) and frame.

Methods: Discuss with the group which size will be better to have the photo printed and the glass cut. Research the specs for measurements of the hardware we will use.

Data:

* Photo: can either be printed 5’x7′ or 8’x10′

* Glass: less 1/8 inche thick and 2′ 0r 3′ larger than the photo

* Arduino Uno: 68.6 x  53.4 mm / 3 x 0.8 x 2.5 inches

* MP3 shield: 69 x 53 x 2mm / 2.7  x  2.1  x 0.8 inches

* Ultrasonic Sensor: 45 x 20 x 15mm

* Battery: 2.2 x 1.6 x 0.8 inches

* Male DC Power Plug: 2.1 mm x 5m, Cable Length : 12cm/4.7”

* Speakers: roughly 2 x 2 x 1 inches

Discussion: Based on the size of the school 3D printer, we still have to decide the size of the frame and, therefore, the size the photo will be printed and the glass cut.

Results: It seems like our best option is to build a hollow frame to accommodate all the hardware.  The length and width of the frame will be determined based on the school 3D printer constraints.

Posted in Uncategorized | Leave a comment

Hamster Sphere Lab #1

Objective: To find out how to start to make a Hamster Sphere hover.
Materials: Computer, Blender Software, Processing Software, Arduino Software.
Methods:
-Searching all over the web for information.
-Searching for Sphere models
-Found blender model UV Sphere
-Searching for Wii Remote tracking code
-Found how to digest and hack a wii remote

(Suly) For the programming:
Links that can help:
http://www.cs.cmu.edu/~15-821/CDROM/PAPERS/lee2008.pdf
This link is to read about how to hack into a Wii Remote.

http://www.instructables.com/id/arduino-controlling-helicopter-arducopter/
This link is to read about how to set up the circuit board for the Arduino.
The arduino code will work best with ‘Fade’ Code

(Matthew) For the designing:
Found a UV Sphere template and made a mesh wireframe.

Results:
-Have the outer design for the Sphere
-Arduino code to test using ‘Fade’ example to be able to “hover and land safely.”

Posted in Uncategorized | Leave a comment

BoByBot (11-13-14)

Sample for Robot

Objective: Testing Arduino with motors

Materials: Arduino Dualmilanova , Bread Borad ,  2 Servo Motors , Red Yellow Black Wire , Wire cutters , Internet

Methods: For today we test to see if the servo motors on the Arduino. First we loaded up the example code on the Arduino software called sweep. Which controls 1 servo motor, we then added another motor, and tested if it worked. We then added a third motor.

Data:

Screen Shot 2014-11-13 at 11.38.39 AM1113141104

Results: The code worked with the first motor , we then adjusted the code so that it would controlled the second motor, then we added a third motor and adjusted the code again. The code worked for all three motors. The motors each have three wires, the Red is power, Black is ground and Yellow is for the signal(for controlling each motor). For our project we will need to use PWM(Pulse Width Modulation) for the signal.

Data: 

Discussion: For next time we hope to have the equipment to start construction on BoByBot. And also understanding the code for the bluetooth module and motor shield.


Posted in Uncategorized | Leave a comment