Contents
Overview:
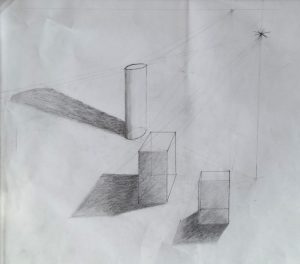
To draw believable cast shadows using one and two-point perspective.
Due Date: xxxx

Instructions:
- Find two boxes and two cylinders to use as still life objects. Use either your phone light, a flash light or desk lamp to light these objects in a simple still life.
- Make drawings of four different setups following the same procedures for each setup. The four situations are as follows:
- One two-point perspective box lit by a light
- One two-point perspective cylinder lit by a light
- A still life of at least two lit boxes where the cast shadow of one box falls on both the ground plane and wall of the second box
- A still life of a lit box and cylinder where the cast shadow of one object falls on both the ground plane and wall of the second object
- Place four separate drawings on one sheet of 14×17 inch paper. Make a rectangle border defining each drawing. You will use two sheets of paper for a total of eight drawings.
- For each setup make two drawings as follows:
- Light the object/s so you clearly see clear shadows. It may help to draw in a dark room and place your objects on a light surface, like a white piece of paper.
- Quickly draw free-hand the object/s and shadows as you see them.
- Put an X where the light source is.
- Draw a vertical guideline from the light source down to the light’s vanishing point.
- Using a different colored pencil for each shadow corner, draw guidelines from the light source to the object to the shadow.
- Note whether your guidelines match what you saw. If not, look more closely at your setup and make any revisions to your drawing that you see. Do NOT simply change your drawing to match your guidelines. This is an observational drawing.
- Make a second, accurate perspective drawing of your object/s, the light and cast shadow/s, again using different colored pencils for each shadow point.
- Using a 4B or 6B soft graphite pencil, darken the shadows and unlit sides of your objects.
- Upload your drawings, as well as photos of each setup to the Cast Shadows category housed under Student Posts in OpenLab.
Learning Outcomes:
- To understand how to render cast shadows in a 3-dimensional space using perspective
- To discover how cast shadows can be used to create define the 3-dimensional space, as well as create interesting positive/negative shapes
- To practice drawing from observation
Resources:
For resources on the following, Click HERE
- Step-by-step drawings with written annotation
- YouTube videos:
- Video of shadows cast from a box and sphere
- Video of shadows cast from a box and pitched-roof house
- Video of cast shadow bending from ground to wall, with floor lamp
- Examples: Artists and illustrators
- Recording [provide hyperlink] of [date xxxx] class meeting

Checklist:
- Have you made two drawings of each of the four setups, where one drawing is done from observation and the other using perspective rules?
- With the perspective drawings, have you drawn one horizon line and the appropriate vanishing points?
- Have you put an X where the light source is and drawn a line down to its vanishing point?
- Have you drawn shadow guidelines from the light source to the top of the objects as well as from the light’s vanishing point to the bottom of the objects?
- Have you darkened the cast shadows and unlit sides of your objects?
- Have you uploaded your drawings, as well as photos of each setup, to the Cast Shadows category housed under Student Posts in OpenLab.