Table of Contents
Project Overview
COMD 1100 ASSIGNMENT 3— TEXTURE AND VALUE COLLAGE
Theme: Discover, define, and visualize the importance of Texture and Value for all areas of design, while creating a collaged composition in either Analog or Digital format.
Problem: Create one Monochrome Value/Texture collage, choosing either digital collage using photo based visual textures and a gradation of values from light to dark, or one Analog using magazine photos. Collages will show understanding of Monochromatic Value range from Dark to Light, Chromatic gradation from High to Low Intensity, and dynamic use of TEXTURE.
Limits: no representational forms, only using images of the surface of a form’s texture to reveal its identity.
Materials: Magazine photos, Adobe Photoshop, camera/phone, Sketchbook, pencils, colored pencils, 1 sheet Bristol Board 9×12″, ruler/t-square.
Concepts: Value, Texture, Actual texture, Visual Texture, grayscale, achromatic, Monochrome, gradation, contrast, narrow value, broad value, high key, low key, Color Attributes: Hue, Value, Chroma.
Technical Skills: mind map, thumbnail sketching, measuring with ruler, inking.
Learning Outcomes
For the successful completion of this project, you should be able to:
- Practice visual thinking using your own photography and photos collected from magazine.
- Discover and communicate abstract concepts through visual means and writing.
- Demonstrate an understanding the basic principles of composition.
- Demonstrate attention to detail and craft using value range and collage techniques
- Study Texture using hand drawing approaches and rubbings.
- Share each phase of the design process by posting to the class site and providing critical supportive feedback to classmates.
Grading Rubric
Each project will be graded using the Project Rubric. Complete each part of the design process, following the due dates provided in each class meeting agenda.
Design Process
- Discover: Take Photos or Collect Magazine colors, read assignment sheet and research
- Define: Create Value Scales, Study Vocabulary, begin collage process
- Develop: Create Collage: Choose Analog of Digital
- Deliver: Post and Comment
1. Discover
- Read Ellen Lupton chapter on Texture, pgs 52-68
- Research Anne Ryan, Paul Klee and other collage approaches
- For Analog Collage:
- Choose one Hue to create your Monochrome Value/Texture Collage from Primary or Secondary Palette.
- Identify, select and cut a variety (10-15) pages in your color range
- organize by hue, value, texture and color intensity
- When selecting Magazine photos or when taking photographs for Digital Collage find images that include::
- Hue
- Choose one color, from Primary or Secondary Triad
- Tertiary or Warm to Cool range : for example for Blue, find a range from Blue-Green to Blue-Violet
- Choose one color, from Primary or Secondary Triad
- Value
- Light tints to tones and shades of that Hue.
- Chroma or Intensity
- Pure vibrant
- Muted neutral
- Hue
- Write a list of words that represent all of the textures you’ve found, such as smooth, soft, prickly, sharp, rough etc.
2. Define
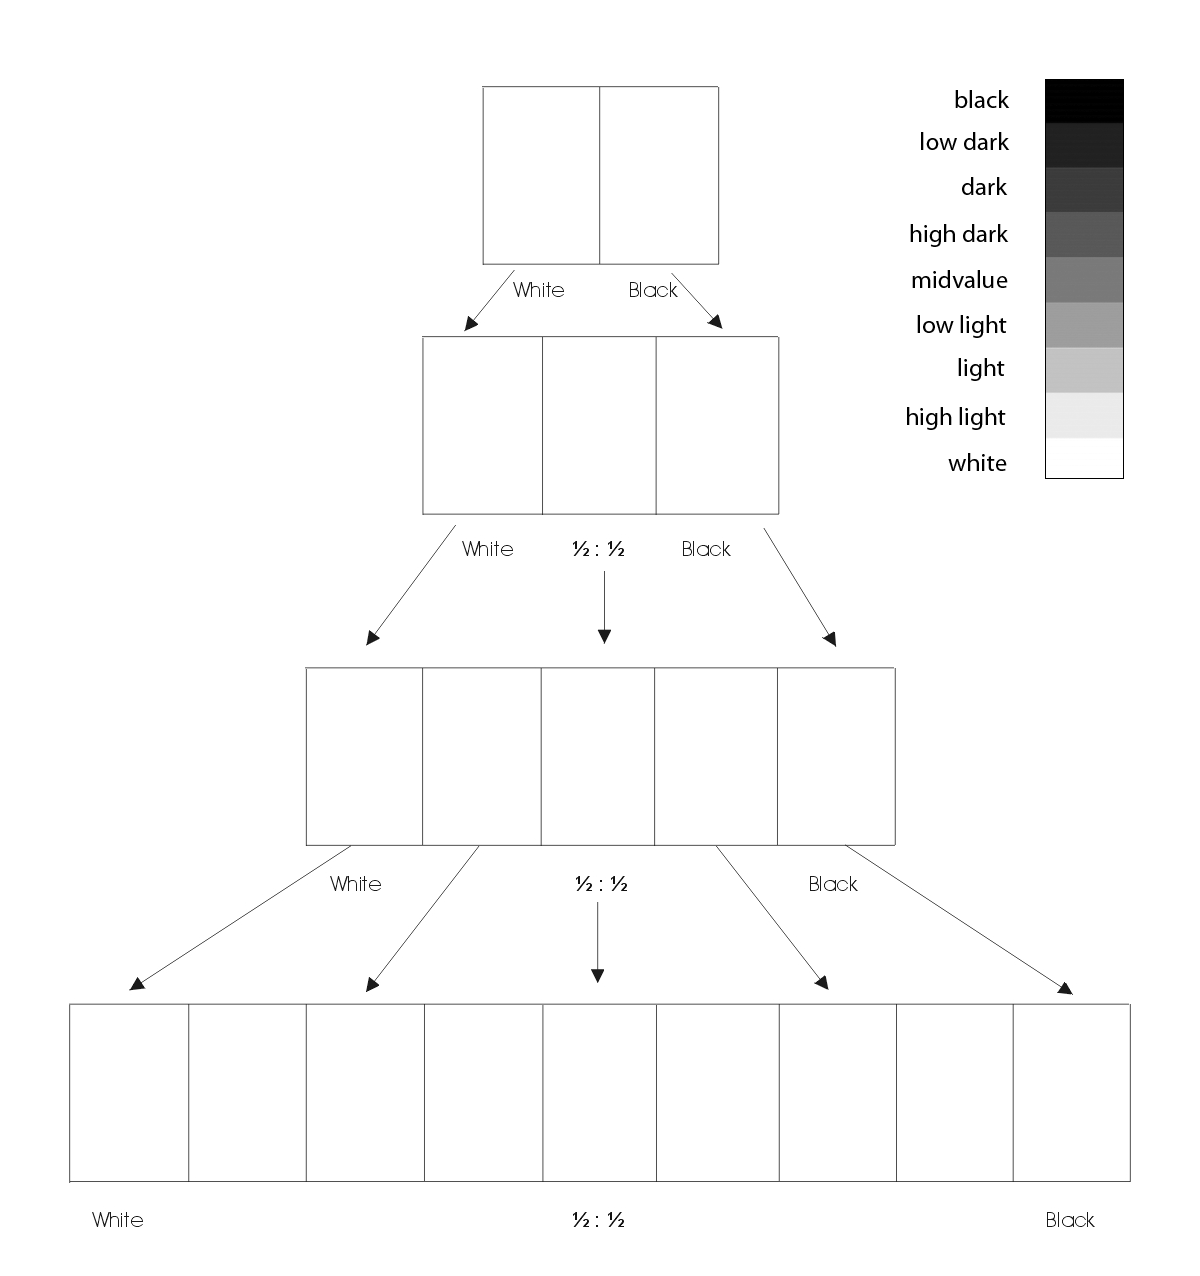
Value Scale
Complete the Achromatic Value Scale using a range of pencils (2H-5B)
- On the handout provided, complete the four scales starting with 2-step (black/white) and ending with 9-step. You can print out or remake your own grid scale on sketch paper.
- Your 9-step value scale should have black, low dark, dark, high dark, mid-value, low light, high light, and white.
Study DESIGN Vocabulary:
VALUE- Design Element; the degree of lightness or darkness in a color (hue) or the steps from white to black in an achromatic (no color) scale or palette.
MONOCHROME PALETTE: One hue from the color wheel, with adjacent blends, tints, shades, tones. For instance, a Monochrome of Red can include red-orange and red-violet, and all tints and shades of those hues.
CHROMATIC GRAYS- gray tones that have some neutral color. In paint, chromatic grays are made using complementary color pairs mixed plus white.
TONE: colors plus gray (mix of black and white) to create neutrals.
TEXTURE— Design Element: the feel of things, the surface tactile sensation; such as roughness, smoothness, gritty, silky etc. ACTUAL texture is a real material surface that has tactile sensation such as sandpaper, cotton ball, vs VISUAL texture, which is a picture – photo or illustration OF a textured surface.
DESIGN PRINCIPLES:
GRADATION- slow incremental change between two elements (dark to light, color to color, big to small shape etc)
CONTRAST: large change in element – big/small, dark/light, long/short etc
TEXTURE — also look for as much contrast in TEXTURE in your photographs. Natural textures, human, manmade etc etc.
3. Develop
TO CREATE ANALOG COLLAGE
Magazine images:
- Organize your colored patched cut from magazine images.
- Arrange in Gradation overall design with flow.
- Glue and overlap, integrating hues, values and textures to a Unified Textural color field.
TO CREATE A DIGITAL COLLAGE
Adobe Photoshop.
- Upload 10 texture photos into photoshop; they will be separate files.
- Open one new document entitled Texture Value Collage
- Use marquee tool to cut and paste small sections of individual texture photos into Collage Doc.
- Collage pieces using GRADATION first and some CONTRAST later in a simple overall design that shows flow, control of transitions, interesting JUXTAPOSITION of textures.
- Use Value range to organize textures.
- You may use layer masks to create more complex interweaving of textures.
Texture/Value Continued: Drawings and Rubbings
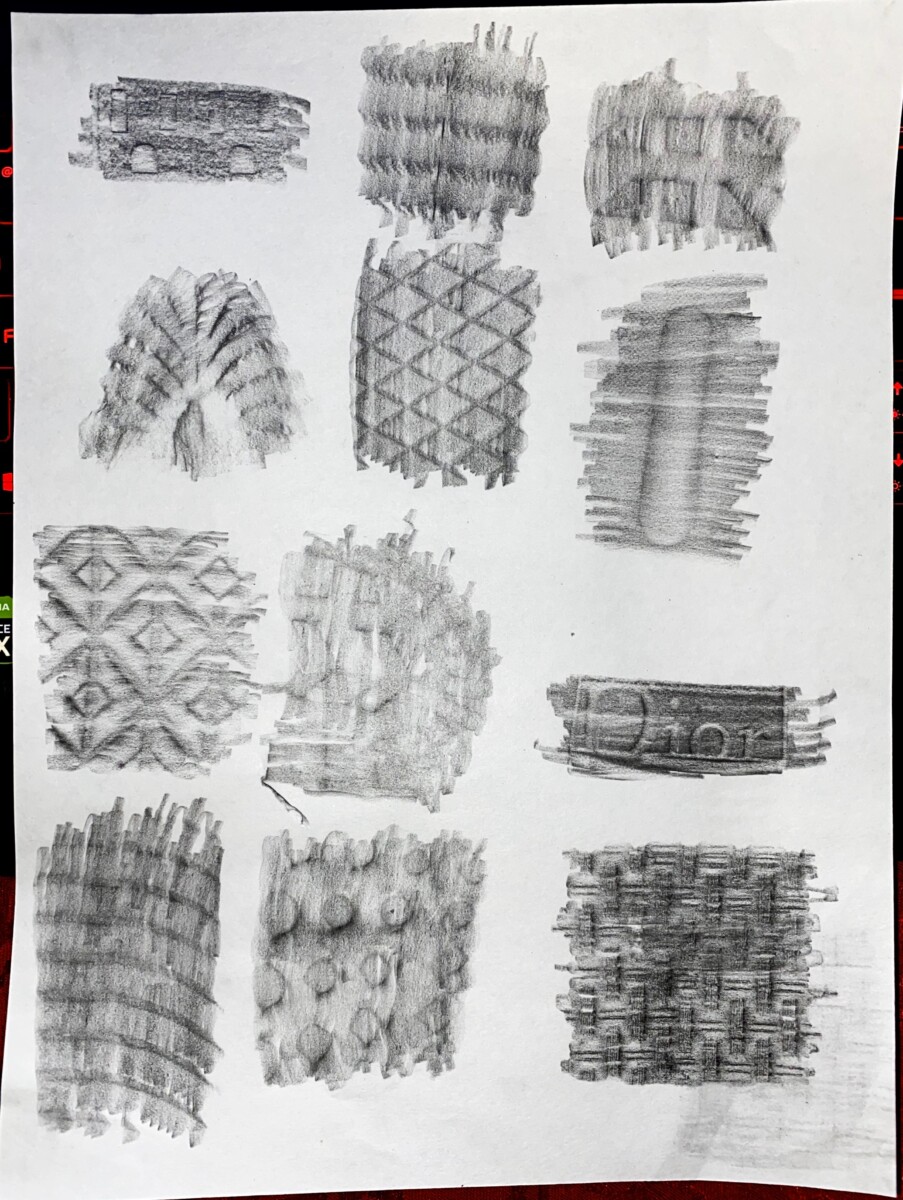

- Create two-three sheets of Textures, first one is rubbings
- Rubbings: Tracing paper and pencil, 6-9 per patches per page until you get 1 good page of large patch shaped rubbings where you can clearly see pattern/textures. You may lightly write underneath what surface you used-optional.
- Using a soft graphite pencil, go around your apartment or out into the world and create rubbings of different textures hand drawn textures from objects. examples; metal gratings, stone, wood, bottoms of shoes, rubber raised surfaces, coins etc.
- Hand Drawn Texture Grid: Sketch paper, create a grid, 5″x5″ with 1″ increments. Fill each square with a different type of drawn texture.
- View Link for ideas. Don’t copy others’ drawings-but analyze and try your own.
- Create 1″x1″ Viewfinder by cutting a page of Bristol or Sketch.
- this can help isolate things you look at for areas of texture without seeing the whole object, such as hair or fur or fabric.
- Use areas of your magazine collage images, other photo sources and real objects with compelling textures. View close up in light to see lights and darks and use value range in pencil, pen to and colored pencil to imitate textural effects.
- Experiment with pencils and pens-stippling, scratching, variety of mark making to create area of textural feel
4.Deliver
Documentation and Feedback
Submitting in your work
Follow the Submitting Your Work guidelines and include the project-specific details below:
- Post Title: Texture/Value Collage and Drawings/Rubbings
- Images: Organize your post to include all content from the three other Design Process phases for this project. Create headings for each phase and include images or a gallery, where appropriate:
- Written Project Reflection: In the Deliver section of your post, document your thoughts about this project. Think about what you learned, what you could have done better (planning, material use, craft), and how you will apply what you learned to your next project. Consider and respond to the comments made in class during the critique.
- Category and Tags:
- Category = COMD1100 Project #3
REMINDER: You will receive a grade and comments from the Professor on this post. Without this post, you will not receive a grade.
Providing Feedback
Part of your Project grade is leaving well-written comments for at least one of your peers. Follow the Providing Feedback for specific guidelines for leaving constructive feedback.Search for:
CREATIVE COMMONS LICENSE
This site is curated and maintained by Prof. Jenna Spevack.
Except where otherwise noted, content on site is licensed under a Creative Commons Attribution-NonCommercial-ShareAlike 4.0 International License.
You are free to share and adapt the content on this site if you provide appropriate credit, provide a link to the license, and indicate if changes were made.
Print this page