Assignment 03 (FALL 2013)

Assignment 03 (FALL 2013)

Description

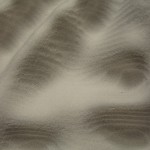
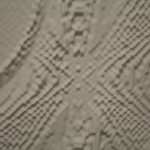
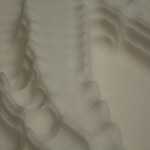
Define a Revolved Surface in a 12″ x 12″ x 12″ volume. Refer to the video below to create your surface. Use the Panel component to describe and comment/label your definition.

Requirements

Create a parametrically controllable revolved surface . Please save your grasshopper (.gh) files to your dropbox folder. Refer to the syllabus for the file naming conventions for dropbox submissions.  These are due before the next class on Tuesday 09/24/13.  Late assignments will receive a grade penalty. Please have your surface ready to and with you in class on Tuesday. We will be using these for the panelization lecture.

Scoring

  • Revolve Surface is parametrically controllable : 25%
  • Fits within the bounds of the volume (12″x 12″x 2″): 20%
  • Demonstrates Proficiency with Tool : 45%
  • Labeling /Organization of Dropbox / Correct File Naming: 10%


Resources

If you want to see what we will be doing with these surfaces you can view last year’s panelization class, you can find the video here:

http://designalyze.com/fab-for-laser-part1

http://designalyze.com/fab-for-laser-part2

Assignment 02 (FALL 2013)

Assignment 02 (FALL 2013)

Description

Define a pattern in a 12″ x 12″ x 2″ volume. You may use attractor geometry or combinations of geometric transformations. Use the Panel component to describe and comment/label your definition.

Continue reading

Week 3 Points + Vectors Video

Week 3 Points + Vectors

This Video introduces the Grasshopper this class covers Points and Vectors. It also covers the point attractors.

Fall 2013 Assignment 01 Math Components

Assignment 01 (FALL 2013)

Description

Using the example files create the number patterns in Grasshopper.  Using the refer to the class video below for a review of the Math components in Grasshopper.

Continue reading

Fall 2013 Week 1 Class Video

Intro to Grasshopper

This Video introduces the Grasshopper plugin for Rhino and goes over a quick example.

Assignment 09

Assignment 09

DESCRIPTION

Refine your surface from Assignment 08 in RhinoCAM. Using your milled “blue foam” surface as a starting point, what changes/refinements would you make?  In this assignment you will be milling your surface out of HDU foam (see material sample images below).  How might this new material affect your design and toolpaths?  Follow the videos provided below and use the Rhino template and CSV tool set file provided on the Course Files page.

REQUIREMENTS

Come to class on May 15st with your RhinoCAM file completed through the roughing and finish toolpaths and a completed toolpath study performed using the InDesign template provided on the Course Files page.  Remember all HDU surfaces/toolpaths must be approved by Professor Ringley before you mill them.

Material example

SAMPLE TOOLPATH STUDY


RhinoCAM Basic 3 Axis CNC Toolpathing Strategy

BONUS ROUND!

Do the Dip!  If you are interested you can modify your surface to use the dipping milling techniques demonstrated by Professor Ringley last week.  Video to follow, but please refer to the documents below.

An expanded CNC toolset for RhinoCAM which includes both the original cutters specified for your 3 axis assignment and the lolli cutters for patterning is now available on our course site:
https://openlab.citytech.cuny.edu/compfab/course-files/

The direct link to is available here:
ARCH3590 SP13 Roland Toolset w-Lollis.csv
As always, verify tool overhang length when loading any tools into the spindle to avoid collision.


Assignment 08

Assignment 08

DESCRIPTION

Toolpath your surfaces from Assignment 07 in RhinoCAM. Follow the videos provided below and use the Rhino template and CSV tool set file provided on the Course Files page. You will be expected to perform a comparative toolpath study for the finish toolpath using a matrix of 3 tool types (3/8″, 1/4″, and 1/8″ ball) and 3 stepover settings (75%, 50%, and 25% of the tool diameter).

REQUIREMENTS

Come to class on May 1st with your RhinoCAM file completed through the roughing and finish toolpaths and a completed toolpath study performed using the InDesign template provided on the Course Files page.

SAMPLE TOOLPATH STUDY


RhinoCAM Basic 3 Axis CNC Toolpathing Strategy


Assignment 07

Assignment 07

Description

Generate surfaces in preparation for RhinoCAM.  Using the image map component tutorial from last week, create two surfaces from images.  Don’t just download an image from the internet, but design one in photoshop/illustrator.  Keep in mind that gray scale images tend to work best and images that have a gradual change in contrast from black to white areas.  Also, feel free to experiment with different photoshop effects and filters.  Hint: you might want to use the Gaussian blur.

Requirements

Come to class on April 24th with your two surfaces and the images you used to create them.  You will be using them in the RhinoCAM tutorial.  Make sure they fit on the template file and that the surfaces fit in a 16″ x 16″ x 2″ volume.

Scoring

  • Design : 60%
  • Demonstrates Proficiency with Tool: 20%
  • Labeling /Organization of Dropbox and definition/ Correct File Naming: 5%
  • Followed Assignment Directions: 15%


Resources

Check out these resources for more info on the responsive components and the laser cutter assignment.

Week ?: Image Map Component


Assignment 06

Assignment 06

Description

Fabricate your responsive component.  You should now have a responsive component in Grasshopper that responds to an input parameter control with a range of 0.0 to 1.0.  Using the laser cutter as your fabrication technique create 3 versions of your component that represent 3 unique states of your component.  You can choose any 3 values from 0.0 to 1.0 or you could use the end and middle conditions, for example 0.0, 0.5, 1.0.

Continue reading

Assignment 04

Assignment 05

DESCRIPTION

Merge your Assignment 04 with the DIVA Daylighting and Material components to create a visualization of solar irradiation.  Refer to the video tutorial for Week 5 that Prof. Downey posted to review how the visualization is set up.

Next, revise your responsive component from Assignment 04 to fit the site context (the South façade of the E Building and use: a light-shading screen that is modeled in Rhino. Be sure the unit:

  • Matches up at four points so it will connect to the surrounding units.
  • Is formed from triangles and planar quads so it can be manufactured
  • Contains one, or possibly two openings that are capable of being completely open/shut
  • Contains no more than twelve faces

This component unit will be plugged into a larger sun screen.

Assignment 04

Description

Build a responsive component.  Define a goal for your responsive component to achieve and a method to address that goal.  For example, a goal could be to shade a window surface, and the method could be controlling the size of an aperture or the length of an external shading louver.

Requirements

Your responsive component can really be anything you want.  However, it needs to meet the following criteria:

  1. It must be able to be applied to a surface.  For this assignment you don’t have to apply it to a surface but it is strongly reccommended and both of the tutorials start with a surface as a basis for creating the components.
  2. The responsiveness of your component must be driven by an external parameter, and the limits of the parameter need to be remapped values between 0.0 and 1.0.  See the tutorial videos for reference.
  3. Your component needs to be your own, don’t just do the tutorial and turn that in.  Think about ways you can use the tutorials to give you ideas for your own components.

Continue reading