Please submit your coursework by creating a post and following the guidelines below. Provide feedback by adding a constructive comment on another student’s posts, following the guidelines below. Your work and your classmates’ work can be found in the Student Posts section of this site.
Creating a Post
In the Dashboard, click on the tab Posts > Add New to create a new post.
Add a title in the title box at the top. Each of the Assignment instructions will provide a suggested title, category, and tags.
Add the suggested Category and Tags from the existing list. Example: Category = Reading Responses, Tag = Reading Response #1, Tag = Your Name
To add images or other media to a post, click the + Add Block button and search for the media type: Image, Image Gallery, Slider, YouTube, Vimeo, File, Google Drive, etc.
You can select files saved to your computer by clicking Upload. Then, click Select Files. You can also select images or other files from your media library by clicking the Media Library tab or Insert from URL.
You can make adjustments to the media file by selecting the media block and using the settings on the right-hand side of the screen (toggle the gear icon). Here you can you can adjust the Style, Size, Dimensions, and Alt Text to an image.
You can also make adjustments using the tool bar. Here you can change the Alignment, Link, Crop, Add Text, or Duo tone of an image.
Remember to add a caption or link underneath the media and a credit, if the media is not yours.
If you’re using a different browser simply drag the bookmarklet button from the Get Started page into your bookmarks bar. Note: you need to make sure your bookmarks bar is visible first.
Next click the Hypothesis Group Invite link provided to join the group.
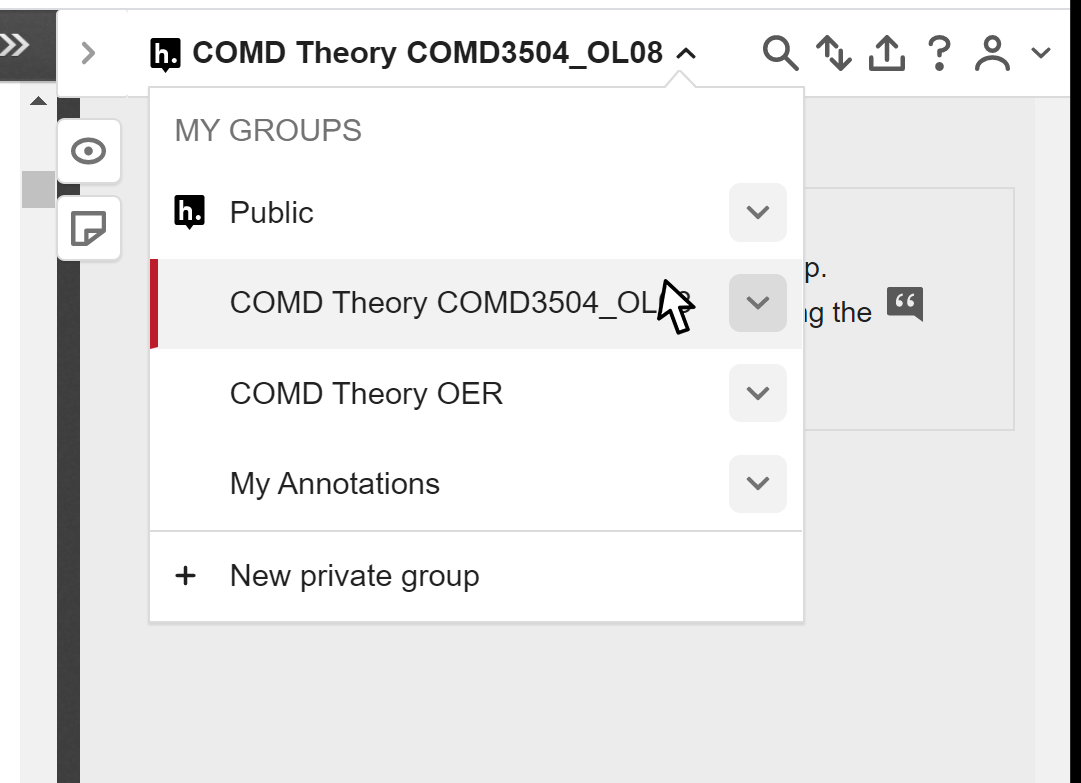
When you are using Hypothesis for this class, be sure to choose our group from the dropdown. That way, all of our annotations are collected in one place.
Choose group
Learn about Annotation Types
Hypothesis gives you a few different tools to help you annotate a reading. As a general rule, your annotations should add something to what is already in the text. What you contribute will also help your classmates. Here are some suggestions for each type of tool.
The Annotation Tool
Use the annotation tool to select a word or phrase in the text and add notes, images, links to share with the class. When others come across the annotation they can also add an annotation or reply to yours. TIP: You can also use the annotation tool for your own research by choosing “Only Me” when posting.
Ask a question. Confused by a passage or word? Select it and pose a question to the class.
Define a word. Did you find an unfamiliar word or a word you don’t understand because of the context? Select it and add a definition plus a link to the source, preferably Websters or similar.
Add a reference. Is there a word or concept in the reading that you are unfamiliar with? Look it up and provide a link to a website, interview, or video. Or add an image.
Rewrite a sentence. Sometimes the way a writer communicates a concept can be confusioning or too wordy. Rewrite the sentence in your own words after defining unfamiliar words, when necessary.
The Highlight Tool
A highlight is similar to swiping a yellow marker over a passage of text. There are no comments or tags, like the annotation, but it’s anchored in the document and is quoted in the sidebar. A highlight is always private (“Only Me”), which means only you can see it, and only when you’re logged in.
Important concepts
Quotations
Statistics
Page Notes
A page note has similar functionality to an annotation, but it associates comments, images, links, and/or tags with the whole document, not an individual word or phrase. Like Annotations, you can make Page Notes private by choosing “Only Me” when posting.
Prompts / Questions. Your professor may use a page note to provide a list of prompts or questions for your reading response.
General Questions or Ideas. If you have a question or thought about the reading as a whole, you might leave it a page note for the class.
Associated Texts. If there are other texts that you think relate, you might add a page note with links to those texts.
Replies
A reply can be added to an annotation, highlight, page note, or a prior reply. Use the Reply icon to create a reply. Your reply can include text, links, images, and/or tags.
Ask or Answer a Question. A reply is a great way to communicate with your classmates and discuss the reading as you go along.
Responding to your own annoations. It’s also a good way of replying to your own highlights, annotations, and notes with additional thoughts as you learn more.
Faculty: Please edit this page to organize any additional course resources that you’d like to share with your students. Please delete this informational block when you are ready to share your site with your students. For help working with OpenLab Course sites, visit OpenLab Help.
Below please find links and support materials to help you succeed in this course and beyond. If you don’t find the resources you’re looking for, just ask!


Recent Comments