Robin Michals | COMD 1340 Photography 1

Category: Lab Exercises (Page 1 of 3)

Lab: Week 12 – Outdoor portraits

Take portraits of your classmates in outdoor diffused light using reflectors and fill flash.

Start with using a reflector. Have your model stand with the sun to their back. use the reflector to reflect light back into their face. Hold the reflector higher for a more pleasing result.

Then try fill flash. You don’t want to cast any shadows on the face just brighten it.

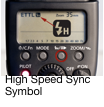
Use your widest aperture. You may need to use a fast shutter speed to compensate. When using flash, make sure to set it to High Speed Sync (HSS) in order to be able to use a shutter speed faster than the sync speed.

Put your 20 best outdoor portraits in an album on Flickr and send the best two to the class group.

Lab: Week 10 – One-Light Portrait Styles

Set up:

  • The subject should be at least 4 or 5 feet in front of the backdrop to avoid casting a shadow.
  • Use 65mm focal length when you are using a camera with a cropped frame sensor, 85 mm for a full-frame sensor
  • Focus on the subject’s eyes.

The key or main light is the light that casts the shadows.

Working with just the key light:

Front view:

Photograph your subject with:

  • Rembrandt light – the light is at a 45 degree angle to the subject. Look for the key triangle -a triangle of light on the darker side of the face to position the light.

    Do not place the light too high because this will cause shadows around the subject’s eye sockets.
  • Split light – the light is at a 90 degree angle to the subject. One side of the face is dark but light does fall on the other side.
  • Front light (butterfly) – Light falls on the subject from the camera position.


Three-quarter view:

  • The model’s face is turned to a 45 degree angle from the camera.

Photograph your subject with:

  • broad lighting by placing the light on the side of the visible ear. There will be a broad highlight on the subject’s hair. This works for subjects wearing glasses.
  • short lighting by placing the light on the side of the invisible ear. 

Profile:

The model turns their face at a 90 degree angle to the camera. Place light like a side light. The subject faces the light BEING VERY CAREFUL NOT TO LOOK DIRECTLY INTO THE LIGHT. 

Put your 20 best photos into an album on Flickr. Make sure to represent each one of these lighting styles. Send your 2 best to the class group.

Lab 8: Space and Focus

On our field trip:

Take at least 20 photos that use perspective to depict deep space. This can be either converging lines or diminishing scale or both. these photos should use extensive depth of field meaning everything from near to far should be sharp. this may not be possible in dark indoor spaces but should be possible outside or in bright indoor spaces.

Take at least 20 photos that use shallow depth of field. The subjects of the photo need to be at varying distances from the camera. Somethings the closest thing should be in focus, somethings the thing in the mid distance and sometimes the thing in the far distance. Of course somethings its not a thing but a person. Make sure that your shutter speed is fast enough that the blur in the photo is shallow depth of field and not motion blur.

Put your 40 photos in an album on Flickr. Send your best example of perspective and of shallow depth of field to the class group.

Lab: Week 7 – Global Corrections

Make global adjustments on each example:

Post your corrected versions of all three to Flickr.

Select your favorite of your partner’s photos that could look better with some adjustment. Tone it in Lightroom. Your partner will also adjust the same photo. Compare your results. Post both versions titled with each of your names to Flickr in a way that we can see them side by side.

Now, reverse it. Your partner picks their favorite of your photos. And you both adjust it. Post the results.

« Older posts