
Choose SAVE FOR WEB (screen PDFs) 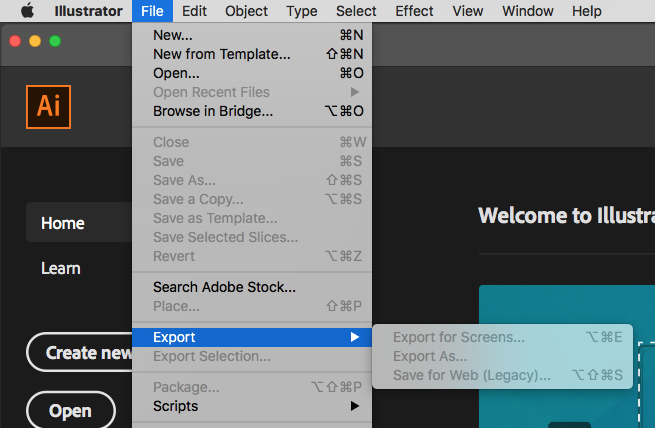 Same as above
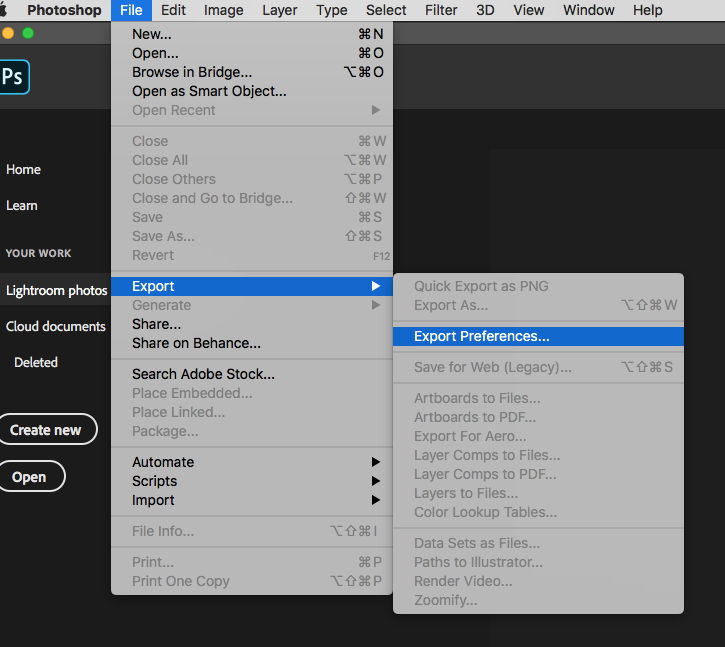
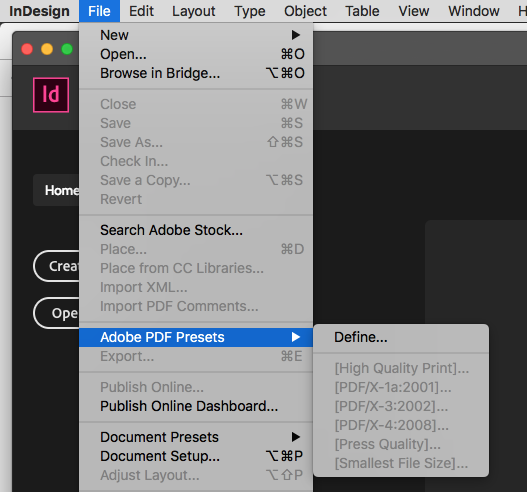 Here you can choose the types of PDFs. For Print, choose PDF X-1a. For Screen, smallest file size.
Category: Uncategorized
Additional Icon notes and files
Making Peace With Resolution
Resolution is the amount of information your document contains. The final outlet determines how much information you need to make your image look great.
Without enough information, your finished deliverable looks bad. It looks bad because there wasn’t enough information in your file for proper processing–by a printing machine, for example. That’s why you can’t upload a small file to a printing service bureau and expect nice results.
If your file has too much information, the immediacy of its delivery online or on devices takes too long or takes over the screen because it’s too big.
You MUST learn and understand the difference between the different kinds of files and process your design work according to the final output device.
For ANY screen application, the resolution is 72 dpi. That’s because all screens have that resolution.
This means that your file must be processed, regardless of physical size, to a resolution of 72 dpi. We’ll talk about the physical size later.
• When you first create a document, choose a file that’s RGB at a dpi of 300. It’s the best of both worlds. You’ll have the biggest color gamut (RGB) and the best resolution (300 dpi). This is, of course unrealistic. A file like this would be too huge for screen applications, and the incorrect color gamut (also called a color space) for print. Don’t worry, you’ll process it for the correct color space and resolution output later.
Later:
• When you make a PDF for screen, in InD, under FILE — PDF presets — choose “Smallest file size”.
To designate that your file was processed to this size, put a w somewhere in the file name; either at the beginning or at the end.
Like this:
COMD1200_Icon_Gira_w.pdf
In Pshop or Illustrator, it’s called EXPORT. Same thing: chose smallest file size. Chances are strong you’ll have to modify the physical size, but we’ll talk about that soon.
• When you make a PDF for print, in InD, under FILE — PDF presets — choose “High Quality Print” or “PDF-X-1A”. PDFX1-A always works for anything that’s printed. It looks awesome.
To designate that your file was processed to this size, put a p somewhere in the file name; either at the beginning or at the end.
Like this:
COMD1200_Icon_Gira_p.pdf
In Pshop or Illustrator, it’s called EXPORT. Same thing: chose high quality print. You won’t need to modify the physical size, because the image is already to the designated output size.
Next Tuesday, all your icon files are due, both print and screen, and we’ll go to print them in Voorhees. I’ll then get laser prints and see if we can print them in The Pearl from a high-end printer as well (have to check supply levels). The idea of the three print methods is for you to see how each of them answers your needs.
As with digital music, we’ve ground used to an inferior quality output as long as the input is as good as it can be. Meaning, that the color and resolution of your files must be good, because we tend to be more forgiving of our output devices.
As for size:
For digital: Choose the smallest size you can get away with.
11 x 17″ IS NOT AN OPTION for any screen application. You’ll find that anything bigger than 5 x 7″ for screen is overkill. It doesn’t help you image. It just makes it bigger. And bigger, when it comes to screen, especially Internet, is BAD.
The key here is to CREATE your images in the proper resolution, and process them to the appropriate size in the computer. When you[‘re photographing, choose CAMERA RAW. When you’re in Illustrator, set up your doc to the best resolution you can (see image attached).
Icon project tips
Some tips:
a) if you forget your flash drive, or for any other reason can’t copy to it, email it to yourself by uploading it to
WeTransfer.com
You have up to 2 gigs of free space for a week. This way you don’t clog up your email or drop box.
b) How to prepare your images for the “Icon Test”
• copy your polished version of your icon to a NEW DOCUMENT of the exact same size in either InD or AI
• Go to EXPORT
• Select .png. A dialog box will come up. Chose transparent or white background, depending on the shape of your icon. If the icon doesn’t look right once the icon is made, you can always go back and choose the other.
• Go to http://icoconvert.com. Cycle through and upload your .png. Chose the shapes you’d like to try, choose the sizes (make one the size of a phone icon, one the size of a YouTube icon, the others as you wish)
• Hit the button and then download them.
LOOK AT THE IMAGES
Do they translate well when they’re small, tiny?
If not, go back and modify them. Make lines wider; backgrounds lighter or darker; add tiny stroke lines of a color slightly lighter or darker around the objects in the illustration to accent them and try it again.
You’ll get it this time around, or….
TRY IT AGAIN.
Reference: How to format your assignment files
Naming them:
As we discussed, you’ll be naming your files as per a naming convention.
For this class, name your uploads as follows:
wCOMD1200_Sp20_Icon_XXXX.pdf
pCOMD1200_Sp20_Icon_XXXX.pdf
Upload your B/x/w icon
a) Of the three images you’ve been working on, make six treatments in b x w in the template I gave you.
Make two files:
Web: Choose SMALLEST FILE SIZE. Combine all three into a single PDF and upload.
Print: Make another PDF in PDF x – 1A and print the three sheets on laser paper. Bring to class.
Week 2, Sessions 1 & 2
Session 1:
Finished grid with all 77 sketches due. Personal Critique.
• Short Quiz on Syllabus
• Sketch [Idea] book review
• Enlarged sketches on mini grid in pencil.
Assignment: • Of the three sketches, fill in six pencil sketch developments to class.
Session 2:
Quick critique of enlarged developed sketches
Bring sketches into the computer in black and white, using illustrator
Assignment: • Continue lab exercise started in class: a) Bring 3 of your sketches to the computer IN BXW and refine them, making 6 sketches each, 3 sheets total. b) Name them properly, print them, make a PDF and upload . c) Start to bring color to them by making a color scheme

