Normcore Getting Started

Link to video:     https://youtu.be/pnIqGBoFXGU

Link to project build: https://drive.google.com/file/d/1c5vJ3n473W31WfGAjORm_cD4GJLJRQx1/view?usp=sharing

Documentation:

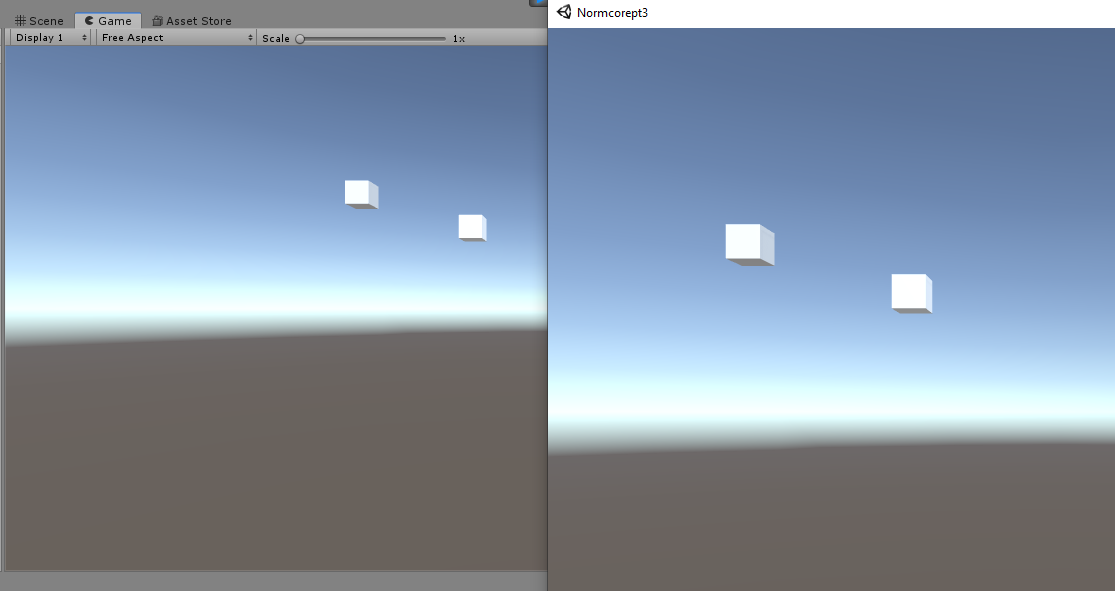
In this video tutorial I’m going to be showing you how to use Normcore with your Unity projects. First things first, what is Normcore? So Normcore is a company that has created a Unity plugin that is used to create multiplayer experiences or games with a heavier focus in VR. Now to start with Normcore you’re going to have to type in https://normcore.io/ in your web browser and create an account. Once done you’re going to hover over the download button and download the latest version of Normcore. Once that’s finished, go back to the home screen and click on Getting Started. If you want to get some feel for the plugin you should follow this small tutorial that they have here. This will show you how to add the plugin to your Unity scene and how to test out the multiplayer functionality. Next we are going to open up a new Unity project using the 2018.4.22f1 version as that is the best one to use at this time, name it whatever you want and then we are going to go back to Normcore and create an application, what this does is it helps us create an app key that is going to be used as a server room for when we launch our project. Once you have that done, go back to Unity and for the easiest way to import the plugin we are going to open our file explorer and go to downloads, drag and drop the Normcore download into our project folder area on Unity. It will ask you to import the plugin and just accept it. Now we have Normcore on our project so let’s use it. Click on the new folder that appeared called Normal, go to Examples and Cube Player. Click and drag the Realtime + Cube Player prefab onto your Hierarchy. If you look at the inspector on the prefab, you’ll notice the little app key section, this is where you’re going to copy and paste that app key you made earlier. Once you’ve done that, save and press play. You’ll notice you can move your cube with the WASD keys. That’s not the coolest part though, if we click on file and click Build and Run, then reduce the size of the build to something that is smaller than your screen preferably half the size you can move your cube on the build but you can also press play on your Unity editor and have a second cube spawn and you can move one or the other and you will be able to see the changes just like you would in any kind of multiplayer setting.

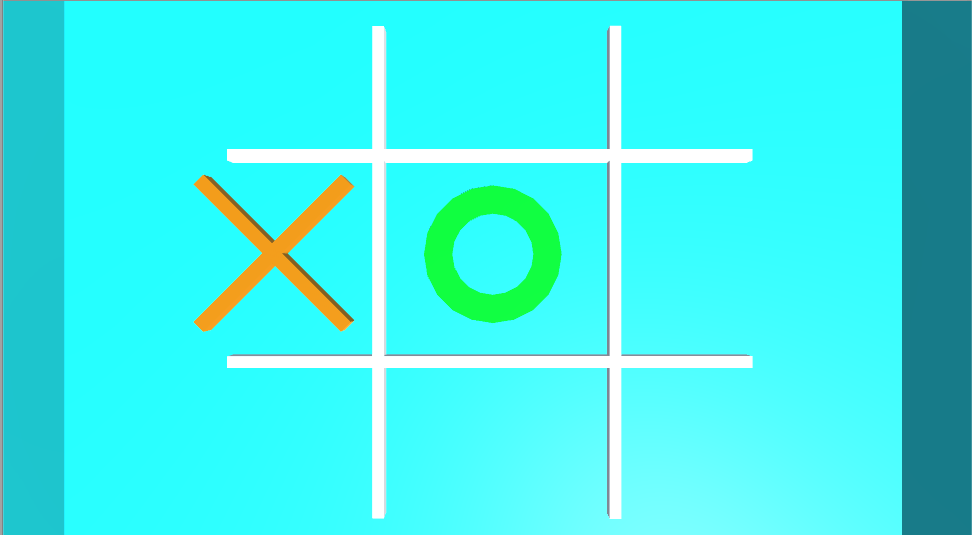
Once we have this done you will have the very basics of Normcore ready at your disposal and you can think of many things to use it for. I decided to use it on a small bare bones game of Tic Tac Toe. Both players are the small red cubes that you see moving around the screen and when a player presses the X or O keys, a Circle or X will appear on their location. There are a couple issues with this game of course since it is a rough cut. If player wants to spam the X or O keys they will spawn multiple instances of the X and circle prefabs all over the place and there is no direct win loss conditions in place.

I spent a lot of the time trying to get the very core concepts of Normcore working on this project. I had to make the prefabs of X and O’s spawn on the players depending on their position on the scene, that was a little simple with a small script and attaching that to the cube player prefabs themselves it was pretty easy. The biggest problem appeared when I was trying to test everything out in the Build/editor view. I noticed that whenever I spawned one of the prefabs I created, the would not appear for the other players in the scene, there was no existence of the X’s and O’s on someone else’s screen. Now if you noticed, Normcore has a discord server that is linked on their website. You can always join the server and ask the developers for some help with any project you may be working on. With Normcore you should be able to make some really cool projects and games on Unity with little problem and of course if you do run into issues, always be sure to check their discord server. This is Normcore and thanks for watching.

Final Project Normcore Documentation Week 2

During this week I decided that I was going to work on a project to make a basic tic tac toe game using the Normcore plugin as well as basic unity skills such as instantiating objects and player movement. My design for this game will be very simple and I would be leaving a lot of responsibility up to the players. To spawn an X on the board a player will need to press the X key and to spawn an O then the O key would need to be pressed. The symbols would be spawned on the players current position. Once the players are done with the quick game then they will have to press the R key to restart their game. I wanted to make a platform game at the start since I thought it may have been a little easier to work with, but after I began messing with some particle systems, I wanted to make a game like slither.io or snake. After I noticed that the particle system was going all over the place (most likely since I was working with a Z axis as well) I decided why not make tic tac toe multiplayer. It’s a game that people always play with just a simple pencil and paper, but with how things have been going on with the world recently, playing such a simple game is not as easy as it used to be without wearing a bunch of things now. My biggest challenge may be instantiating the object based on which player pressed the X or O key as it would be very weird if two Xs popped up in two different areas since the players were technically clones of the same prefab. I would have to research more in order to find out what the best route might be to avoid that. I might use specific key words depending on what works. I began to make a layout of the game board and the surrounding area as well as have a start game screen that is very simple as a placeholder. I created Xs and Os as prefabs with different colors, I basically have all assets ready for the actual creation of the coding and testing process. The players will be located on the board by the cubes that were used in the example Normcore project.


Final Project Normcore Documentation Week 1

I made an account and downloaded Normcore’s plugin onto my desktop to give it a try. I opened up a new 2019 unity version project and follow the documentation tips they give to test out located on https://normcore.io/documentation. Using the 2019 version, everything seemed to be working out just fine until you reach the multiplayer step. When I tried to export the project as they did in the photo, it wouldn’t let me run the project in a windowed screen, only Fullscreen. I changed the player settings for the build and still the same occurred, Unity documentation states that in order to not have full screen, one would need to add a line of code to their script to not have it happen. Since I was not familiar with Normcore’s code, I didn’t want to mess with it, so I scrapped the project and began it again from the beginning on a 2017 version. When I exported it in a windowed setting, I could see that I could move and create a cube using the built version as well as in the Unity Editor itself. The only issue was that each cube would only show itself moving if I was clicked onto the specific window, meaning if I was in the editor then the cube, I was moving would not show changes on the built version until I clicked on the built version. The next problem I ran into was that, the cubes would sometimes just disappear, I’m not sure why they would do this, but I feel like it may have been due to too many changes being done between the two windows as well as using a 2017 Unity version as the example uses 2018. I restarted the project again using the 2018 version and the entire thing worked so effortlessly just like their example. I believe this will mean that for the best results, I will have to be using the 2018 Unity Version for any projects involving this in the future. For the continuation of this week, I will be working on making my own small simple game using Normcore’s plugin as the multiplayer base. Below is how the multiplayer feature looked side by side using just one computer.

Week 12 Documentation

During this week’s lab assignment, I was setting up the camera and animation for the video capture. Making the animation tracks for the camera was not too difficult. I had one mistake happen with the animation track since the rotation of the camera flipped in the middle of the animation, a few areas of the clip were also sped up due to too much movement of the camera in a small amount of time. When trying to export the video in 1080p HD the exporting process was very long moving literally frame by frame. After about 40 minutes an error occurred and forced me to close the Unity. When I reopened it, the animation wasn’t saved and the video it exported was corrupted so I had to start over. With the new animation made (which was better), I began to export it with a 720p HD setting and it again took a long time. This time it had exported the full video but I left it running for a bit too long so I had to trim the video itself down a bit. Below is a link to the video as I couldn’t upload here directly.

https://drive.google.com/open?id=1SYWPolNDgdLGCmucSYi1ZshjD8pxCnop

Week 11 Documentation

Working on this week’s assignment was very weird on my end. At first, I ran into an issue with the software since it wouldn’t let me upload photos and only videos, then when I would upload the videos, it wouldn’t accept them. After I figured out what I was doing wrong I noticed that my scans looked nothing like how the examples had shown. When I added the textures and built the meshes I was left with something that looked either close or not at all like the pictures. I wasn’t sure how to fix this, I tried following all the steps that were shown as much as I possibly could but I still ended up with the photos below. When adding the obj files into my VRChat room, they also didn’t have the textures I had added from within Agisoft. Honestly, they ended up looking like pools of cement.

Photos I took (about 10+ each)

What the 3D scan gave m:

How it ended up looking in the VRChat Room after importing:

Week 9 Documentation

For this week we had to continue building on our VRChat custom rooms. I left the original room from the tutorial alone and decided to expand on the entire structure itself. I got rid of the balcony that was given to us and I added in a new room. The new room was made to be a bit more eerie and dark. I added in a few broken objects and dead plants that I found on Sketchfab into this room and to the outside area that the player can view from the small window. The only problem with this would be trying to move things around once everything was baked, such as the main camera I used to take the photos below, it would move very slowly to get to where I needed it too. Overall it was a fun experience to mess around with. I used ProBuilder and ProGrids to make the new layout of the room and make all the objects snap as smoothly as possible to their respective surfaces.

Week 8 Documentation

For this week I followed the tutorial for building a VRchat custom home and honestly it went pretty well. Once I baked the lighting things looked more realistic. Here are a few pictures of how my room looked after the tutorial. The only main issue I had was getting the mirror to work correctly. During the tutorial, it was working fine but once I baked all the lights it turned plain white. I also didn’t add a picture as the tutorial did, mostly because I didn’t have one at the time.

Week 2 Pictures

1. This is a picture of different monsters from the series Monster Hunter. I chose this because a lot of these monsters are old and new but the quality of this image shows them in a new light, especially the older ones. The game is very fun and challenging so it helped push me into much harder video games instead of the easier ones.


2. This is a character from a car game called Cardfight Vanguard. I chose this because I’ve always liked the cards and their art style especially the group called Royal Paladins (which is where this one is from), they always had a sense of justice and knighthood which always draws me in.


3. This is an anime called Ace of the Diamond. I chose this picture because this anime and sport-related ones really interest me. They give me a new way to look at sports that really draws my attention.


4. This is an old Animal Crossing game and was my first game on the original Nintendo DS. I chose this because this was a new game to me. Before this, all I knew was Pokemon and Digimon. For me to play this and very much enjoy it was something totally new to me.


5. This is an old Pokemon game and was one of my first ever to play. I really enjoyed the game and I chose this picture because games like this are what made me want to pursue something in the game design department.


6. This is one of my favorite Mexican foods called Tamales. I chose this picture because they are something that is eaten within my family every year around the holidays so it has been in my life since I was very young. I would want to make them as good as my grandmother one day.

Week 5 Articles

  1. The Top 50 XR Experiences Of 2019

https://www.forbes.com/sites/jessedamiani/2020/01/30/the-top-50-xr-experiences-of-2019/#35aaad8414d9

This link shows a lot of projects and information about each as well as a video connected to them that really shows all the different kinds of XR/VR experiences people have made.

2. 4 Feet: Blind Date

https://www.teenvogue.com/story/4-feet-blind-date-vr-film

4 Feet is very interesting in that it tells a story about a disabled person and there aren’t many of those that I have seen in our society.

3. 2nd Civil War

https://vrfilmreview.ru/https-vrfilmreview-ru-tribeca-immersive-2019-ce24ca1b8ae3

The concept of a 2nd Civil war is interesting but it was hard to find an article that spoke specifically about this one piece but I still wanted to show it, as it is something that could affect us in the future.


4.  Traveling While Black

https://www.theguardian.com/tv-and-radio/2019/sep/02/traveling-while-black-behind-the-eye-opening-vr-documentary-on-racism-in-america

I think this experience is something that is very good for people to experience as it can show what people of color had to deal with in past generations and it shows how different our society really was.

5.  Home After War

https://www.homeafterwar.net/

I chose this because it shows the destruction and the hurt that follows war. It shows what people are really left with after the fact especially when it isn’t you who is suffering from war.


Welcome!

This is the first post on your Learning Blog. Edit or delete it, then start blogging!

The ePortfolio is both a Learning Blog and an Academic Career Portfolio. Use the Learning Blog to document your learning experiences and class assignments each semester. As time goes by, add content to the Academics and Career sections to show your department, graduate institutions, or future employers how well prepared you are for your chosen career.

NOTE: Remember to add appropriate Categories and Tags to your posts. This will help your professors and other visitors find the content they are looking for. The Categories “Coursework” and “Field Trips” and the Tags “OpenLab” and “City Tech” have already been applied to this post. Feel free to make changes!