Category Archives: Uncategorized

Final day of shooting

I didn’t get to shoot today because I modeled for 3 different people. I think I have enough for my final to be good. My strong point is i think i shot the product very well since that was my goal. The only weakness is maybe not shooting enough to have 6 solid pieces.

2nd Shoot

This week I shot with models and it was a better experience compared to the week before. I got to capture different peoples styles and actions even though they all shared the same brand of shoe. It was good to get some shots that I could probably composite together to make one ad.

Final – Second Shot

IMG_1841-2

I didn’t shot for the first time, so this post will be my first shot for my final project. My theme for the final project is fresh fruit drinks for summer. After I have done shooting, I figured out that my lighting is a bit dark in the front. I had a strobe light on top and one under neath. What works out for this time is the splash. I throw the fruit into the water, and it came out pretty nice, and I tried to throw the fake ice into the water, it came out good too. I also shot the water with the fake ice. the shadow and the ice have a nice contrast, so It looks pretty elegant, even it is just a glass cup of ice water. Next time, I will be shooting with color papers and try to shot with the continues light. I think I have enough splash photo, so I want to try to shot with the color paper and continues light.

Second Shoot – Josh Rojas

The second shoot was an improvement, after experimenting with different setups I finally found one I could expand on. I used the black plexiglass instead of the wood table , it gave the drum more life with the reflection underneath. I also started experimenting with some motion blur to show the model in action. Foe the next shoot I would like to get a few more angles with the setup from last week. I plan on using some of the color gels to make the shot lively and add another light for the model.

Thoughts on the Second Shoot – Wilbert Perez

For the second shoot of the final project for our class, I was able to shoot. Luckily being able to shoot first amongst my classmates, I was able to find a sweet spot for my set-up fairly quickly. After tinkering with a separate light and the overhead light, I turned my only light source into a soft-box attached overhead onto a boom. With a black backdrop, the devices that I was shooting had no problem standing out in the light. Using a black plexi table top to sit underneath my devices, I was able to get a clear and good representation of my idea. My reflections were clear and crisp. I had to make sure to clean the plexi after every device due to the dust which could dropped and later appear in the photo. Another essential tool that helped tremendously was a tri-pod. I may go back and re-shoot some products to get better results. In the end, I believe I did a good job reducing the shininess that occurs when shooting several electronic devices. For my next shoot, I plan to finish up my shoots and get to printing.

First Shoot – Josh Rojas

What Worked:

– Dramatic Lighting

– Model interaction with drum

– Quick setup time

–  Shot composition

Didn’t Work:

-Lighting on the drum

-Getting a full shot of the drum

Next Shoot:

– Position the model differently

– Try new lighting effects

-Experiment with color gels

-Try new back drop


Thoughts for First Shoot – Wilbert Perez

For the first shoot of the final project for our class, I was unable to shoot. Due to high demand of the studio I began to participate as a model later during class. Working with Kelly-Ann on her shoot I was able to take mental pointers as to how I would I want to shoot my own project. Aspects that I believed worked well in her favor include a fierce back-light complimented with another side-light to create drama within the photos. For next week, I must really expierment with the angle of incidence to reduce reflection in my photos from different devices. I will attempt to use a black mirror to use elegant reflections but I must understand that shiny things are better shot in soft light to keep the bright highlights in the shine from blowing out. I will have to make sure that my setup is not in direct light to avoid shininess.

First Shoot Review

I was able to shoot one model last class, which was successful. I wanted to create a dark, very masculine, macho mood for my first portrait since the parallel lines painted on his face created a very dynamic and dramatic feeling. The side light and back light which really helped to convey that mood. After several shots, playing around with different lighting positions, the final shot was ideal. In this first shoot I was able to see how effective the lighting will be for these portraits which was intended. For the next shoot, I hope to spend more time experimenting with lighting on the models face and shooting from a different angle which will aid in setting the emotion/mood for each portrait.

Final Project- Kelly-Ann Thompson

Topic:  My topic is painted face portraits. I want to communicate individuality and how different lighting is able to create different moods and emotions. I plan on using regular and glow in the dark face paint.  I do intend to use this as a future advertising campaign, and also to have some portraits.

Subject Matter: The subject matter will be models faces, face paint- both regular and glow in the dark.

Style: Each portrait will convey a different style in relation to the abstract art painted on their faces. This means the lighting will be different for each model. However, I think a black background will be kept consistent throughout each portrait, (this is subject to change). The faces will be centered, since it is the main focus.

dfcee2cd2712d886a206a13461393d9d 9ab670be55a799629d8f8beffbe608ad

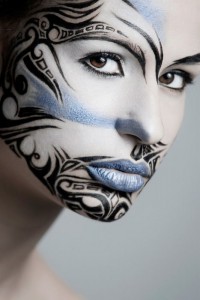
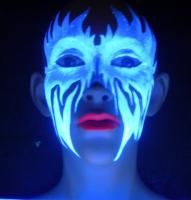
Lighting: The lighting is key to this project, this is what I will use to create the emotion and mood for each individual, in order to tell a store and bring the face paint to life, especially the glow in the dark ones. So therefore it will be all different lighting used (side lighting, front, backlight, e.t.c) what is best suited for the emotion I’ll be conveying.

Props: The most that will be used is a stool for the model to be seated while shooting. This project will show my lighting skills combined with my design skills hands on.

First Shoot-Tera Cunningham

The first shoot went ok I guess. I forgot to bring most of my props because I was rushing out but I will have the salt, lime and shot glass next class. I only wish that I got better lighting from the beginning rather than towards the middle/end of my shoot. I was thankful that Matthew was giving me some ideas on how to get the mood that I wanted. I want to shoot on plexiglass next class because I noticed in most patron advertising u get that nice reflection of the bottle on the bottom and would like to incorporate that into my next idea. Also next time I will be using my own filtered water rather than the schools tap water because it produced too many bubbles in the glass and made it look murky. I’m even going to bring and mix juice to make it look like its an actual cocktail in the glass to add variety to what I’m trying to achieve. Also Professor Michals suggested that I try strobe lighting for the next shoot. To see how they will come out.