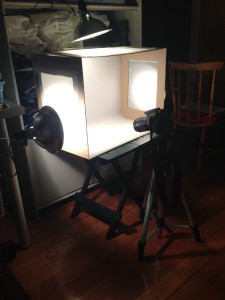
Building a lighting studio can be a challenging. First thing that popped into my mind is how much will it cost to make one? Second thing that popped into my mind is where will I put it? After moving things around in my room, I manage to create a space that is JUST RIGHT for the studio. I even found this fold-able table laying in my closet. Soon after I finish making space for the studio, I realize that I don’t have enough material to construct a box. The cardboard that I have wasn’t big enough and there wasn’t enough foam cord board to use instead. So I decided to put that aside first and move on to other things like reflector and lights. Since I’m more of a online shopper person, I decided to just order a 5-1 reflector kit; which happens to cost no more than $20 + free shipping. When the reflector came, I notice that they placed the reflector in a very huge cardboard box. 10% was the actual reflector and 90% was just the wrapping paper for protection on the items. I took advantage with it and created my studio lighting box. First thing I did was tape the 4 flap area of the box together to extend the box longer. Then I cut out windows for both sides of the box as well as the top (leaving about 2 inch margin). At the end, I putted and taped 3 tracing paper to cover up all the opening windows. And there it was, my studio lighting box. For my background, I have about 50 yards of white roll of paper. This made my life a lot easier because with this roll of paper, I can create a seamless background. The final part of this set up is the lights. I went with buying 3 clamp lights with spotlight bulb, frosted bulb and clear bulb.
-
Recent Posts
Recent Comments
Categories


How great that the box the reflectors came in was so useful!