
Table of Contents
1………………. Introduction into Blender & Unity
1.1……………. Purpose of 3D Modeling
1.2……………. Resources/Links
2……………… Before you begin, Tips & Tricks for every beginner
2.1…………… Common pitfalls to avoid
3……………… Getting Started
4…………….. Workflow of Blender & Unity
5…………….. Conclusion
6…………….. Recommendations
7…………….. Acknowledgements
1. Introduction
Blender and Unity, a piece of software known as a 3D modeling application. It is also known in the computer modeling world as a 3D computer graphics software program for developing animated movies, 3D models as well as 3D games using its own game engine.
Blender is an open source program, free to anyone for use. It offers many features for 3D such as modeling, texturing, rigging, skinning, smoke simulation, animation, rendering, and video editing. It is an entirely free program that is available for Microsoft Windows, Mac OS and Linux operating systems.
1.1 Purpose of 3D Modeling
Many beginners new to the world of 3D modeling always seem to make the assumption that 3D modeling is a truly daunting, nearly impossible program to learn. However, the truth is that these programs may seem like too much because of its user interface (UI), the foreign terminology or simply your nerves getting to you. But with some practice and research into what make these programs tick and how you as the user can use them to your liking, you will eventually realize how easy these programs can be. It simply takes practice, dedication and hard work to understand and be proficient at these programs.
When it comes to 3D modeling, many individuals who start this program as merely a hobby mainly start out with small objects such as a round vase, a cube or even a person with no definition to their body or head. But as you start to learn how to add textures, meshes and animations, you will start to understand the inner workings of 3D modeling. From this foundation, individuals can choose an assortment of career paths such as 3D Animator, Concept Artist, Graphic Designer and many other fields related to 3D modeling. You can also work in video game industry as a 3D Environment or Character Modeler. 3D Modeling today is in very high demand and pretty much anything field that requires 3D modeling or animation such as Pixar, Bioware, Netherlands Studios.
1.2 Resources/Links
The following link should be used to download Blender & Unity:
2. Before you begin, Tips & Tricks for every beginner
#1: Read up on tutorials
If you’re just starting out, or you’re entering an area of Blender you’ve never tried before, then tutorials are you ticket to success. Many things can be learned from a person who uses or views the program a different way. And if there is anything that you you do not know, you better believe I’m going to watch a tutorial on it!
However, abusing that thought process can lead to something I call tutorial addiction or tutorial dependency. A lot of beginners today are falling into the trap of becoming dependent on every tutorial for every little thing they do not understand.
A tutorial will show you the concept and help you gain perspective but your aim should be to get off them at some point and try things yourself at some point.
Use them as you would your beams of support.
#2: Challenge Yourself to be better
This was one of the realizations that helped me the most a long time ago.
What you need to do is start a project that’s outside of your comfort zone. Another way to look at is to step up your game and consider doing something beyond the parameters of your assignment or objective. Then force yourself to complete that challenge. Decide on the end result, and really that gold into your mind. Then once you have set that objective, think to yourself how will you try to achieve without the help of a tutorial.
Your first project will probably be really bad, not everyone knocks it out of the park with their first try. However, that should not really discourage you because regardless of whether you notice it or not, you will have learned some invaluable things during that project that you can carry onto the next project. And everytime you repeat this process, I guarantee you will learn something (however big or small) from each of these projects that you can build on for the next one. It just takes time in this process we call trial and error, for each time you fail, every step you take to rectify the problem helps to learn something new.
#3: Experiment
Sometimes it’s fun to just play with the many features in Blender and Unity with no real object in mind. And sometimes those experiments lead to great lessons learned that you might not have been expecting.
My car and cube animation started as just a physics test. After I realized I could get some unique and exciting movements, I began to experiment more often until I finally had a little animation that I could use in my game. It was a fun little project that I enjoyed cause that project helped me to learn so much just by taking the time to create a fun little side project.
Some of the biggest companies today let their employees have a day to experiment with whatever kind of project they wish. For example, I learned recently that Google gives their engineers and programmer one day out of the week to work on anything they like and they still get paid for that. To me it sounds really foreign for any workplace, especially in today’s workplace culture, however, it was actually on of those days that the concept for Gmail was created.
Experiments are invaluable for learning.
#4: Be brave, Be Patient
Beginners early on never like to hear this only because they may think it is a personal attack against them or it makes them feel inferior. But to become proficient at anything, you need to practice constantly and build up patience for when you make mistakes.
But as you grew older and you more mature, you may being to fear failure only because of how much it may bring you down. And if you expose yourself to enough to failure often enough, then you might become increasingly fearful to start any new project for fear of the outcome. There might even come a time where you will want to give up at some point during the project and hide the finished project in fear of criticism.
But failing is the only way you can ever learn. To me it is not so much of how you can learn by being successful, it is how much you can bounce back and learn after failing that really matters. If you saw any professionals hard drive full of failed attempts because of one or two little things they got wrong, then you would probably relax a little and realize how much in common you really have with them. They started somewhere, just like you are now. Practice often and do not expect greatness right away, anyone who’s anyone in their industry who is well known practiced relentlessly until they understood it.
And here’s a special treat for you: ctrl+z
You will thank me later.
2.1. Common pitfalls to avoid
- Here are some common mistakes when you are first using Blender.
- Not using images planes or references images. The reason I bring this up is because when you create an object, you might get carried with creating multiple to support multiple objects. But the thing to note is that unless you absolutely need it, do not create more planes than necessary.
- Do NOT Create objects in Edit Mode. Basically, when you create an object in Blender or Unity, create the mesh in object first, then whenever you need to edit the object go to edit mode. I only say this because if there is a specfic object you need to create or highlight and you may have many objects on screen, creating that object will give you the liberty to focus on that object only. Otherwise, if you were to create the object in Edit Mode then switch back to Object Mode, you will select each object created in Edit Mode simultaneously, in any case just avoid creating anything in Edit Mode first if you don’t have to.
- Seemless Meshes. This may seem like a weird concept but hear me out. If you create objects without any edges or faces, there may come a time where you could confused as to how to modify the object a little later on. Unless you know what not having a face or edge is in Blender and Unity, start with simple objects, experiment with them then move your way up.
- Using subdivide for all models and subdivision surfaces. Just make sure all of your objects are as you divided them or else you could run into some real sculpting problems down the road.
- Just trying to do too much too soon when starting out with Blender. Take it slow and do not rush yourself cause that WILL lead to mistakes being made
- Keyslipping (hitting a key that has a function you do not know about, something happens and that scares you because you do not what just happened and whether or not you just screwed your entire project). Just try to be mindful of everything you are doing near the keyboard at all times, since Blender and Unity may be new programs for you, hitting the wrong button at the wrong time could send you into panic mode. I should know, it has happened to me countless times.
- Selecting object with the wrong mouse click. Right-click is the default for selection in Blender and Unity, but you can change that by going to User Preferences and selecting left as the select button
- Modeling an entire object in one piece. Look at each object as one small piece of the larger puzzle, think about its smallest factor, then think about that individual piece affects the larger piece as a whole. Think small, work small, but always remember the bigger goal at the end.
3. Getting Started
Now I know this seems counter-productive, but no one ever learns everything from one source. What I would say here is that if you wish be more prepared to learn Blender and Unity, you should check many different sources online, read a quick user manual, consider purchasing a book as a supplemental guide and repeat the same exercises.
When you start out with any new program, there may be many (if not all) of its aspects that you simply do not understand, but by experimenting with the controls and/or the UI, you can eventually begin to understand why this program structures their tools and features they way do.
All of this preparation can help you when first start to learn new software. This is especially true when you enter the world of 3D modeling, which is becoming a field with a lower entry barrier for beginners. In my opinion, the best way to learn a program is to read a user manual. A lot of the time, those manuals can spell the definition and purpose of a function while helping you to learn new terminology.
4. Workflow of Blender & Unity
Step 1: Opening

This is what blender looks like when you open it.
You are faced with a toolbar to the left an right, file operations to the top, timeline on the bottom, and the 3D view in the center.
Blender’s default starting mesh is a cube, we will be demonstrating basic functions on this.
Step 2: Basic Navigation

To rotate around in the 3D view, hold down the middle mouse button and move the mouse. However, if you wish, this can be changed in User Preferences.
To move up and down or to and fro, hold shift+middle mouse, and move the mouse.
Use the scroll wheel to zoom in and out from view of the object.
To select an object right click, to de-select right click away from the object.
To select multiple objects, hold “SHIFT” and select the objects.
To select everything press “A” or to de-select everything press “A”
Notice that when you select something, it will be highlighted orange.
Step 3: Object Mode & Edit Mode


The two modes we will be using in this tutorial are: Object Mode & Edit Mode
Object Mode allows you to select objects and move them around as you please.
Edit Mode gives you the liberty to select individual vertexes, edges, lines, and planes. you can modify the mesh in this mode.to switch between these two modes you can either go down to the menu below, or just press TAB.
Step 4: Rotating, Scaling & Translating
First I want to make note of the arrows that appear when you select an object.
those are the Axes. The red arrow is the X axis, green is the Y axis, and blue is the Z axis.These arrows allow you to move things more accurately.
Translating
There are three ways to do this, one is to simple right click and drag. Another is to just select the object and press “G”
Or, you can left click on the axis you want to move the object on, and drag.
Rotating
Rotating is very simple, all you have to do is select the object to be rotated, and press “R”
If you want to rotate around a specific axis, first press “R” then “X”, “Y”, or “Z”. Each letter corresponds to it’s respective axis.
Scaling
To scale an object, simply press “S”. if you want to stretch an object along a certain axis press “X”, “Y”, or “Z”, after pressing “S”
Step 5: The 3D Cursor

The 3D cursor is exactly what it sounds like, it’s a cursor in the 3D view. By default it starts in the origin, but you can move it by left clicking.If you add an object, such as a cube or sphere, it will appear where the 3D cursor is.
Step 6: Adding a Mesh

To add a mesh (Cube, Cylinder, Sphere, etc.), go to the “Add” menu on the bottom left side of the screen (next to where it says Object Mode on the screen). From there you will find many sub menus, the top one being “Mesh”. Just select the mesh you want and drag the object to whatever location you desire.
Step 7: Selecting in Edit Mode

In edit mode there are three ways to select things, you can either select individual vertexes, lines or planes.
To switch, click the three buttons at the bottom.
Step 8: Merging


In edit mode you can select two or more vertexes, and merge them together.
To do this, go into edit mode, select the vertexes you want to merge, press “W”, then, merge.
Step 9: Extruding

In edit mode, you can select a line, vertex, or plane, and extrude, or, extend it.
to do this, select the thing you want to extrude, then press “E”
Step 10: Edge Loop Slide


This allows you to make a “cut” in a mesh, letting modify it in individual pieces.
to do this, press “CTR+R” and select the spot you want to cut, then it will allow you to slide that cut, then place it.
This is handy when you want to extrude only a certain part of a plane or an object.
Step 11: Modifiers


Switch back to object mode.
Modifiers modify your mesh.
One that you will use often will be the “subdivision surface” modifier.
This modifier makes your model all smooth.
The modifier properties are in the right tool bar.
And to continue to the workflow into Unity, we have complied the following steps on how import files from Blender into Unity:
Note: Unity natively imports Blender files. This works under the hood by using the Blender FBX exporter, which was added to Blender in version 2.45. For this reason, you must update to Blender 2.45 or later.
- To get started, save your .blend file in your project’s Assets folder (or whatever folder you saved your project in). When you switch back into Unity, the file is imported automatically and will show up in the Project View.
- To see your model in Unity, drag the model from the Project View into the Scene View.
- Finally, from this point onwards, whenever you modify your .blend file, Unity will automatically update whenever you save.
Unity also sends the following information about .blend files with this method that makes it especially easy for importing:
- All nodes with position, rotation and scale. Pivot points and Names for the project.
- Meshes with vertices, polygons, triangles, UVs, and normals.
- Bones
- Skinned Meshes
- Animations
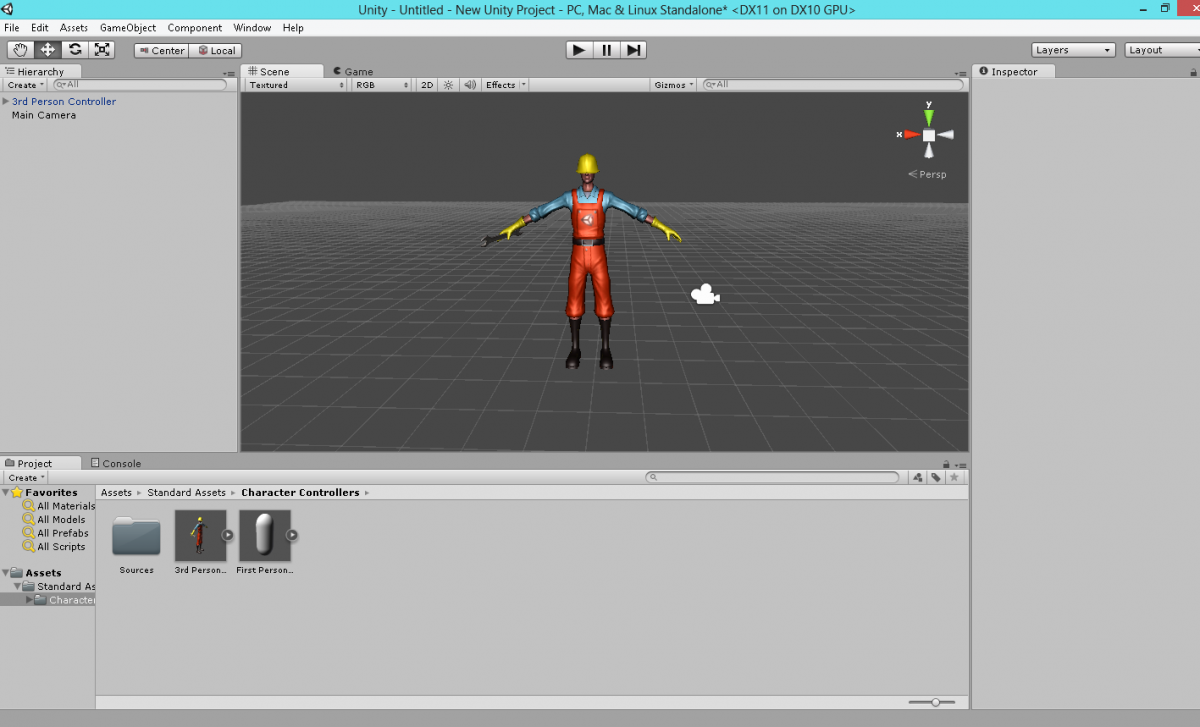
Example Character Model
Once the file has been exported, you will have a couple of options available. First, you can save the file in a .blend file format.
One important note to make is that when you import Blender files into Unity, be aware that not everything may be transferred over.
Despite the fact that they are similar programs, each program may the certain processes and look at assets in a different way. For example, for this tutorial we decided to go ahead and import a character into Unity. This character model was imported from Blender and has fully rigged for animation. However, some of his textures was carried over such as the dark blue textures on the model’s shirt and boots.
One way to make sure your files stay intact when they are exported into Unity is to ONLY save them as a .blend file.
Another way to back up your work is to save a copy of your desired version of the character in a assets folder separate from your current working folder.
Secondly, you can save the file in a .unitypackage file format. However, you must be warned that saving the file in this file type results in your project being unable to imported back into Blender.
From here on out, everything that can be done with Blender can also be done with Unity.
5. Conclusion
As you can see, there is a lot of utility with the Blender into Unity workflow. For example, commercial products can be monetized via Unity’s licensing agreements, which would allow you to access every single of Unity’s features to maximize the potential of your product. Unity, you are allowed to make fully realized 3D games that can even be sold on many platforms such as the Playstation Store, Microsoft Xbox Arcade, Nintendo eshop and even Steam. There are many possibilities for each program such that both have their pros and cons individually, both are really an invaluable resource for content creation.
To us, we find that Blender usually excels more at creating, rigging and animating 3D models while Unity is more of the powerful game engine in which your character can live and thrive in. Individually, they are great still tools on their own, however, with both you can accomplish many feats in the 3D modeling world. You can even create a whole video game without ever having to look for other resources other than Blender and Unity. And before you come to a conclusion about the application, my only advice is to use the program, understand many of its ins and outs, find what works for you then make your judgement. Otherwise, you might end up walking away from an exciting opportunity and miss out on the potential of your creations in Blender and Unity.
6. Recommendations
If you are interested in 3D Modeling and wish to learn more about you can pursue it, you can follow these links:
Other free 3D Modeling applications:
7. Acknowledgements
We would like to take the time out to personally thank everyone who has helped with our journey into Blender and Unity.
We would like to thank professor Baker for his consultation with us throughout every step of the process. His knowledge and his guidance helped us to understand and make a guide that could be used as a starting for all people who have no idea what to do or where to start when using a program such as Blender and Unity.
We would also like to thank our entire Sensor Tiles Project Team. Al, Brian, Kenneth, Miles, Reno. With their wild ideas along the way (too many to count), we would not have had the many of the features of our Blender game that exist today. Furthermore, their help and guidance also helped to make this tutorial achieve the highest quality it could be.

